Laminate Wood Flooring Over Concrete Slabs: A Comprehensive Guide
Laminate wood flooring offers an attractive and cost-effective alternative to solid hardwood. Its durability, ease of installation, and variety of styles make it a popular choice for residential and commercial spaces. One of the most common subfloor types for laminate flooring is a concrete slab. However, successfully installing laminate flooring over concrete requires careful preparation and an understanding of key considerations to ensure a long-lasting and aesthetically pleasing result.
Concrete slabs, while structurally sound, can present specific challenges. Moisture, unevenness, and temperature fluctuations are among the factors that need to be addressed before embarking on a laminate flooring installation project. Ignoring these elements can ultimately lead to flooring damage, mold growth, and costly repairs.
This article provides a comprehensive guide to installing laminate wood flooring over concrete slabs, outlining the essential steps, necessary precautions, and best practices to achieve a professional and durable finish.
1. Assessing the Concrete Slab: Moisture, Levelness, and Cleanliness
Before any material is purchased or any installation begins, a thorough assessment of the concrete slab is crucial. This assessment focuses on three core areas: moisture content, levelness, and cleanliness. Each plays a pivotal role in the success of the laminate flooring installation.
Moisture Testing: Concrete is porous and can retain moisture from the ground, even years after being poured. Excess moisture can lead to warping, buckling, and mold growth under the laminate flooring. Therefore, accurately measuring the moisture content is paramount. Several methods are available for testing concrete moisture.
Calcium Chloride Test: This test involves placing a measured amount of calcium chloride under a sealed dome on the concrete slab. After a specific period (typically 72 hours), the calcium chloride is weighed again. The weight gain indicates the amount of moisture absorbed from the concrete. This test provides a quantitative measurement used to determine if the moisture level is acceptable for laminate flooring installation. Manufacturers' specifications often dictate the acceptable moisture levels, and these should be strictly adhered to.
Relative Humidity (RH) Test: This test involves drilling small holes into the concrete and inserting RH probes. The probes measure the relative humidity within the concrete slab. This method provides a more accurate assessment of the moisture conditions within the concrete itself. Similar to the calcium chloride test, manufacturers will specify the acceptable RH range for their laminate flooring products.
Polyethylene Film Test: This is a simpler, less precise method. A square of polyethylene film is taped to the concrete surface for 24-72 hours. After removing the film, the concrete is visually inspected for moisture. The presence of condensation on the underside of the film or a darkened concrete surface indicates excessive moisture. If this test suggests high moisture levels, more accurate testing methods should be employed.
If moisture levels exceed the manufacturer's recommendations, mitigation measures are required. These can include applying a moisture barrier to the concrete surface or installing a subfloor system with integrated moisture protection.
Levelness Evaluation: Laminate flooring requires a relatively flat and level subfloor. Uneven surfaces can cause the planks to shift, buckle, or even break under pressure. A visual inspection can reveal obvious dips and bumps, but a more accurate assessment requires the use of a long, straight edge (at least 6-10 feet) and a level.
Place the straight edge on the concrete surface in various directions and use the level to check for deviations. Gaps between the straight edge and the concrete indicate unevenness. Minor irregularities can often be addressed with self-leveling compound. Larger deviations may require grinding down high spots or filling in low spots with a concrete patching compound. The manufacturer's specifications for allowable subfloor variation should be consulted. Typically, variations greater than 3/16 inch over a 10-foot span require correction.
Surface Cleanliness: A clean concrete surface is essential for proper adhesion of any moisture barrier or underlayment. Remove all debris, dust, paint, adhesive residue, and other contaminants. Sweep or vacuum the surface thoroughly. For stubborn residue, consider using a concrete cleaner or degreaser. Ensure the surface is completely dry before proceeding.
Addressing these three aspects – moisture, levelness, and cleanliness – is fundamental to creating a stable and suitable foundation for the laminate flooring.
2. Selecting and Installing a Moisture Barrier and Underlayment
Once the concrete slab has been properly assessed and prepared, the next crucial step is to install a moisture barrier and an underlayment. These two components play distinct but equally important roles in protecting the laminate flooring and enhancing its performance.
Moisture Barrier: As discussed earlier, concrete is porous and susceptible to moisture intrusion from the ground. A moisture barrier is designed to prevent this moisture from reaching the laminate flooring. It typically consists of a thin layer of polyethylene film or a specialized liquid-applied membrane.
Polyethylene Film: This is a common and cost-effective moisture barrier option. It is typically available in thicknesses of 6 mil or greater. The film is rolled out over the concrete slab, overlapping the seams by at least 6-12 inches. The seams are then taped with moisture-resistant tape to create a continuous barrier. It is important to ensure that the film extends up the walls slightly (a few inches) to prevent moisture from wicking up from the edges.
Liquid-Applied Membranes: These membranes are applied directly to the concrete surface using a roller or brush. They form a seamless and waterproof barrier. Liquid-applied membranes are often more expensive than polyethylene film but offer superior moisture protection. They are particularly recommended for areas with high moisture levels or for below-grade installations.
When selecting a moisture barrier, it is crucial to consider the specific moisture conditions of the concrete slab and the manufacturer's recommendations for the laminate flooring. Choosing the right moisture barrier is an investment in the long-term durability of the flooring.
Underlayment: The underlayment provides a cushioning layer between the concrete slab and the laminate flooring. It serves several important functions:
Sound Insulation: Underlayment can reduce noise transmission between floors, making it a valuable addition in multi-story buildings or apartments. It absorbs impact noise, creating a quieter and more comfortable environment.
Comfort Underfoot: Underlayment provides a softer and more comfortable feel underfoot. It can reduce fatigue and improve the overall walking experience.
Minor Subfloor Imperfection Accommodation: While the concrete slab should be as level as possible, underlayment can help to bridge minor imperfections and prevent them from affecting the laminate flooring.
Thermal Insulation: Certain underlayments can provide a degree of thermal insulation, helping to keep the floor warmer in colder climates.
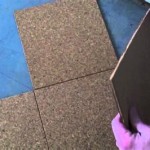
Underlayments are available in various materials, including foam, cork, and rubber. Each material offers different properties and performance characteristics. Foam underlayments are generally the most affordable and provide good cushioning. Cork underlayments offer excellent sound insulation and are environmentally friendly. Rubber underlayments provide superior shock absorption and durability.
Some laminate flooring products come with an attached underlayment. In this case, a separate underlayment is not required, but a moisture barrier is still essential. When installing an underlayment, follow the manufacturer's instructions carefully. Typically, the underlayment is rolled out over the moisture barrier, and the seams are taped together.
The combination of a properly installed moisture barrier and underlayment is critical for protecting the laminate flooring from moisture damage, enhancing its comfort, and improving its overall performance.
3. Installing the Laminate Flooring: Expansion Gaps and Locking Mechanisms
With the concrete slab properly prepared and the moisture barrier and underlayment in place, the final step is to install the laminate flooring itself. This process involves careful planning, precise cutting, and proper use of the laminate's locking mechanisms.
Planning the Layout: Before starting the installation, plan the layout of the laminate flooring. Consider the direction of the planks (typically parallel to the longest wall) and how the planks will transition between rooms. Calculate the number of planks needed and add a buffer for waste (typically 5-10%).
Expansion Gaps: Laminate flooring expands and contracts with changes in temperature and humidity. To accommodate this movement, it is essential to leave expansion gaps around the perimeter of the room and around any fixed objects, such as pipes or door frames. These gaps are typically ¼ inch to 3/8 inch wide. Expansion gaps allow the flooring to expand without putting pressure on the walls or other objects, which can cause buckling or warping. Use spacers to maintain consistent expansion gaps during installation.
Cutting the Planks: Laminate flooring can be cut with a variety of tools, including a laminate flooring cutter, a circular saw, a jigsaw, or a utility knife. A laminate flooring cutter provides a clean and precise cut without creating dust. A circular saw or jigsaw can be used for more complex cuts, but it is important to use a blade designed for cutting laminate to prevent chipping. When using a saw, cut the planks with the decorative side facing up to minimize chipping.
Locking Mechanisms: Most laminate flooring products feature a click-lock system that allows the planks to be easily joined together without the need for glue. The locking mechanisms vary depending on the manufacturer, but they typically involve angling the planks together and then pressing them down to lock them into place. Carefully follow the manufacturer's instructions for engaging the locking mechanism. Use a tapping block and a hammer to gently tap the planks together if necessary. Avoid using excessive force, as this can damage the locking mechanism.
Installing the First Row: Start the installation along a straight wall, ensuring that the expansion gap is maintained. Install the first row of planks, locking them together end-to-end. Cut the last plank in the row to fit, leaving the appropriate expansion gap. Use the leftover piece to start the next row, as long as it is at least 12 inches long. This helps to minimize waste and create a staggered pattern.
Continuing the Installation: Continue installing the laminate flooring row by row, staggering the seams between rows. This creates a more visually appealing and structurally sound floor. Ensure that the planks are tightly locked together and that the expansion gaps are maintained. Use a pull bar to tighten the planks along the walls if necessary.
Final Touches: Once the flooring is installed, remove the spacers. Install baseboards or quarter-round molding to cover the expansion gaps and provide a finished look. Install transition strips where the laminate flooring meets other flooring types, such as tile or carpet.
Proper installation is crucial for ensuring the longevity and performance of the laminate flooring. By carefully planning the layout, maintaining expansion gaps, and properly engaging the locking mechanisms, a durable and beautiful floor can be achieved.

Installing Laminate Flooring Over Concrete The Ultimate Guide Aa Floors

Laminate Flooring On Concrete Basement Floors Expert Installation Guide Csg Renovation

A Complete Guide On How To Install Laminate Flooring Concrete

Guidelines For Hardwood Floor Installation Over Concrete

How To Install Laminate Over Concrete Day 1

How To Install Tongue Groove Hardwood Floors Over Concrete

Laminate Flooring On Concrete Basement Floors Expert Installation Guide Csg Renovation

Installing Luxury Vinyl Flooring On Concrete What You Need To Know 50floor

Flooring Suggestions To Hold Floating Laminate Floor From Sliding On Vapor Barrier Installed Over Concrete Slab Home Improvement Stack Exchange

Lvp Flooring Installation Over Concrete Subfloor Full Instructional Builds By Maz Flooret
Related Posts