Laminate Wood Flooring Installation Instructions
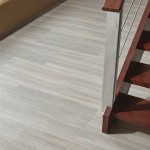
Laminate wood flooring offers an affordable and aesthetically pleasing alternative to solid hardwood. Its durability, ease of maintenance, and relatively simple installation process make it a popular choice for homeowners undertaking DIY projects. This article provides comprehensive instructions for installing laminate wood flooring, covering essential pre-installation preparations and step-by-step guidance through the laying process.
Successful laminate flooring installation hinges on meticulous preparation and adherence to established techniques. Neglecting these initial steps can lead to problems such as warping, buckling, and uneven surfaces, ultimately compromising the floor's appearance and longevity. The following sections outline the critical aspects of preparing for laminate floor installation.
Acclimation and Subfloor Preparation
Acclimation is the process of allowing the laminate flooring to adjust to the ambient temperature and humidity levels of the installation environment. This is a critical step that prevents expansion and contraction issues after the floor is installed. Before beginning the installation, store the unopened boxes of laminate flooring in the room where they will be installed for a minimum of 48 to 72 hours. This allows the planks to expand or contract, ensuring they will remain stable after installation.
The subfloor must be clean, level, and dry. Any debris, such as nails, staples, or remnants of previous flooring, must be removed. Use a scraper or vacuum to thoroughly clean the subfloor’s surface. Ideally, the subfloor should be concrete or plywood. If installing over concrete, a moisture test is essential. High moisture levels can damage the laminate flooring over time. Use a moisture meter to test the relative humidity of the concrete. If the readings are above the manufacturer's recommended levels, a moisture barrier must be installed before the underlayment and laminate flooring.
Leveling the subfloor is crucial for a professional-looking result and to prevent issues such as squeaking or uneven wear. Minor imperfections can often be addressed with self-leveling compound. For larger discrepancies, sanding or patching may be necessary. Use a long level to identify high and low spots. Fill low spots with patching compound and allow it to dry completely before sanding down high spots. Once the subfloor is level, sweep or vacuum again to remove any remaining dust or debris.
Once cleaned and leveled, the subfloor is ready for underlayment. Underlayment serves as a moisture barrier (in many cases, though some require a separate vapor barrier), cushion, and sound insulator. Select an appropriate underlayment based on the type of subfloor and the manufacturer's instructions. Roll out the underlayment according to the manufacturer's guidelines, overlapping seams slightly. Secure the seams with moisture-resistant tape. Ensure the underlayment is properly adhered to the subfloor to prevent movement during installation.
Gathering Tools and Materials
Having the right tools and materials readily available will streamline the installation process and minimize delays. This preliminary step is essential for efficiency and precision. The following is a list of necessary tools and materials:
- Laminate flooring planks
- Underlayment
- Moisture barrier (if required)
- Spacers
- Measuring tape
- Pencil
- Circular saw or laminate floor cutter
- Tapping block
- Pull bar
- Rubber mallet
- Safety glasses
- Knee pads
- Utility knife
- Moisture-resistant tape
- Self-leveling compound (if needed)
- Vacuum cleaner
Verify that the saw blade is designed for cutting laminate. Using the wrong blade can result in chipping or splintering the laminate surface. The tapping block and pull bar are essential for ensuring tight seams between the planks. The tapping block protects the tongue and groove edges, preventing damage during installation, while the pull bar helps to pull the final rows of flooring into place against the wall.
Safety is paramount. Always wear safety glasses to protect eyes from flying debris generated during cutting. Knee pads will provide comfort during the installation process, which often involves prolonged periods of kneeling. Ensure the work area is well-lit to facilitate accurate measurements and cuts.
Laying the First Row and Subsequent Rows
The first row is critical as it establishes the alignment for the rest of the floor. Proper alignment of this row is essential for a professional-looking finish. Start by determining the direction in which the planks will be laid. Typically, laminate flooring is laid parallel to the longest wall in the room. This can make the room appear larger and create a more visually appealing look. However, considering the light source is equally important. Laying the planks parallel to the main light source can minimize the visibility of seams.
Begin laying the first row of planks along the straightest wall. Use spacers to maintain an expansion gap between the planks and the wall. This gap is crucial to allow for natural expansion and contraction of the flooring due to changes in temperature and humidity. The manufacturer's instructions will specify the appropriate expansion gap, typically around 1/4 to 3/8 of an inch. The expansion gap should be consistent around the perimeter of the room.
Connect the planks by aligning the tongue of one plank with the groove of the adjacent plank. Use the tapping block and rubber mallet to gently tap the planks together until they are securely joined. Ensure the seams are tight and flush. If any planks are not aligning properly, carefully examine the tongue and groove edges for any damage or debris. Remove any obstructions and try again.
Continue laying subsequent rows using the same technique. Stagger the end joints of the planks in each row to create a more visually appealing and structurally sound floor. A common staggering pattern is to cut the first plank in each row to a different length, ensuring that the end joints are offset by at least 6 inches. This helps to distribute weight evenly and prevent long, continuous seams. When cutting planks, measure accurately and use a sharp blade to ensure clean cuts. Always cut with the decorative side facing up to minimize chipping.
As the installation progresses, regularly check the alignment of the floor with a long straightedge or level. This will help to identify and correct any deviations early on. Use the pull bar to tighten the seams in the final rows, where access with the tapping block may be limited. The pull bar allows the user to apply force against the wall, pulling the planks into place.
When laying the final row, it may be necessary to rip the planks to fit the remaining space. Measure the distance between the last full row and the wall, subtracting the expansion gap. Use a table saw or circular saw to cut the planks to the correct width. Install the final row using the pull bar and tapping block to ensure a tight fit.
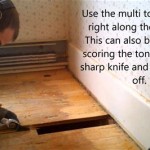
Around doorways and other obstructions, use a jigsaw or coping saw to cut the planks to the required shape. Create a template using cardboard or paper to ensure accurate cuts. Always leave an expansion gap around these obstacles as well. Cover the expansion gap with trim or molding to create a finished look.
After completing the installation, remove all spacers and install baseboards or quarter-round molding to cover the expansion gaps. Use a nail gun or construction adhesive to secure the molding to the wall, not to the floor. This allows the floor to expand and contract freely without restriction. Inspect the floor for any imperfections or gaps and address them as necessary. Clean the floor with a damp cloth to remove any dust or debris.
Proper installation is pivotal to the longevity and aesthetics of the laminate floor. Adherence to these instructions maximizes the likelihood of a successful outcome.

Laminate Flooring Installation Guide Step By Instructions

Laminate Flooring Installation A Step By Guide

Glueless Laminate Installation Instructions Wood Shaw Floors

Parquet And Laminate Flooring Installation Instructions Meister Masterclic Gb

Help I Need Installation Instructions Flooring Questio Word Of Mouth Floors

How To Install Hardwood Flooring Step By Forbes Home

A Complete Step By Wood Floor Installation Guidelines Teka Flooring

How To Install Laminate Flooring The Home Depot

Floor Installation Guides Eurostyle Flooring Vancouver

Rigid Max Installation Instructions Floors
Related Posts