Installing Wooden Flooring on Stairs: A Comprehensive Guide
Installing wooden flooring on stairs elevates the aesthetic appeal of a home, adding warmth, sophistication, and durability. This project, while rewarding, requires careful planning, precise execution, and an understanding of various techniques to ensure a safe and visually appealing outcome. This article provides a detailed guide on the installation process, covering crucial aspects from preparation to the final finishing touches.
Before embarking on the installation, it's imperative to assess the existing staircase structure. This involves identifying the type of stairs, checking for any structural deficiencies, and taking accurate measurements. The type of stairs – whether they are straight, curved, or winding – will influence the complexity of the project and the materials required. Furthermore, the existing condition of the stairs, including any cracks, uneven surfaces, or loose treads, must be addressed before proceeding.
Accurate measurements are critical for ordering the correct amount of wood flooring and ensuring a seamless fit. Measure the length and width of each tread and riser individually, accounting for any variations. It is advisable to add an extra 10-15% to the total material estimate to accommodate cuts, waste, and potential errors. This buffer will prevent delays and ensure a consistent look throughout the staircase.
Key Point 1: Preparation and Material Selection
Preparation is arguably the most important phase of any flooring project, particularly when dealing with stairs. This stage encompasses removing existing flooring, preparing the subfloor, and acclimating the new wood flooring to the environment.
The first step involves removing any existing carpet, vinyl, or other flooring materials from the stairs. This process typically requires a utility knife, pry bar, and scraper. Exercise caution to avoid damaging the underlying subfloor during removal. Once the existing flooring is removed, thoroughly clean the stairs, removing any nails, staples, or adhesive residue. A solvent-based cleaner may be necessary to remove stubborn adhesive.
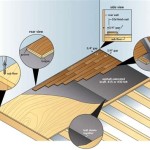
The subfloor, typically constructed of plywood or OSB (Oriented Strand Board), serves as the foundation for the new wooden flooring. Inspect the subfloor for any signs of damage, such as rot, warping, or delamination. Repair any damaged areas by replacing sections of the subfloor as needed. Ensure the subfloor is level and free of any imperfections that could affect the stability of the new flooring. Minor imperfections can be addressed with floor leveling compound.
Acclimation is the process of allowing the wood flooring to adjust to the humidity and temperature conditions of the installation environment. This is crucial to prevent warping, cupping, or gapping after installation. Stack the wood flooring in the room where it will be installed for at least 72 hours prior to installation. This allows the wood to expand or contract to its equilibrium moisture content, minimizing the risk of future problems.
Choosing the right type of wood flooring is crucial for achieving the desired aesthetic and ensuring long-term durability. Solid hardwood, engineered hardwood, and laminate flooring are all viable options, each with its own advantages and disadvantages.
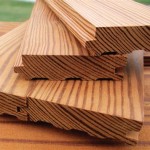
Solid hardwood is a classic choice, offering timeless beauty and exceptional durability. It can be sanded and refinished multiple times, extending its lifespan. However, solid hardwood is more susceptible to moisture damage and is generally more expensive than other options. Engineered hardwood consists of a thin layer of hardwood veneer bonded to a multilayer plywood core. This construction makes it more stable than solid hardwood and less prone to warping or cupping. Engineered hardwood is also generally easier to install and is a more cost-effective option.
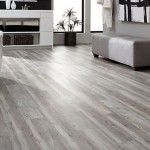
Laminate flooring is a synthetic material that mimics the look of wood. It is highly durable, scratch-resistant, and easy to clean. However, laminate flooring does not have the same warmth and character as real wood. It is also not as durable as solid or engineered hardwood and cannot be refinished. The decision hinges on budget, desired aesthetics, and the anticipated level of foot traffic.
Key Point 2: Installation Techniques and Considerations
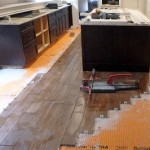
The installation process involves cutting the wood flooring to the correct size and shape, attaching it to the stairs, and finishing the edges for a clean and professional look. The choice of installation method depends on the type of flooring, the existing staircase structure, and the desired aesthetic.
Before cutting any wood, create templates for each tread and riser. This is particularly important for stairs that are not perfectly square or have irregular shapes. Use cardboard or thick paper to create accurate templates, ensuring they fit snugly against the existing stair structure. Transfer the template outline onto the wood flooring, taking into account the grain direction and any desired pattern.
Cutting the wood flooring to the correct size and shape requires precision and the use of appropriate tools. A circular saw, miter saw, and jigsaw are essential for making accurate cuts. Use a sharp blade and cut slowly to avoid splintering or chipping the wood. Always wear safety glasses and hearing protection when operating power tools.
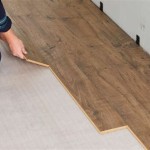
Attaching the wood flooring to the stairs can be accomplished using a combination of adhesive and fasteners. Construction adhesive, specifically designed for wood flooring, provides a strong and permanent bond. Apply the adhesive in a serpentine pattern to the back of the wood flooring, ensuring even coverage. In addition to adhesive, use finish nails or screws to secure the wood flooring to the subfloor. This provides additional support and prevents movement. Ensure the fasteners are countersunk to avoid creating bumps or snags.
When installing stair treads, consider adding a nosing, which is an overhanging edge that provides a finished look and enhances safety. Nosing can be purchased pre-made or custom-fabricated from the same wood as the flooring. Attach the nosing to the tread using adhesive and fasteners, ensuring a secure and flush fit.
Risers are the vertical boards that connect the treads. Installing risers requires careful attention to detail to ensure a seamless transition between the tread and the riser. Cut the riser to the correct height and width, ensuring it fits snugly between the treads. Attach the riser using adhesive and fasteners, ensuring it is plumb and flush with the adjacent surfaces.
For stairs that are not perfectly square or have irregular shapes, scribing and fitting techniques may be required. Scribing involves transferring the contour of an irregular surface onto the wood flooring, allowing for a precise fit. Use a compass or scribing tool to trace the contour onto the wood flooring, and then carefully cut along the line. Fitting involves making minor adjustments to the wood flooring to ensure a snug and seamless fit. This may require the use of a block plane or file.
Key Point 3: Finishing and Safety Considerations
The finishing stage involves filling any gaps or imperfections, sanding the wood flooring smooth, and applying a protective coating. This stage is crucial for enhancing the appearance and durability of the flooring. Safety considerations are paramount throughout the entire installation process.
After the wood flooring is installed, inspect it for any gaps, cracks, or imperfections. Fill any gaps with wood putty or filler that matches the color of the flooring. Allow the filler to dry completely before sanding. Sanding is essential for creating a smooth and even surface. Use a belt sander or orbital sander with progressively finer grits of sandpaper, starting with a coarse grit (80-grit) and ending with a fine grit (120-grit). Vacuum thoroughly after each sanding pass to remove dust and debris.
After sanding, apply a finish to protect the wood flooring from wear and tear. Polyurethane is a popular choice for wood flooring, offering excellent durability and water resistance. Apply two to three coats of polyurethane, allowing each coat to dry completely before applying the next. Lightly sand between coats to create a smooth and even finish. Water-based polyurethane is a low-VOC option that is environmentally friendly and dries quickly. Oil-based polyurethane provides a richer, warmer tone and is more durable than water-based polyurethane, but it has a higher VOC content and requires longer drying times.
Staining the wood flooring can enhance its natural beauty and complement the overall aesthetic of the home. Apply the stain evenly using a brush or rag, and allow it to penetrate the wood for the recommended amount of time. Wipe off any excess stain before it dries. Always test the stain on a small, inconspicuous area first to ensure the desired color is achieved.
Safety is paramount throughout the installation process. Wear safety glasses, hearing protection, and a dust mask when operating power tools or working with wood dust. Ensure the work area is well-ventilated to avoid inhaling harmful fumes from adhesives or finishes. Use caution when working on stairs, as falls can result in serious injuries. Use stable ladders and scaffolding, and never overreach. Keep the work area clear of clutter and debris to prevent tripping hazards.
Installing wooden flooring on stairs is a challenging but rewarding project that can significantly enhance the beauty and value of a home. By following these detailed instructions and taking the necessary precautions, homeowners can achieve a professional-looking result that will last for years to come. Diligence in preparation, precision in execution, and a commitment to safety are the keys to a successful installation.

How To Install Laminate Flooring On Staircase Step By Guide

How To Install Laminate Flooring On Stairs Direct Wood

How To Install Laminate On Stairs Follow Our Essential Guide Laying And Costing For

Value Carpets Flooring Installing Laminate On Stairs

How To Install Laminate Flooring On Stairs Direct Wood

How To Install Wood Flooring On Stairs Esb

How To Install Laminate Flooring On Stairs 13 Steps

Laminate On Stairs With Bad Installation

How To Install Vinyl Plank Flooring On Stairs In 6 Steps Inc

Installing Wood Flooring On Stairs
Related Posts