Installing Wood Flooring On Tile: A Comprehensive Guide
Transforming a tiled surface into an elegant wooden floor requires careful preparation and precise execution. Installing wood flooring on tile is a rewarding project that can significantly enhance the aesthetic value and comfort of your space. This comprehensive guide will provide you with detailed instructions and essential considerations to ensure a successful installation.
1. Surface Preparation:
Meticulously cleaning the tile surface is crucial. Remove any dirt, debris, or grease using a degreasing cleaner. Ensure the tile is completely dry before proceeding. Uneven tiles or grout lines may require leveling with a self-leveling compound or thinset mortar. A smooth and level surface is essential for a professional-looking finish.
2. Underlayment:
An underlayment provides a cushioning layer between the tile and wood flooring. It reduces noise, absorbs impact, and helps prevent moisture damage. Select an underlayment suitable for your wood flooring type (engineered or solid). Install the underlayment according to manufacturer's instructions, ensuring that seams are overlapped and securely taped.
3. Moisture Barrier:
If the tile floor is located on a concrete slab, a moisture barrier is essential to prevent moisture from rising into the wood flooring. Roll out a polyethylene vapor barrier over the underlayment and secure it with tape.
4. Choosing the Right Adhesive:
Select an adhesive specifically designed for installing wood flooring on tile. Different types of adhesives are available, such as moisture-resistant or flexible varieties. Consult the manufacturer's recommendations and choose an adhesive suitable for your wood flooring and the subfloor.
5. Installation Process:
1. Apply a thin layer of adhesive to the tile surface using a notched trowel. Work in small sections to prevent the adhesive from drying.
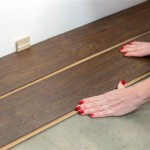
2. Place the first plank of wood flooring onto the adhesive and gently tap it into place using a rubber mallet.
3. Continue laying the planks row by row, ensuring that they are securely locked together and level.
4. Use spacers to maintain consistent gaps between the planks and walls.
5. Trim the last plank to fit and secure it into place.
6. Wipe away any excess adhesive that may have squeezed out during installation.
6. Finishing Touches:
Once the wood flooring is installed, allow it to cure for the recommended time specified by the adhesive manufacturer. Remove the spacers and install baseboards or shoe molding to cover the expansion gap around the edges of the flooring.

Can You Install Wood Flooring Over Tiled Floors Havwoods

Wood Look Tile Flooring How To Lay That Looks Like

Installing Wood Look Tile Tips From A Pro Brepurposed

Can You Install Wood Flooring Over Tiled Floors Havwoods

How To Install Wood Look Floor Tile

Discover How To Lay Wood Floors Over Tile Discount Flooring Depotdiscount Depot Blog

Install Hardwood Flooring Over Tile Floor Double Glue Down Method

Tile Flooring Demo Installation Centsational Style

Tips When Installing Wood Look Tiles

Installing Wood Look Tile 5 Insider Tips To Achieve Success Diytileguy
Related Posts

