Installing Vinyl Plank Flooring Over Wood Subfloor: A Comprehensive Guide
Vinyl plank flooring has emerged as a popular choice for homeowners due to its durability, water resistance, aesthetic appeal, and relatively straightforward installation process. A common scenario involves installing vinyl plank over an existing wood subfloor. This article provides a detailed, step-by-step guide to ensure a successful installation.
Before embarking on the installation, it is crucial to understand the specific type of vinyl plank being used. There are primarily two types: click-lock (also known as interlocking) and glue-down. Click-lock vinyl planks utilize a tongue-and-groove system, allowing them to connect seamlessly without adhesive. Glue-down vinyl planks, on the other hand, require an adhesive to be applied to the subfloor before the planks are laid. The chosen type will significantly influence the installation procedure and the selection of appropriate tools and materials.
Key Point 1: Subfloor Preparation is Paramount
The single most important factor determining the longevity and appearance of your vinyl plank flooring is the condition of the subfloor. A properly prepared subfloor will provide a stable, even, and clean surface, preventing future issues such as buckling, unevenness, and premature wear.
Inspection: The first step is a thorough inspection of the existing wood subfloor. Look for signs of water damage, such as staining, warping, or rot. Address any underlying moisture issues before proceeding. Check for loose or squeaky boards. These should be secured with screws, ideally countersunk to avoid protrusions. Also assess for any signs of insect infestation.
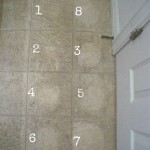
Leveling: Vinyl plank flooring requires a relatively level surface. Use a long straightedge (at least 6 feet) and a level to identify any significant dips or humps. Variations exceeding 3/16 inch over a 10-foot span should be addressed. Small dips can be filled with a self-leveling compound specifically designed for wood subfloors. Larger discrepancies may require shimming or sanding down high spots.
Cleaning: Thoroughly clean the subfloor to remove any debris, dust, dirt, grease, or old adhesive residue. This can be accomplished by sweeping, vacuuming (preferably with a HEPA filter), and scrubbing with a suitable cleaning solution. Ensure the subfloor is completely dry before proceeding to the next step. Consider using a wood cleaner specifically designed to remove stubborn stains and grease.
Underlayment (Optional): Depending on the type of vinyl plank and the existing subfloor condition, an underlayment may be necessary. Underlayment can provide additional cushioning, sound insulation, and moisture barrier. Consult the vinyl plank manufacturer's recommendations to determine if an underlayment is required or recommended. If using an underlayment, ensure it is properly installed according to the manufacturer's instructions. When selecting an underlayment, consider its thickness and density, as well as its compatibility with your specific type of vinyl plank flooring.
Key Point 2: Installation Techniques for Click-Lock Vinyl Plank
Click-lock vinyl plank flooring offers a relatively simple installation process, making it a popular choice for DIY enthusiasts. The interlocking system allows for a floating floor, meaning it is not directly attached to the subfloor, allowing for expansion and contraction due to temperature and humidity changes.
Acclimation: Allow the vinyl planks to acclimate to the room's temperature and humidity for at least 48-72 hours before installation. This will minimize expansion and contraction after installation, preventing gaps or buckling. Store the boxes of vinyl planks in the room where they will be installed, ensuring adequate air circulation around them.
Planning the Layout: Before starting, plan the layout of the planks. Measure the room and determine the best starting point. Consider the direction of the planks, typically running parallel to the longest wall or the primary light source. Dry-lay a few rows to visualize the pattern and ensure proper alignment. Account for expansion gaps (typically ¼ inch to ⅜ inch) along the walls. These gaps will be covered by baseboards or trim.
Cutting Planks: Vinyl planks can be easily cut using a utility knife and a straightedge. Score the plank several times along the cut line, then snap it along the score. For more complex cuts, such as around door frames or pipes, a jigsaw or a miter saw may be necessary. Always wear safety glasses when cutting vinyl planks.
Installation Process: Begin installing the first row of planks along a straight wall, ensuring the tongue or groove side faces the wall. Use spacers to maintain the expansion gap. Connect the planks end-to-end, using the click-lock mechanism. For subsequent rows, stagger the plank joints to create a more visually appealing and structurally sound floor. Angle the plank slightly and insert the tongue into the groove of the adjacent plank, then press down to lock it into place. A tapping block and a rubber mallet can be used to ensure a tight fit. Continue the process until the entire floor is covered.
Finishing Touches: Once the floor is installed, remove the spacers and install baseboards or trim to cover the expansion gaps and create a finished look. Install transition strips where the vinyl plank flooring meets other types of flooring. Clean the floor thoroughly to remove any dust or debris.
Key Point 3: Installation Techniques for Glue-Down Vinyl Plank
Glue-down vinyl plank flooring requires a more meticulous installation process compared to click-lock, as it involves applying adhesive to the subfloor. This method provides a more permanent and stable installation, particularly suitable for high-traffic areas or commercial settings.
Adhesive Selection: Choose an adhesive specifically designed for vinyl plank flooring and compatible with your subfloor type. Consult the vinyl plank manufacturer's recommendations for the appropriate adhesive. Consider factors such as the adhesive's open time, working time, and curing time. Ensure the adhesive is VOC-compliant to minimize health risks.
Applying Adhesive: Apply the adhesive to the subfloor using a notched trowel, following the manufacturer's instructions for the notch size and angle. Apply the adhesive evenly and in manageable sections, typically a width of 2-3 rows of planks at a time. Avoid applying too much adhesive, as this can cause the planks to slide or buckle. Avoid applying too little adhesive, as this can result in poor adhesion and potential delamination.
Laying the Planks: Carefully position the vinyl planks onto the adhesive, pressing them firmly into place. Use a roller to ensure full contact between the planks and the adhesive. Work quickly and efficiently, as the adhesive will begin to set after a certain period. Stagger the plank joints to create a more visually appealing and structurally sound floor. Clean any excess adhesive from the surface of the planks immediately with a damp cloth.
Rolling and Curing: After laying the planks, roll the entire floor with a heavy floor roller to ensure proper adhesion. This will help eliminate air pockets and ensure a strong bond between the planks and the subfloor. Allow the adhesive to cure completely according to the manufacturer's instructions before allowing foot traffic on the floor. This curing time can range from 24 to 72 hours.
Ventilation: Ensure adequate ventilation during the adhesive application and curing process. Open windows and doors to allow for air circulation. Consider using a fan to speed up the drying process and minimize the odor of the adhesive.
Handling Seams: For glue-down applications, special attention is needed at the seams. Some manufacturers recommend using a seam roller immediately after placement to ensure that the edges are firmly pressed into the adhesive. Weighting down the seams during the curing process can also enhance adherence. Ensure that the adhesive is not squeezed out onto the surface of the planks during this process. If adhesive does seep out, clean the surface immediately with a recommended cleaner and soft cloth.
Finally, regardless of whether you choose click-lock or glue-down installation, adhering strictly to the manufacturer's guidelines will ultimately lead to a professional and lasting result. Always prioritize proper preparation, careful execution, and the use of appropriate tools and materials when installing vinyl plank flooring over a wood subfloor.

Installing Luxury Vinyl Floors Over Engineered Hardwood Honey Built Home

How To Install Vinyl Plank Flooring On Plywood Floor

How To Prep Your Sub Floor For Luxury Vinyl Flooring

Vinyl Over Ecowarm Radiantboard

A Beginner S Guide To Installing Vinyl Plank Flooring Dumpsters Com

Installing Luxury Vinyl Floors Over Engineered Hardwood Honey Built Home

How To Install Vinyl Plank Flooring As A Beginner Home Renovation

Installing Vinyl Floors A Do It Yourself Guide The Honeycomb Home

Preparing To Install Luxury Vinyl Flooring A How Guide

How To Prep Wood Subfloor For Luxury Vinyl Plank Flooring Beginners Fix High And Low Spots
Related Posts