Installing Vinyl Plank Flooring On Subfloor
Vinyl plank flooring offers a durable, water-resistant, and aesthetically pleasing option for homeowners. Its click-and-lock installation system makes it a popular choice for DIY projects. Successful installation, however, hinges on proper subfloor preparation and adherence to manufacturer instructions. This article outlines the necessary steps for installing vinyl plank flooring directly onto a subfloor.
Assessing and Preparing the Subfloor
Before beginning the installation, thorough assessment of the subfloor is crucial. The subfloor must be clean, level, dry, and structurally sound. Any existing flooring, such as carpet, tile, or sheet vinyl, should be removed completely. Adhesive residue must be scraped away, and staples or nails should be removed or hammered flush. Sweeping or vacuuming eliminates dust and debris.
Uneven subfloors will compromise the integrity and longevity of the vinyl plank flooring. High spots can be sanded down, while low spots require patching with a suitable leveling compound. Manufacturers often specify acceptable tolerances for unevenness, typically around 3/16" over a 10-foot span. A long straight edge and a level are useful tools for assessing floor flatness.
Moisture is detrimental to vinyl plank flooring. Concrete subfloors should be tested for moisture content using a concrete moisture meter. Wood subfloors can be evaluated using a wood moisture meter. Elevated moisture levels must be addressed before proceeding with installation. Potential sources of moisture, such as leaks or excessive humidity, should be identified and rectified.
Necessary Materials and Tools
Gathering the necessary materials and tools beforehand streamlines the installation process. This typically includes the vinyl plank flooring itself, underlayment (if required or desired), a tapping block, a pull bar, a utility knife with sharp blades, a measuring tape, a pencil, a safety square, spacers, and a saw suitable for cutting vinyl planks (e.g., a miter saw, jigsaw, or utility knife).
The choice of underlayment depends on the specific vinyl plank flooring and the subfloor. Some vinyl planks come with an attached underlayment, while others require a separate underlayment. Underlayment provides several benefits, including sound insulation, moisture protection, and minor subfloor imperfection compensation. Consult the flooring manufacturer's recommendations regarding underlayment compatibility.
Installing the Underlayment (If Applicable)
If a separate underlayment is required, it should be installed before laying the vinyl planks. Roll out the underlayment, ensuring the seams are butted tightly together but not overlapping. Some underlayments are equipped with an adhesive backing, while others may require taping the seams. Follow the manufacturer's instructions for proper underlayment installation.
Laying the Vinyl Planks
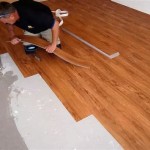
Most vinyl plank flooring utilizes a click-and-lock system. Installation typically begins in a corner of the room, working outward. Spacers are placed along the walls to maintain a consistent expansion gap, allowing the flooring to expand and contract with temperature and humidity fluctuations. The size of the expansion gap is specified by the manufacturer and is typically between ¼" and ½".
Each plank is carefully clicked into the previous one, ensuring a tight and secure connection. The tapping block and pull bar are used to gently tap the planks into place without damaging the edges. Difficult cuts around door frames, pipes, or other obstacles can be made using a template or by carefully measuring and marking the planks.
Maintaining a staggered pattern enhances the visual appeal and stability of the floor. Manufacturer recommendations often dictate the minimum offset between end joints of adjacent rows. This stagger typically ranges from 6 inches to half the length of the plank.
Cutting and Fitting Vinyl Planks
Accurate measurement and cutting are essential for a professional-looking finish. A utility knife with a sharp blade is often sufficient for straight cuts. For more complex cuts, a jigsaw or miter saw provides greater precision. Scoring the plank along the cut line multiple times before snapping it ensures a clean break.
When fitting planks around doorjambs, undercut the casing to allow the flooring to slide underneath. This creates a seamless transition and avoids the need for transition strips.
Final Inspection and Maintenance
Upon completion of the installation, a thorough inspection is recommended. Ensure all planks are securely locked in place and that the expansion gaps are consistent. Remove any spacers and install baseboards or quarter-round molding to conceal the expansion gaps and provide a finished look.
Regular sweeping or vacuuming, along with occasional damp mopping with a manufacturer-recommended cleaner, will keep the vinyl plank flooring looking its best. Avoid using abrasive cleaners or scouring pads, as these can damage the surface.

20 Tips For A Great Vinyl Plank Flooring Installation

Lvp Flooring Installation Over Concrete Subfloor Full Instructional Builds By Maz Flooret

How To Install Glue Down Luxury Vinyl Plank Flooring On Osb Sub Floor

10 Beginner Mistakes Installing Vinyl Plank Flooring

Preparing Your Sub Floor For Luxury Vinyl Plank Flooring

How To Install Waterproof Vinyl Plank Flooring Diy Installation

How To Prepare The Floor For Vinyl Plank Installation

Choosing Underlayment For Vinyl Plank Flooring Your Ultimate Guide Jona Panel S Inc

How To Prepare A Concrete Floor For Vinyl Flooring Parrys

How To Install Luxury Vinyl Plank Flooring Parrys
Related Posts