Installing Tranquility Vinyl Plank Flooring: A Comprehensive Guide
Tranquility vinyl plank flooring offers a durable, aesthetically pleasing, and relatively easy-to-install flooring solution for various residential and light commercial applications. Its waterproof nature makes it particularly suitable for kitchens, bathrooms, basements, and other areas prone to moisture. This article provides a comprehensive guide to installing Tranquility vinyl plank flooring, covering essential preparation steps, the installation process itself, and important considerations for ensuring a successful and long-lasting result.
Before initiating the installation, meticulous planning and preparation are paramount. This includes accurately measuring the area, selecting the appropriate type of Tranquility vinyl planks for the intended use, gathering the necessary tools and materials, and preparing the subfloor to receive the new flooring.
Key Point 1: Subfloor Preparation
A properly prepared subfloor is the foundation for a successful vinyl plank installation. Any imperfections in the subfloor will telegraph through the vinyl planks, resulting in an uneven surface and potential damage over time. The subfloor must be clean, level, dry, and structurally sound.
Cleaning the Subfloor: The first step is to thoroughly clean the subfloor. Remove any existing flooring materials, including old carpet, tile, adhesive, or nails. Vacuum or sweep the entire area to eliminate dust, dirt, and debris. For stubborn adhesive residue, use a scraper and an appropriate adhesive remover, following the manufacturer's instructions carefully. Allow the adhesive remover to work for the recommended time before scraping it away. Ensure proper ventilation during this process.
Leveling the Subfloor: Leveling is crucial, especially for concrete subfloors. Use a long straightedge (at least 6 feet) and a level to identify any uneven areas. High spots can be ground down using a concrete grinder, available for rent from most home improvement stores. Low spots can be filled with a self-leveling compound. Follow the manufacturer's instructions for mixing and applying the self-leveling compound. Allow it to dry completely before proceeding. For wood subfloors, use a floor patch compound to fill any holes or imperfections. Minor undulations may be addressed with underlayment but addressing major level issues with self-leveling compound is highly recommended. Check the subfloor again after the self-leveling compound has completely dried and cured, ensuring that the surface is level.
Checking for Moisture: Moisture is a major enemy of vinyl plank flooring. Before installing the flooring, test the subfloor for moisture content. For concrete subfloors, use a calcium chloride test kit to measure the moisture vapor emission rate (MVER). The MVER should be within the limits specified by the Tranquility vinyl plank manufacturer. For wood subfloors, use a moisture meter to measure the moisture content. The moisture content should be within the range recommended by the manufacturer, typically below 12%. If the moisture content is too high, allow the subfloor to dry completely or install a moisture barrier before proceeding with the installation. There are specific underlayments designed to act as moisture barriers.
Ensuring Structural Soundness: Inspect the subfloor for any signs of structural damage, such as cracks, rot, or loose boards. Repair any damage before installing the vinyl plank flooring. For concrete subfloors, fill cracks with a concrete crack filler. For wood subfloors, replace any rotted or damaged boards. Ensure that the subfloor is securely fastened to the joists. Use screws to reinforce any loose boards.
Underlayment Considerations: While Tranquility vinyl plank flooring often features an attached underlayment, additional underlayment may be desired for added cushioning, sound absorption, or moisture protection. Check the manufacturer's recommendations regarding the use of additional underlayment. If using an additional underlayment, choose one that is compatible with vinyl plank flooring and follow the manufacturer's instructions for installation. Ensure the chosen underlayment's thickness does not exceed the limitations specified for the chosen flooring type.
Key Point 2: Tools and Materials
Having the right tools and materials on hand will streamline the installation process and ensure a professional-looking result. Here’s a list of essential items:
Tranquility Vinyl Plank Flooring: Calculate the square footage of the room and add 10-15% extra for waste and cuts. Purchase the appropriate type of Tranquility vinyl planks for the intended use. Consider ordering an extra box or two beyond the initial estimate to account for future repairs or pattern matching.
Measuring Tools: A tape measure is essential for accurately measuring the room and cutting the planks. A straightedge (at least 6 feet) and a level are needed for checking the subfloor for levelness and for ensuring that the planks are installed straight. A combination square is useful for marking accurate cuts.
Cutting Tools: A utility knife with sharp blades is necessary for scoring and snapping the planks. A jigsaw or circular saw may be needed for more complex cuts, such as around door frames or pipes. A vinyl plank cutter, specifically designed for this type of flooring, can provide clean and efficient cuts, especially for straight lines. Consider the thickness and density of the plank when selecting a cutter. Some planks require a heavier-duty cutter.
Tapping Tools: A tapping block and a rubber mallet are crucial for engaging the locking mechanism of the planks without damaging them. The tapping block distributes the force evenly, preventing damage to the edges of the planks. Avoid using a metal hammer directly on the planks, as this can cause chipping or cracking.
Spacing and Alignment Tools: Spacers are used to maintain a consistent expansion gap between the flooring and the walls. These gaps are essential to allow for expansion and contraction of the flooring due to changes in temperature and humidity. A chalk line is helpful for establishing a straight starting line and for marking long cuts. Consider using laser levels for larger rooms to ensure precise alignment.
Adhesive (If Required): Some Tranquility vinyl plank flooring may require adhesive, particularly in areas with heavy traffic or moisture. Check the manufacturer's recommendations regarding the use of adhesive. If adhesive is required, choose one that is specifically designed for vinyl plank flooring and follow the manufacturer's instructions carefully. A notched trowel will be needed to apply the adhesive evenly.
Safety Gear: Safety glasses are essential for protecting your eyes from dust and debris. Knee pads will make the installation process more comfortable. Gloves are recommended for protecting your hands from cuts and abrasions. A dust mask is important for preventing the inhalation of dust particles.
Key Point 3: Installation Process
Once the subfloor is prepared and the necessary tools and materials are gathered, the actual installation process can begin.
Acclimation: Allow the Tranquility vinyl planks to acclimate to the room's temperature and humidity for at least 48 hours before installation. This will help to prevent warping or buckling after installation. Store the planks in the room where they will be installed, laid flat and out of direct sunlight.
Planning the Layout: Before starting, plan the layout of the flooring to minimize waste and ensure a visually appealing result. Consider the placement of seams and the direction of the planks. Stagger the seams to create a more natural look. Avoid placing small pieces near doorways or in high-traffic areas. If possible, plan the layout so that the planks run parallel to the longest wall in the room. This will make the room appear larger.
Starting the First Row: Begin installation along the longest straight wall, leaving an expansion gap of about 1/4 inch between the flooring and the wall. Use spacers to maintain this gap. Ensure the first row is perfectly straight, as this will serve as the foundation for the rest of the installation. Use a chalk line to mark a straight line along the wall. This will help to ensure that the first row is installed straight.
Connecting the Planks: Engage the locking mechanism of the planks by angling the edge of one plank into the edge of the adjacent plank. Use a tapping block and a rubber mallet to gently tap the planks together until they are securely connected. Avoid using excessive force, as this can damage the locking mechanism. Work your way across the room, row by row, repeating this process.
Cutting Planks: When you reach the end of a row or need to cut planks to fit around obstacles, measure the required length and mark the plank with a combination square. Use a utility knife to score the plank along the marked line, then snap the plank along the score line. For more complex cuts, use a jigsaw or circular saw. Ensure the cut edge will be concealed under baseboards or other trim.
Working Around Obstacles: When working around obstacles such as door frames, pipes, or cabinets, use a template or measuring tools to accurately transfer the shape of the obstacle onto the plank. Use a jigsaw or circular saw to cut the plank to fit around the obstacle. Leave a small expansion gap around the obstacle. Consider utilizing a scrap piece of plank to practice your cuts before cutting the actual piece you need for the installation area.
Installing the Last Row: The last row of planks may need to be cut to fit the remaining space. Measure the required width and cut the planks accordingly. Use a pull bar and a tapping block to engage the locking mechanism of the last row of planks. Ensure that the expansion gap is maintained along the wall.
Finishing Touches: After installing the flooring, remove the spacers and install baseboards or quarter-round molding to cover the expansion gaps. This will give the installation a finished look and protect the edges of the flooring. Use a nail gun or adhesive to attach the baseboards or quarter-round molding. Clean the flooring with a damp cloth to remove any dust or debris. Install transition strips where the vinyl plank flooring meets other types of flooring.
Proper installation and maintenance are critical to maximizing the lifespan and appearance of Tranquility vinyl plank flooring. By adhering to these guidelines, individuals can achieve a professional-looking installation that enhances the value and aesthetics of their space.

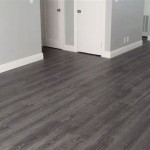
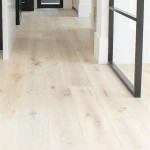
Tranquility Vinyl Floor Installation

Tranquility Vinyl Floor Installation

Tranquility Xd 4mm Rail Tie Oak Waterproof Luxury Vinyl Plank Flooring 7 08 In Wide X 48 Long Ll

I Installed Tranquility Vinyl Plank Flooring Organically Ann

My Luxury Vinyl Plank Flooring Review Pros And Cons Average But Inspired

Tranquility 3mm Mojave Hickory Waterproof Luxury Vinyl Plank Flooring 6 3 In Wide X 48 Long Ll

My Luxury Vinyl Plank Flooring Review Pros And Cons Average But Inspired

How To Install A Tranquility Resilient Flooring With Tips From Property Improvement Guru Llc

Luxury Eco Friendly No Glue Waterproof 20mil 6mm Tranquility Spc Tiles Vinyl Plank Flooring China Made In Com

Tranquility Seeker Deep Space Luxury Vinyl Flooring Mohawk Klc Floors More
Related Posts