Essential Aspects of Installing Tongue and Groove Chipboard Flooring
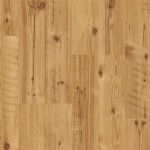
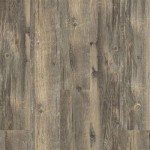
Tongue and groove chipboard flooring offers an affordable and easy-to-install option for both residential and commercial spaces. It is renowned for its durability, soundproofing properties, and ease of maintenance. Here are some essential aspects to consider when installing tongue and groove chipboard flooring:
1. Preparation
Prior to installation, ensure that the subfloor is level, dry, and free of any debris. Any unevenness can lead to creaking or buckling of the flooring. It is recommended to use a moisture meter to check the subfloor's moisture content, which should not exceed 12%. Additionally, do not install chipboard flooring in areas prone to high moisture, such as bathrooms.
2. Laying the Underlayment
An underlayment provides a moisture barrier between the subfloor and the chipboard flooring. It also helps to reduce noise and enhance underfoot comfort. Roll out the underlayment over the entire subfloor, ensuring that the seams overlap by at least 6 inches. The underlayment should not be stretched tightly; it should be cut to fit snugly against the walls.
3. Installing the First Row
Start installing the chipboard flooring from a corner of the room, ensuring that the tongue-and-groove edges are facing the wall. Place spacers along the wall to maintain a consistent gap between the flooring and the wall. Apply a small amount of wood glue to the tongue of the second board and insert it into the groove of the first board. Continue installing the first row by following the same process.
4. Continuing the Installation
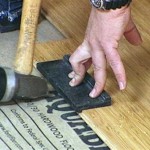
For subsequent rows, apply wood glue to the tongue of the board and insert it into the groove of the previous row. Stagger the joints between the rows to enhance the strength of the flooring. Use a tapping block and a hammer to gently tap the boards into place. Ensure that the flooring is level by periodically checking it with a spirit level.
5. Cutting and Fitting
When reaching obstacles such as doorways or pipes, measure and cut the chipboard flooring accordingly. Use a circular saw or a jigsaw for precise cuts. For areas where full-sized boards cannot fit, cut smaller pieces to fill the gaps. It is important to ensure that all cuts are clean and square.
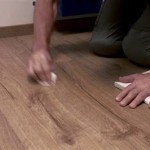
6. Trimming and Finishing
Once the entire flooring is installed, remove the spacers and trim the excess underlayment. Install baseboards or moldings around the perimeter of the room to conceal the expansion gap and enhance the finished look. Seal the joints between the flooring and the baseboards with a flexible sealant.

Chipboard Flooring How To Lay P5 Tongue And Groove

How To Lay Chipboard Flooring Roofing Super Help Advice

How To Lay Chipboard Flooring

Building A Garden Room Laying Chipboard Flooring 22mm Egger Protect The Full How To Guide On Site

Is It Best To Or Glue Chipboard Timber Joinery Sheet Materials Elliotts

Moisture Resistant P5 Chipboard Caber Flooring Caberfloor

Chipboard Flooring How To Lay P5 Tongue And Groove

Installing Chipboard Tips And Tricks For Construction Professionals

Fitting Hardwood Flooring To Chipboard Wood And Beyond Blog

Laying New Floorboards
Related Posts