Installing Self-Adhesive Laminate Flooring Over Tiles In a Bathroom
Updating a bathroom floor can significantly enhance the overall aesthetic of a home. While a full-scale renovation involving tile removal is an option, it can be costly and time-consuming. A more practical and budget-friendly alternative is installing self-adhesive laminate flooring directly over existing tiles. This method offers a relatively simple and quick way to achieve a new look without the hassle and mess associated with demolition.
This article provides a comprehensive guide to installing self-adhesive laminate flooring over tiles in a bathroom. It covers the necessary preparations, step-by-step installation procedures, and essential considerations for a successful and long-lasting result. The goal is to equip individuals with the knowledge and understanding required to complete this project efficiently and effectively.
Key Point 1: Preparation is Paramount
The success of any flooring project, especially when installing over an existing surface, hinges on meticulous preparation. Proper preparation ensures adequate adhesion, prevents future issues like unevenness or moisture damage, and ultimately contributes to the longevity of the new floor. Neglecting this step can lead to unsatisfactory results and potentially costly repairs down the line.
The first step in preparing the bathroom floor is a thorough cleaning. Remove all loose debris, dirt, and grime from the tiled surface. A combination of sweeping, vacuuming, and washing with a suitable cleaning solution is recommended. Pay particular attention to grout lines, as these areas tend to accumulate dirt and residue. Allow the floor to dry completely before proceeding to the next steps.
Next, inspect the existing tile floor for any damage or imperfections. Loose, cracked, or chipped tiles must be addressed before installing the laminate flooring. Loose tiles should be re-adhered using a tile adhesive, and cracked or chipped tiles should be repaired with a tile repair compound. Ensure that the repair compound is fully cured and sanded smooth to match the level of the surrounding tiles. This step is crucial for creating a flat and even surface for the laminate flooring.
Leveling the surface is another critical aspect of preparation. If there are significant height variations between tiles or if the grout lines are deeply recessed, a self-leveling compound may be necessary. Apply the self-leveling compound according to the manufacturer's instructions, ensuring it flows into the grout lines and fills any low spots. Allow the compound to cure completely before proceeding. This creates a smooth, consistent surface that will prevent the laminate planks from flexing or becoming uneven over time.
Finally, consider the moisture levels in the bathroom. Bathrooms are inherently humid environments, and excessive moisture can compromise the adhesive properties of the laminate flooring. Ensure adequate ventilation in the bathroom, especially during and after showering or bathing. If the bathroom is prone to high humidity, consider applying a moisture barrier to the tiled floor before installing the laminate. This will help protect the laminate from moisture damage and prevent mold or mildew growth.
Key Point 2: Installation Techniques for Self-Adhesive Laminate
Once the tile floor has been properly prepared, the installation of the self-adhesive laminate flooring can begin. Accurate measurements and careful planning are essential for a professional-looking result. It involves understanding the layout of the room, acclimating the flooring, and utilizing the right tools for the job.
Begin by measuring the dimensions of the bathroom accurately. Create a layout plan that indicates the placement of the laminate planks, paying attention to doorways, corners, and any other obstacles. This plan will help minimize waste and ensure a visually appealing and symmetrical floor. Consider the direction of the planks; typically, they are installed parallel to the longest wall of the room to create a sense of spaciousness.
Acclimation of the laminate flooring is a crucial step often overlooked. Bring the boxes of laminate planks into the bathroom at least 48 to 72 hours before installation. This allows the planks to adjust to the temperature and humidity levels of the room, minimizing expansion or contraction after installation. This reduces the risk of gaps or buckling in the finished floor.
Before peeling off the adhesive backing, dry-lay the first few rows of laminate planks to ensure proper alignment and fit. This allows adjustments to be made before committing to the adhesive. Use spacers along the walls to maintain a consistent expansion gap of approximately ¼ inch. This gap allows the laminate to expand and contract with temperature changes without putting pressure on the walls.
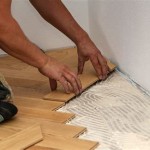
Once satisfied with the dry-lay, begin removing the adhesive backing of the first plank and carefully position it according to the layout plan. Press the plank firmly onto the prepared tile floor, ensuring full contact with the adhesive. Use a rolling pin or hand roller to apply even pressure across the entire surface of the plank, eliminating any air pockets. Continue this process, working row by row, overlapping the planks according to the manufacturer's instructions. Often a tongue-and-groove method is used.
When cutting planks to fit around obstacles or at the edges of the room, use a utility knife and a straight edge. Score the plank several times before snapping it along the scored line. For more complex cuts, a jigsaw may be necessary. Ensure that all cuts are clean and precise to create a professional finish. Install transition strips at doorways to create a smooth transition between the laminate flooring and adjacent flooring surfaces.
After the installation is complete, allow the adhesive to fully cure according to the manufacturer's recommendations. This typically takes 24 to 48 hours. Avoid heavy traffic on the newly installed floor during this period. Once the adhesive is cured, install baseboards or quarter-round molding along the walls to conceal the expansion gap and provide a finished look.
Key Point 3: Addressing Specific Bathroom Considerations
Bathrooms present unique challenges for flooring installations due to the presence of moisture, plumbing fixtures, and confined spaces. Careful consideration of these factors is essential for ensuring the longevity and performance of the self-adhesive laminate flooring.
Water resistance is a primary concern in bathrooms. While self-adhesive laminate flooring is typically water-resistant, it is not entirely waterproof. Prolonged exposure to standing water can damage the flooring and compromise the adhesive bond. Therefore, it is crucial to address potential water sources, such as leaky faucets or shower enclosures.
Apply a bead of waterproof sealant around toilets, sinks, and other plumbing fixtures to prevent water from seeping under the laminate flooring. Regularly inspect these areas for any signs of leaks and promptly address them to prevent moisture damage. Additionally, consider using a bath mat or rug in high-traffic areas to absorb moisture and protect the flooring.
Installing laminate flooring around toilets requires careful planning and precise cutting. Remove the toilet if possible to allow for a seamless installation. If removing the toilet is not feasible, carefully measure and cut the laminate planks to fit snugly around the base of the toilet. Use a jigsaw to make curved cuts and ensure that the edges are sealed with waterproof sealant. The use of toilet flange extenders might be necessary in some scenarios.
Ventilation is crucial to combatting moisture buildup in the bathroom. Ensure that the bathroom is adequately ventilated during and after showering or bathing. Use the exhaust fan regularly to remove excess moisture from the air. Proper ventilation will help prevent mold and mildew growth under the laminate flooring and extend its lifespan.
Finally, consider the specific type of self-adhesive laminate flooring best suited for bathroom use. Look for products that are specifically designed for wet areas and that have a high water-resistance rating. Consult with flooring professionals or read product reviews to determine the best option for the specific bathroom environment.
By carefully considering these specific bathroom considerations and implementing appropriate preventive measures, individuals can successfully install self-adhesive laminate flooring over tiles and enjoy a beautiful, functional, and long-lasting bathroom floor.

How To Install L And Stick Tiles In Guest Bathroom For Beginners Tips Tricks Step By Part 4

How To Lay Sheet Vinyl Flooring

How To Install Vinyl Plank Flooring In A Bathroom Fixthisbuildthat

How To Install Vinyl Plank Floors In A Bathroom Over Tile

How To Install L And Stick Vinyl Flooring Al Friendly Tiera Lovelle

Can You Lay Vinyl Flooring Over Tile Mersey

How To Install Vinyl Plank Tiles In A Bathroom

Can You Put Vinyl Flooring Over Tile A Complete Guide Teka

Installing Luxury Vinyl Over Existing Tiles Choices Flooring

How To Lay A Vinyl Tile Floor This Old House
Related Posts