Installing Laminate Flooring Transitions On Concrete Walls
Laminate flooring offers a cost-effective and aesthetically pleasing alternative to traditional hardwood. However, achieving a professional finish requires careful attention to detail, especially when transitioning from the laminate flooring to concrete walls. These transitions are crucial for concealing expansion gaps, protecting the edges of the laminate, and providing a clean, finished appearance. This article will outline the process and considerations involved in installing laminate flooring transitions against concrete walls.
Understanding Different Transition Types
Several types of transitions are available, each designed for a specific purpose. Selecting the correct transition is essential for both functionality and aesthetics.
T-Molding: Used when joining two flooring surfaces of equal height, such as where laminate meets another flooring material in a doorway. T-molding is not typically used against a wall.
Reducer Strips: Designed to bridge the height difference between two flooring surfaces, such as when transitioning from laminate to a lower surface like carpeting or tile.
Stair Nosing: Specifically designed for stair edges, providing a safe and finished look.
Wall Molding/Baseboard: These are commonly used against walls and provide a decorative finish while concealing the expansion gap. They come in various profiles, including quarter-round, shoe molding, and baseboard.
Preparing the Concrete Wall
Before installing any transitions, the concrete wall should be clean and dry. Any dust, debris, or protrusions can interfere with the installation and compromise the finished look. Cleaning the wall with a damp cloth and allowing it to dry completely is crucial.
Inspect the wall for any significant irregularities. While minor imperfections can often be addressed with caulking, larger gaps or protrusions may require patching or other corrective measures before proceeding with the transition installation. A straight and even wall surface will ensure a proper fit and seal.
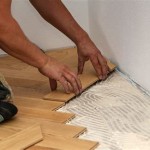
Choosing the Right Adhesive
The adhesive used to secure the transition will depend on the specific material of the transition and the manufacturer's recommendations. Construction adhesive is commonly used for wall moldings and baseboards against concrete. Some transitions may come with pre-applied adhesive backing, simplifying the installation process.
When using construction adhesive, apply it in a consistent bead along the back of the transition piece. Avoid applying excessive adhesive, as this can create a messy finish and make cleanup more difficult. Follow the manufacturer's instructions regarding drying times and clamping requirements.
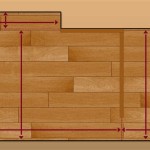
Measuring and Cutting Transitions
Accurate measurements are essential for a seamless fit. Measure the length of the wall where the transition will be installed, and use a miter saw or coping saw to cut the transition piece to the correct length. For inside and outside corners, angled cuts are necessary, which can be achieved with a miter saw or by carefully coping the profile of the existing molding.
When cutting, ensure the transition is cut cleanly and squarely to avoid gaps or uneven edges. A sharp blade and proper cutting technique will contribute to a professional finish.
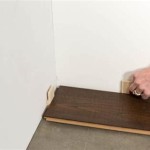
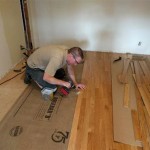
Installing the Transitions
Once the transition pieces are cut, carefully apply them to the wall, ensuring they are flush against both the flooring and the wall. If using construction adhesive, apply firm and even pressure to ensure proper adhesion. Some transitions may require the use of finishing nails or brads for added security. Pre-drill holes before nailing into concrete to prevent cracking.
For transitions with pre-applied adhesive backing, simply peel off the protective layer and firmly press the transition against the wall. Ensure proper alignment before applying pressure, as repositioning can weaken the adhesive bond.
Finishing Touches
After the transition is installed, inspect it for any gaps or imperfections. Small gaps can be filled with paintable acrylic caulk to create a seamless and water-resistant seal. Caulking also provides a more finished and professional appearance. Smooth the caulk with a damp finger or caulking tool for a clean line.
Maintaining Laminate Flooring Transitions
Regular cleaning and maintenance of the transitions will help prolong their lifespan and maintain their appearance. Avoid using harsh chemicals or abrasive cleaners, as these can damage the transition material. A damp cloth and mild detergent are usually sufficient for cleaning.
Inspect the transitions periodically for any signs of wear and tear, such as cracking or loosening. Address any issues promptly to prevent further damage and ensure the longevity of the flooring installation.

A Complete Guide On How To Install Laminate Flooring Concrete

How To Install Laminate Flooring The Awesome Orange

Installation Instructions For Floor On The Wall Haro Laminate English

The Ultimate Guide To Installing Laminate Flooring Parrys

Installing Laminate Flooring Finishing Trim And Choosing Transition Strips

Installing Laminate Flooring For The First Time Crafted Work

How To Easily Install A Laminate Floor Over Concrete Sunny Side Design

Installing Laminate Flooring Finishing Trim And Choosing Transition Strips

How To Install Laminate Flooring On Your Own Diy Hq Longwood Fl

Laminate Floor Installation For Beginners 9 Clever Tips
Related Posts