Installing Laminate Flooring Over Wood: A Comprehensive Guide
Installing laminate flooring is a popular choice for homeowners looking to update their living spaces due to its durability, affordability, and ease of installation. One of the common questions that arises is whether it's possible to install laminate flooring directly over existing wood floors. The answer is generally yes, but careful consideration and preparation are crucial for a successful and long-lasting installation.
This article provides a comprehensive guide on how to install laminate flooring over wood, covering essential preparation steps, necessary tools and materials, the installation process itself, and potential issues to watch out for. This guide aims to equip individuals with the knowledge to determine if they can proceed with a DIY project or if it's best to call in a professional flooring contractor.
Evaluating the Existing Wood Floor
Before commencing any installation, it is imperative to thoroughly assess the condition of the existing wood floor. This evaluation will determine whether the wood floor is a suitable subfloor for laminate installation and identify any necessary repairs or adjustments.
First, the flatness of the floor must be checked. An uneven subfloor can lead to problems with the laminate flooring, including squeaking, buckling, and premature wear. Use a long level or a straight edge (at least 6 feet long) to identify any dips or high spots in the existing wood floor. Significant variations exceeding 3/16 inch over a 10-foot span must be addressed. Smaller variations might be accommodated by the underlayment, but larger ones require more extensive leveling.
Secondly, inspect for stability and structural integrity. Loose, warped, or damaged boards need to be repaired or replaced. Walking across the floor, feel for any soft spots or excessive flex. Addressing these issues is vitally important because the laminate flooring will only be as stable as what lies beneath it. Any movement in the subfloor will translate to the laminate flooring, potentially causing joint separation and other problems.
Thirdly, assess the moisture content of the wood subfloor. Wood and laminate are susceptible to moisture damage, and excessive moisture can lead to warping, mold growth, and other serious issues. An ideal moisture content for a wood subfloor prior to laminate installation is typically between 6% and 12%. Use a moisture meter to take readings in several locations throughout the room. If moisture levels are above the recommended range, identify and address the source of moisture before proceeding with the laminate installation. Consider utilizing a vapor barrier even with acceptable moisture levels to provide an added layer of protection.
Finally, clean the existing wood floor thoroughly. Remove all debris, dust, and dirt. Use a vacuum cleaner with a brush attachment to pick up loose particles, and then follow with a damp mop to remove any remaining residue. Ensure the floor is completely dry before installing the underlayment and laminate flooring. This step is important to prevent any trapped debris from interfering with the laminate's ability to lay flat on the subfloor.
Gathering Tools and Materials
Having the right tools and materials readily available is essential for a smooth and efficient laminate flooring installation. This section provides a comprehensive list of what is needed. It is advisable to gather everything before commencing any work to avoid interruptions and potential delays.
The essential tools for laminate flooring installation include a measuring tape, a pencil, a utility knife, a tapping block, a pull bar, a rubber mallet, a circular saw or a jigsaw, safety glasses, and knee pads. A measuring tape is crucial for accurately measuring the room dimensions and the laminate planks. A pencil is needed for marking cut lines. The utility knife is useful for scoring laminate planks before snapping them, especially for intricate cuts. The tapping block and pull bar are essential for securely locking the laminate planks together without damaging the edges. A rubber mallet is used to gently tap the tapping block and pull bar. A circular saw or a jigsaw is required for making accurate cuts, especially around door frames and other obstacles. Safety glasses are essential for protecting the eyes from debris. Knee pads provide comfort and support while working on the floor.
The necessary materials include the laminate flooring, underlayment, vapor barrier (optional), spacers, and transition strips. The quantity of laminate flooring needed will depend on the room's square footage, plus an additional 5-10% for waste. The underlayment provides a smooth, cushioned surface for the laminate flooring and helps to reduce noise. The vapor barrier (if used) protects the laminate flooring from moisture. Spacers are used to maintain a consistent expansion gap around the perimeter of the room. Transition strips are used to create smooth transitions between the laminate flooring and other flooring types.
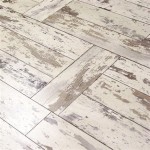
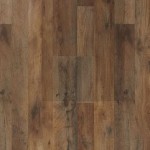
When selecting the laminate flooring, consider factors such as the thickness, AC rating (abrasion class, indicating durability), and style. The thickness influences the comfort and sound insulation. The AC rating determines the laminate's resistance to wear and tear. The style should complement the overall aesthetic of the room. Quality underlayment will enhance the durability and noise reduction properties of the laminate flooring. Shop around and compare prices to find the best value for the materials and tools necessary for the project.
The Installation Process: Step-by-Step
This section provides a detailed, step-by-step guide to installing laminate flooring over an existing wood floor. Following these steps meticulously will help to ensure a professional-looking and long-lasting result.
The initial step is to prepare the room. Remove all furniture and any existing baseboards or moldings. Clean the existing wood floor thoroughly, as mentioned earlier. If installing a vapor barrier, unroll it across the floor, overlapping the seams by at least 6 inches, and tape the seams with moisture-resistant tape. The vapor barrier should extend up the walls slightly to prevent moisture from wicking up from the subfloor.
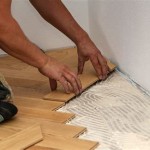
Next, install the underlayment. Unroll the underlayment parallel to the direction of the laminate flooring installation. Butt the seams together and tape them with underlayment tape. Ensure the underlayment is smooth and flat, without any wrinkles or bubbles. Trim the underlayment to fit the perimeter of the room, leaving a small gap between the underlayment and the wall. This step creates a cushioned surface for the laminate flooring, providing insulation, reducing noise, and protecting the floor from moisture.
The following step is to begin installing the laminate flooring. Start in one corner of the room, placing spacers along the wall to maintain the recommended expansion gap (typically 1/4 to 3/8 inch). The expansion gap allows the laminate flooring to expand and contract with changes in temperature and humidity without buckling or warping. Place the first row of laminate planks with the tongue side facing the wall. Connect the planks end-to-end, using the tapping block and rubber mallet to ensure a tight and secure fit.
Continue installing the laminate planks row by row, staggering the end joints to create a more visually appealing and structurally sound floor. Use the tapping block and pull bar to lock the planks together tightly. For the last row, it may be necessary to cut the planks to fit the remaining space. Measure carefully and use a circular saw or jigsaw to make accurate cuts. Remember to leave the required expansion gap along the wall.
Finally, install the transition strips and baseboards. Transition strips are used to create smooth transitions between the laminate flooring and other flooring types, such as tile or carpet. Baseboards are installed along the perimeter of the room to cover the expansion gap and provide a finished look. Use a nail gun or adhesive to secure the baseboards to the wall.
Once the installation is complete, inspect the floor for any gaps or imperfections. Clean the floor with a laminate floor cleaner to remove any dust or debris. Allow the floor to settle for 24-48 hours before placing furniture back in the room. Carefully read and adhere to the manufacturer’s instructions for installation and maintenance.
Addressing Potential Issues
Despite careful planning and execution, potential issues can arise during laminate flooring installation. Being aware of these issues and knowing how to address them can help to minimize delays and ensure a successful outcome.
One common issue is dealing with uneven subfloors. As previously mentioned, significant variations in the flatness of the wood subfloor can cause problems with the laminate flooring. If the variations are minor, self-leveling compound can be used to create a smooth and even surface. For more substantial variations, shims or plywood can be used to raise low spots. It is essential to address these issues before installing the laminate flooring to prevent squeaking, buckling, and premature wear.
Another potential issue is moisture problems. If the wood subfloor is excessively damp, it can lead to mold growth and warping of the laminate flooring. Identifying and addressing the source of moisture is crucial. Use a dehumidifier to dry out the subfloor, and consider installing a vapor barrier to prevent moisture from seeping into the laminate. Ensure proper ventilation in the room to avoid moisture buildup.
Cutting laminate planks accurately can also be challenging, especially around door frames and other obstacles. Use a jigsaw for making curved cuts and a circular saw for straight cuts. Always measure carefully and double-check the cut lines before cutting the planks. Consider using a template to ensure accurate cuts around irregular shapes.
Locking the laminate planks together tightly can sometimes be difficult, especially in tight spaces. The tapping block and pull bar are essential for ensuring a secure and seamless connection. Gently tap the planks together, avoiding excessive force that could damage the edges. If the planks refuse to lock together, inspect the edges for any debris or imperfections that might be preventing a proper connection.
Finally, damage to laminate planks can occur during installation. Handle the planks with care to avoid scratches and dents. If a plank is damaged, it can be replaced with a new one. Keep extra planks on hand for such instances.

How To Install Laminate Flooring For Beginners

5 Reasons To Install Laminate Over Hardwood Floors

Installing Hardwood Floors Over Existing Diy Mryoucandoityourself

How To Install Laminate Flooring Forbes Home

Can You Put Laminate Over Hardwood Answered Mellowpine

Installing Luxury Vinyl Floors Over Engineered Hardwood Honey Built Home

Common Mistakes When Laying Laminate Flooring Next Day Floors

The Real Reason Laminate Flooring Is Better Than Hardwood

How To Install Floating Hardwood Directly Over Existing Flooring

Reasons To Choose Laminate Flooring Over Hardwood
Related Posts