Installing Laminate Flooring on Stairs with Railings: A Comprehensive Guide
Laminate flooring offers a durable and aesthetically pleasing option for staircases. Its resistance to scratches, wear, and tear makes it a practical choice for high-traffic areas like stairs. Installing laminate on stairs with railings, however, presents unique challenges compared to a standard flooring installation. This article provides a detailed guide to navigate these challenges, ensuring a professional and lasting result.
Before embarking on the installation, careful planning and preparation are crucial. This includes selecting the appropriate laminate flooring, gathering necessary tools, and accurately measuring the staircase. Failing to adequately prepare can lead to errors, increased material waste, and a less-than-satisfactory finished product.
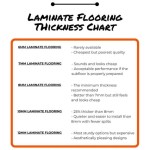
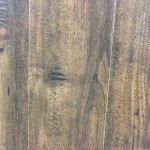
The type of laminate flooring chosen should be specifically designed for stair applications. These products often feature a thicker wear layer and a textured surface to enhance grip and reduce the risk of slipping. Consider the existing decor and the overall aesthetic of the home when selecting the laminate’s color and pattern.
Essential tools for the project include a measuring tape, pencil, circular saw or miter saw, jigsaw, safety glasses, ear protection, hammer, rubber mallet, construction adhesive, stair nose molding, shims, and a level. Access to a nail gun or brad nailer can also be beneficial for securing the stair nose molding.
Accurate measurements are paramount. Begin by measuring the width and depth of each stair tread. Note any variations in dimensions between steps, as this is common in older homes. Measure the height of each riser as well. These measurements will dictate the amount of laminate and stair nose molding required.
Key Point 1: Preparing the Stairs for Laminate Installation
Proper preparation of the existing staircase is vital for a successful laminate installation. This involves removing any existing flooring, repairing damage, and ensuring a stable and level surface. Addressing these issues beforehand prevents problems that can compromise the integrity and appearance of the finished staircase.
If the existing stairs are carpeted, carefully remove the carpet, padding, and any staples or nails. Use pliers or a staple remover to ensure all fasteners are removed, preventing them from interfering with the laminate installation.
Inspect the stair treads and risers for any signs of damage, such as cracks, splinters, or uneven surfaces. Repair any damage using wood filler or shims. For significant damage, consider replacing the affected tread or riser entirely. A stable subfloor is essential for preventing the laminate from flexing or shifting over time.
Use a level to check the treads and risers for levelness and plumbness. Minor variations can be corrected using shims. For more significant discrepancies, a self-leveling compound may be necessary to create a perfectly flat and level surface. Ensure the compound is fully cured before proceeding with the laminate installation.
Cleaning the stairs thoroughly is crucial for ensuring proper adhesion of the construction adhesive. Vacuum the stairs to remove any loose debris, dust, or dirt. Wipe down the surfaces with a damp cloth to remove any remaining residue. Allow the stairs to dry completely before applying adhesive.
Key Point 2: Installing the Laminate Flooring
The installation process involves cutting the laminate pieces to size, applying adhesive, and securely attaching them to the treads and risers. Working with precision and attention to detail is crucial for achieving a professional-looking result. The stair nose molding provides a finished edge and enhances the safety of the stairs.
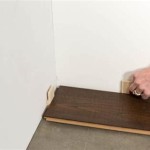
Begin by cutting the laminate pieces for the risers. Use the measurements taken earlier to cut each piece to the correct size and shape. Use a circular saw or miter saw for straight cuts and a jigsaw for curved or intricate cuts. Dry-fit the risers to ensure they fit properly before applying adhesive.
Apply a generous bead of construction adhesive to the back of each riser piece. Position the riser against the stair and press firmly into place. Use shims to hold the riser in place while the adhesive dries. Allow the adhesive to cure according to the manufacturer's instructions.
Next, cut the laminate pieces for the stair treads. Ensure the pieces are slightly oversized to allow for minor adjustments. Dry-fit the treads to ensure a proper fit. Pay close attention to the fit around the railings, making any necessary cuts or adjustments with a jigsaw. This process necessitates careful measurements and potentially the creation of a template.
Apply construction adhesive to the stair tread and the back of the laminate tread piece. Position the laminate tread onto the stair tread and press firmly into place. Secure the tread with shims if necessary. Allow the adhesive to cure completely before proceeding to install the stair nose molding.
The stair nose molding provides a finished edge for the stair tread and protects the edge from wear and tear. Measure and cut the stair nose molding to the correct length. Apply construction adhesive to the back of the molding and position it along the front edge of the stair tread. Secure the molding with finish nails or brad nails using a nail gun or brad nailer. Ensure the nails are countersunk to avoid creating tripping hazards.
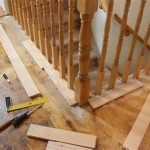
When working around the railing posts, precision is key. Measure the distance from the railing post to the edge of the stair tread or riser. Transfer these measurements to the laminate and carefully cut around the post using a jigsaw. A coping saw may be needed for intricate curves.
Key Point 3: Addressing Railing Integration and Finishing Touches
The presence of railings necessitates careful planning and execution to ensure a seamless and aesthetically pleasing integration with the laminate flooring. This involves precise cuts around the railing posts and the use of appropriate finishing techniques to conceal any gaps or imperfections. Paying attention to these details contributes significantly to the overall quality of the finished product.
The installation around the railing posts is often the most challenging aspect of the project. Creating a template can be helpful for accurately cutting the laminate to fit around the posts. Use cardboard or heavy paper to create a template of the post's base. Transfer the template to the laminate and carefully cut along the lines using a jigsaw.
Once the laminate is installed around the railing posts, inspect for any gaps or imperfections. These gaps can be filled with color-matched caulk or wood filler. Apply the caulk or filler sparingly and smooth it out with a wet finger or a putty knife. Wipe away any excess caulk or filler with a damp cloth.
Consider the transition between the laminate flooring on the stairs and the flooring on the landing or hallway. Use transition strips to create a smooth and seamless transition between the different flooring types. These strips are available in various materials and colors to match the laminate flooring.
After completing the installation, thoroughly inspect the entire staircase for any imperfections or areas that require touch-ups. Address any issues promptly to ensure a long-lasting and visually appealing result. Clean the laminate flooring with a damp cloth and a mild detergent. Avoid using abrasive cleaners or excessive water, as these can damage the laminate.
Securing the stair nose molding is a crucial step. While adhesive provides a strong bond, mechanical fasteners like finish nails or brad nails provide added security. Space the nails evenly along the length of the molding, ensuring they are countersunk to prevent tripping hazards. Use a nail set to drive the nails slightly below the surface of the wood, and fill the holes with wood filler.
Regular maintenance is essential for preserving the appearance and longevity of the laminate flooring. Sweep or vacuum the stairs regularly to remove dirt and debris. Use a damp mop to clean the flooring as needed, avoiding excessive water. Place mats at the top and bottom of the stairs to help prevent dirt and moisture from being tracked onto the laminate.
In cases where the existing railing posts are integrated into the stair treads, creating a clean and professional finish requires extra care. The goal is to minimize the visible gap between the post and the laminate, ensuring a stable and aesthetically pleasing connection. This may involve using a router to create a recess in the laminate for the post base or employing specialized trim pieces designed to conceal any remaining gaps.
For staircases with complex geometries, such as curved or spiral stairs, the installation process becomes significantly more challenging. These projects often require specialized tools, skills, and a deep understanding of geometry. It is advisable to consult with a professional installer in such cases to ensure a successful and safe installation.
When selecting the laminate flooring, consider the thickness of the material. Thicker laminates tend to be more durable and offer better sound absorption. However, they may also require adjustments to the height of the stair nose molding and the transition strips. Ensure that the chosen laminate is compatible with the existing staircase structure and meets all relevant building codes.
Safety should always be a top priority during the installation process. Wear safety glasses and ear protection when using power tools. Use caution when handling sharp objects and construction materials. If you are not comfortable performing any of the steps involved in the installation, it is best to consult with a professional.

Fitting Flooring Around Stair Rail Spindles

Fitting Flooring Around Stair Rail Spindles

Install Laminate Flooring Around Stair Wood Banister Railing Baer Skirt Trim

Fitting Flooring Around Stair Rail Spindles

Fitting Flooring Around Stair Rail Spindles

How To Install Laminate Under Baers Spindles That Go In Ground

How To Install Laminate On Stairs Follow Our Essential Guide Laying And Costing For

Fitting Flooring Around Stair Rail Spindles

Floating Floor In Couction With Baers Greenbuildingadvisor

How To Install Laminate On Stairs Follow Our Essential Guide Laying And Costing For
Related Posts