Installing Laminate Flooring Against Walls: A Comprehensive Guide
Installing laminate flooring can significantly enhance the aesthetic appeal and functionality of a room. Achieving a professional-looking result requires careful attention to detail, particularly when installing the laminate planks against walls. This process ensures a seamless transition between the floor and the wall, preventing gaps and contributing to the overall stability and longevity of the flooring. Proper installation also facilitates expansion and contraction of the laminate due to temperature and humidity fluctuations, preventing buckling or warping.
This article will provide a comprehensive guide to installing laminate flooring against walls, covering essential preparations, tools, techniques, and best practices. Understanding these elements is crucial for achieving a durable and visually pleasing finished product.
Key Point 1: Preparation and Planning
Effective preparation is paramount for a successful laminate flooring installation. Neglecting this phase can lead to complications and potentially compromise the final result. This involves assessing the subfloor, gathering necessary tools, and carefully planning the layout.
Subfloor Assessment and Preparation: The subfloor is the foundation upon which the laminate flooring will rest. It must be clean, level, and dry. Any imperfections, such as cracks, holes, or unevenness, must be addressed before proceeding. Clean the subfloor thoroughly, removing all debris, dust, and existing adhesives. Use a scraper or vacuum to ensure a pristine surface. Leveling compounds can be used to correct minor imperfections. For larger discrepancies, consider using self-leveling concrete or plywood underlayment. Moisture testing is crucial, particularly for concrete subfloors. Excessive moisture can lead to mold growth and damage to the laminate. A moisture meter can accurately measure the moisture content. If the moisture level exceeds the manufacturer's recommendations, a moisture barrier should be installed.
Tool and Material Gathering: Having the right tools and materials readily available streamlines the installation process and ensures efficiency. Essential tools include a measuring tape, pencil, circular saw or laminate flooring cutter, tapping block, pull bar, hammer, spacers, safety glasses, knee pads, and a moisture meter. A jigsaw is also helpful for cutting around door frames and other obstacles. Materials include the laminate flooring itself, underlayment (if required by the manufacturer or desired for added sound insulation), moisture barrier (if necessary based on subfloor moisture test), spacers, and transition strips (for doorways and other transitions). Sufficient quantities of all materials should be on hand to avoid interruptions during the installation process.
Layout Planning: Before commencing the installation, carefully plan the layout of the laminate flooring. Determine the direction in which the planks will be laid. Typically, planks are laid parallel to the longest wall of the room to visually elongate the space. Measure the room's dimensions and calculate the number of rows required. It's generally recommended to start with a full plank along the longest wall to ensure a symmetrical appearance. If the last row will be less than half the width of a plank, adjust the starting row accordingly to avoid a narrow strip at the opposite wall. Acclimate the laminate flooring to the room's temperature and humidity for at least 48 hours prior to installation. This allows the planks to expand or contract, minimizing the risk of gaps or buckling after installation.
Key Point 2: Precise Installation Techniques
The actual installation process requires precision and attention to detail. Proper cutting, spacing, and locking mechanisms are critical for a secure and aesthetically pleasing floor.
Cutting Laminate Planks: Accurate cutting is crucial for achieving a seamless and professional finish. Use a sharp blade in a circular saw or a specialized laminate flooring cutter. A laminate flooring cutter is preferred by many installers as it provides clean, splinter-free cuts and minimizes dust. When using a circular saw, cut with the decorative side facing up to prevent chipping. For complex cuts, such as around door frames or pipes, use a jigsaw. Measure the required cut carefully and mark the plank with a pencil. Use a straight edge as a guide to ensure a straight and accurate cut. Practice on scrap pieces of laminate to refine cutting techniques before working on the actual flooring.
Spacing and Expansion Gaps: Laminate flooring expands and contracts with changes in temperature and humidity. Leaving an expansion gap around the perimeter of the room is essential to accommodate this movement and prevent buckling. Use spacers to maintain a consistent gap between the laminate planks and the walls. The recommended expansion gap is typically between 1/4 inch and 3/8 inch, but always refer to the manufacturer's instructions for specific recommendations. The expansion gap should be maintained around all vertical obstructions, such as pipes and door frames. After the installation is complete, the expansion gap will be covered by baseboards or quarter-round molding.
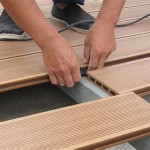
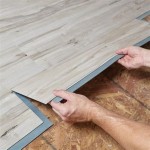
Locking Mechanisms and Seams: Laminate flooring planks are typically designed with tongue-and-groove locking mechanisms. These mechanisms interlock the planks, creating a stable and seamless floor. Start by inserting the tongue of the first plank into the groove of the adjacent plank at an angle. Then, gently press the plank down until it locks into place. Use a tapping block and hammer to gently tap the planks together, ensuring a tight seam. Avoid excessive force, which can damage the locking mechanism. Stagger the seams between rows to create a more visually appealing and structurally sound floor. A common practice is to use the leftover piece from the previous row to start the next row, provided it is at least 12 inches long. Inspect each seam carefully to ensure it is tight and flush. If any gaps are visible, use a pull bar to draw the planks together until they lock properly.
Key Point 3: Addressing Common Challenges and Best Practices
Even with careful preparation and precise techniques, certain challenges can arise during laminate flooring installation. Understanding how to address these challenges and adhering to best practices can ensure a successful outcome.
Dealing with Irregular Walls: Walls are not always perfectly straight or square. This can create challenges when installing laminate flooring. Use a compass or profile gauge to trace the contours of the wall onto the laminate plank. Then, use a jigsaw to cut the plank to match the wall's shape. Ensure that the expansion gap is maintained even when following irregular walls. Consider using flexible molding or caulk to fill any small gaps that may remain after installation.
Cutting Around Door Frames and Pipes: Cutting laminate flooring around door frames and pipes requires precision and patience. Use a jigsaw to create the necessary cutouts. To cut around door frames, use a jamb saw to undercut the frame, allowing the laminate flooring to slide underneath. For pipes, drill a hole slightly larger than the pipe's diameter in the laminate plank. Then, use a jigsaw to cut a slit from the edge of the plank to the hole. After the plank is installed, cover the gap around the pipe with a pipe flange or caulk.
Transition Strips and Finishing Touches: Transition strips are used to cover the expansion gap at doorways and other transitions between different flooring types. Select transition strips that match the color and style of the laminate flooring. Measure the width of the doorway or transition and cut the transition strip to the appropriate length. Install the transition strip according to the manufacturer's instructions, typically using adhesive or screws. After the laminate flooring is installed, install baseboards or quarter-round molding to cover the expansion gap around the perimeter of the room. Ensure that the baseboards or molding are not tightly pressed against the laminate flooring, as this can restrict expansion and contraction. Inspect the entire floor for any imperfections, such as gaps, loose planks, or damaged areas. Address any issues promptly to ensure a durable and aesthetically pleasing finished floor.
By diligently following these steps and paying close attention to detail, one can successfully install laminate flooring against walls, creating a beautiful and functional floor that will last for years to come.

Home Dzine Improvement Create A Feature Wall With Laminate Flooring

Bad Laminate Installation Repair

How To Install Laminate Flooring On Walls 7 Easy Steps Inc

Going Up The Wall Installing Flooring Vertically Floor Trends Installation

How To Make An Accent Wall With Laminate Flooring

How To Install Laminate Flooring The Home Depot

How To Install Laminate Flooring On Walls 7 Easy Steps Inc

Bad Laminate Installation Repair

How To Install Laminate Flooring On Walls And Ceilings

Tongue Or Groove Which To Install First
Related Posts