Installing Harmonics Laminate Flooring On Stairs: A Comprehensive Guide
Installing Harmonics laminate flooring on stairs can significantly enhance the aesthetic appeal and value of a home. This project, while seemingly complex, is achievable for moderately skilled do-it-yourselfers with careful planning, the right tools, and a methodical approach. This article provides a detailed guide to successfully installing Harmonics laminate flooring on most standard staircases. It includes preparation steps, cutting and fitting instructions, and installation techniques to ensure a professional-looking result.
Before embarking on this project, it's crucial to understand the intricacies involved. Improper installation can lead to safety hazards, such as loose treads or uneven surfaces. Adhering to manufacturer guidelines and taking your time will contribute to a safe and visually appealing staircase.
Choosing the Right Materials and Tools
Selecting the appropriate materials and tools is paramount to a successful installation. Start by determining the quantity of Harmonics laminate flooring needed. This calculation should include the combined surface area of all treads and risers, plus an additional 10-15% for waste and potential errors. Purchasing extra material is advisable, especially for first-time installers.
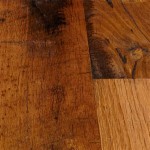
The primary component is, of course, the Harmonics laminate flooring itself. Ensure the chosen flooring is suitable for stair applications. Check the manufacturer's specifications for durability and slip resistance, especially if pets or small children are present in the household. Consider purchasing stair nosing specifically designed for Harmonics laminate flooring. These moldings provide a finished edge on the tread, improving safety and aesthetics. Stair nosing comes in various profiles and finishes, so choose one that complements the flooring and the existing staircase design.
In addition to the flooring and stair nosing, you'll need the following tools:
- Measuring Tape: An accurate measuring tape is essential for precise cuts.
- Pencil and Square: Used for marking cut lines and ensuring right angles.
- Circular Saw or Miter Saw: A circular saw is useful for general cuts, while a miter saw provides more precise angled cuts, especially for stair nosing.
- Jigsaw: This is helpful for intricate cuts around obstacles or for shaping the flooring to fit irregular staircases.
- Construction Adhesive: A high-quality construction adhesive is necessary to securely bond the laminate flooring to the stair treads and risers.
- Caulk Gun: For applying the construction adhesive neatly and efficiently.
- Hammer and Tapping Block: These tools are used to gently tap the laminate flooring into place and ensure tight seams.
- Safety Glasses and Hearing Protection: Protecting your eyes and ears from debris and noise during cutting is crucial.
- Level: Used to check the level of the treads and risers, and to make necessary adjustments.
- Shims: Small pieces of wood used to level uneven surfaces.
- Clamps: Help secure the stair nosing and laminate pieces while the adhesive dries.
- Vacuum Cleaner: Essential for keeping the work area clean and free of debris.
Preparing the Staircase
Proper preparation of the staircase is the foundation for a successful laminate flooring installation. This involves removing any existing flooring, repairing damaged areas, and ensuring a clean, level surface.
Removal of Existing Flooring: Begin by removing any existing carpet, vinyl, or other flooring materials from the stairs. This may involve using a utility knife, pry bar, and scraper. Be careful not to damage the underlying stair structure. Remove all staples, nails, and adhesive residue. A scraper tool can be helpful in removing stubborn adhesive.
Inspection and Repair: Thoroughly inspect the stair treads and risers for any damage, such as cracks, splinters, or unevenness. Repair any imperfections using wood filler or patching compound. Allow the filler to dry completely before sanding it smooth. For significant damage, consider replacing the affected stair tread or riser entirely.
Sanding and Leveling: Sand the stair treads and risers to create a smooth, even surface. This will ensure proper adhesion of the laminate flooring. Use a level to check for any unevenness. If necessary, use shims to level the treads and risers. Secure the shims with construction adhesive and allow them to dry completely before proceeding.
Thorough Cleaning: Vacuum the entire staircase thoroughly to remove all dust, debris, and particles. A clean surface is essential for proper adhesion of the construction adhesive. Wipe down the treads and risers with a damp cloth to remove any remaining dust. Ensure the surfaces are completely dry before applying the adhesive.
Cutting and Installing the Laminate Flooring
The next phase involves accurately measuring, cutting, and installing the Harmonics laminate flooring on the prepared staircase. Precision and attention to detail are crucial during this stage to achieve a professional-looking and safe result.
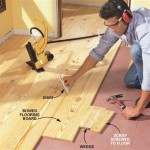
Measuring and Cutting: Carefully measure the width and depth of each stair tread and riser. Transfer these measurements to the Harmonics laminate flooring, adding a small allowance (approximately 1/8 inch) for expansion. Use a square to ensure accurate cut lines. Cut the laminate flooring using a circular saw, miter saw, or jigsaw, depending on the complexity of the cut. For straight cuts, a circular saw or miter saw is generally preferred. For curved or intricate cuts, a jigsaw is more suitable. Remember to always wear safety glasses and hearing protection when using power tools.
Dry Fitting: Before applying any adhesive, dry fit the cut pieces of laminate flooring onto the stair treads and risers. This allows you to check the fit and make any necessary adjustments. If the pieces are too large, trim them down until they fit snugly. If they are too small, you will need to recut them. Dry fitting is an essential step to avoid costly mistakes.
Applying Adhesive: Once you are satisfied with the fit of the laminate flooring, apply a generous bead of construction adhesive to the back of each piece. Ensure the adhesive is evenly distributed across the entire surface. Position the laminate flooring onto the stair tread or riser and press firmly into place. Use a tapping block and hammer to gently tap the flooring and ensure it is fully seated against the substrate.
Installing Stair Nosing: Stair nosing provides a finished edge to the stair treads and enhances safety. Measure and cut the stair nosing to the appropriate length, ensuring it overhangs the tread slightly. Apply construction adhesive to the underside of the stair nosing and position it on the front edge of the tread. Secure the stair nosing with clamps and allow the adhesive to dry completely, following the manufacturer's instructions.
Addressing Common Challenges
During the installation process, several challenges may arise. Understanding these potential issues and knowing how to address them can help ensure a successful outcome.
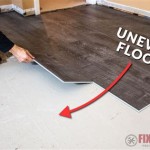
Uneven Stair Treads or Risers: Uneven surfaces are a common problem in older homes. If the stair treads or risers are significantly uneven, shimming is necessary to create a level surface. Use a level to identify low spots and insert shims underneath the laminate flooring until the surface is level. Secure the shims with construction adhesive.
Irregular Staircase Shapes: Some staircases have non-standard shapes, such as curved or winding steps. These require more complex cuts and fitting. Use a template to accurately transfer the shape of the stair tread or riser to the laminate flooring. A jigsaw is particularly useful for making these intricate cuts. Take your time and dry fit each piece carefully before applying adhesive.
Gaps or Seams: Small gaps or seams may appear between the laminate flooring pieces. These can be filled with color-matched caulk. Apply the caulk neatly and wipe away any excess with a damp cloth. The caulk will help to create a seamless and professional-looking finish.
Loose Laminate Flooring: If the laminate flooring becomes loose after installation, it may be due to insufficient adhesive or improper preparation of the substrate. Carefully remove the loose flooring, clean the surface, and reapply construction adhesive. Ensure the adhesive is evenly distributed and that the flooring is pressed firmly into place.
Addressing Obstacles: Many staircases may have handrails or other obstacles that need to be accounted for during installation. Carefully measure the position of these obstacles and cut the laminate flooring to fit around them. A jigsaw is particularly helpful for making these types of cuts. Consider using decorative trim pieces to cover any gaps or seams around the obstacles.

Laminate Stairs Installation How To Install Stair Tread Riser Overlap Nose Tips Mryoucandoityourself

Costco Harmonics Installation On Stairs Laminate Flooring Mohawk

Costco Harmonics Flooring Review And Installation

Costco Harmonics Flooring Review And Installation

Laminate And Stairnose Installation Select Surfaces

Camden Oak By Harmonics Installed At The Lake House Stair Remodel Engineered Wood Floors Flooring Options

Sunken Living Room Laminate Installation

How To Install Laminate On Stairs

Costco Harmonics Vineyard Cherry Laminate Review

How To Install Laminate On Stairs
Related Posts