Installing Hardwood Flooring on Walls: A Comprehensive Guide
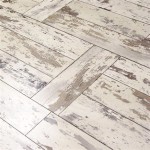
Hardwood flooring, traditionally associated with horizontal surfaces, is increasingly being utilized as a unique and visually appealing wall covering. This application offers a distinctive aesthetic, adding warmth, texture, and character to interior spaces. While the process shares some similarities with traditional flooring installation, adapting hardwood for vertical applications requires careful planning, precise execution, and an understanding of material properties and structural considerations. This article provides a detailed guide to installing hardwood flooring on walls, covering the essential steps, tools, and techniques necessary for a successful project.
Before embarking on the installation, it is crucial to assess the existing wall structure. The wall must be structurally sound, level, and capable of supporting the weight of the hardwood. Drywall or plaster surfaces are generally suitable, but walls exhibiting signs of damage, moisture, or significant irregularities require remediation before proceeding. A thorough inspection, potentially involving a professional contractor, is advised to ensure the integrity of the wall and prevent future issues such as sagging or detachment.
The choice of hardwood flooring is also paramount. Solid hardwood, while aesthetically pleasing, can be heavier and more susceptible to moisture expansion and contraction than engineered hardwood. In high-humidity environments, engineered hardwood is often preferred due to its enhanced stability and resistance to warping. The thickness and width of the planks should also be considered, as these factors directly influence the weight and visual impact of the finished wall. Lighter, thinner planks are generally easier to work with, particularly for larger wall areas.
Furthermore, consider the species of wood. Different wood species have varying degrees of hardness, grain patterns, and color variations. Selecting a species that complements the overall design aesthetic of the room is essential. Utilizing samples to visualize how the chosen hardwood will appear under the existing lighting conditions is a recommended practice. Proper acclimatization of the hardwood flooring is also critical. The wood should be stored in the room where it will be installed for several days prior to installation, allowing it to adjust to the room's temperature and humidity levels. This step minimizes the risk of expansion or contraction issues after installation.
Preparing the Wall Surface
Proper wall preparation is fundamental to a successful hardwood wall installation. This process involves several critical steps, beginning with thorough cleaning. Remove any dust, debris, or existing wall coverings, such as wallpaper or loose paint. A clean surface ensures proper adhesion of the adhesive or fastening system used to secure the hardwood planks.
Next, locate and mark the wall studs. These vertical structural members provide the strongest attachment points for securing the hardwood. Utilizing a stud finder and marking the stud locations with a pencil or tape is crucial for ensuring that fasteners are driven into solid wood, maximizing the holding power. The distance between studs is typically 16 or 24 inches on center, but this can vary depending on the construction of the wall.
After locating the studs, consider applying a moisture barrier. This is particularly important in potentially damp environments, such as bathrooms or basements. A polyethylene film or a specialized moisture-resistant paint can be applied to the wall surface to prevent moisture from penetrating the hardwood and causing damage. Overlapping the seams of the moisture barrier and sealing any penetrations, such as electrical boxes or plumbing fixtures, is essential for creating a continuous barrier.
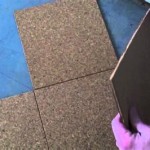
Finally, install furring strips if necessary. Furring strips are thin strips of wood that are attached to the wall to create a level surface for the hardwood planks. This is particularly useful if the wall is uneven or if you wish to create an air gap behind the hardwood, which can improve ventilation and reduce the risk of moisture buildup. Furring strips are typically attached to the wall studs using screws or nails. Ensuring that the furring strips are level and evenly spaced is crucial for a professional-looking result.
Installation Techniques
Several installation techniques can be employed to attach hardwood flooring to walls. The choice of technique depends on factors such as the type of hardwood, the wall structure, and the desired aesthetic. One common method involves using construction adhesive in conjunction with nails or screws.
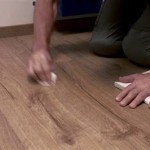
Begin by applying a bead of construction adhesive to the back of each hardwood plank. Choose an adhesive that is specifically designed for use with wood and that is compatible with the wall surface. Spread the adhesive evenly across the back of the plank, paying particular attention to the edges.
Next, position the plank on the wall, aligning it with the starting point. Press the plank firmly against the wall, ensuring that the adhesive makes solid contact with the surface. Use a level to ensure that the plank is straight and level. Secure the plank to the wall studs using finishing nails or screws. Space the fasteners evenly along the length of the plank, typically every 12 to 16 inches. Countersinking the fasteners slightly and filling the holes with wood filler creates a clean, professional finish.
Another technique involves using a brad nailer to attach the hardwood planks to the wall. This method is particularly well-suited for thinner hardwood planks and for installations where a minimal number of visible fasteners is desired. A brad nailer uses small-gauge nails to secure the planks to the wall, leaving only small, inconspicuous holes.
When using a brad nailer, position the nailer at a slight angle to the edge of the plank, driving the nails through the tongue of the plank and into the wall stud. This technique, known as "blind nailing," conceals the nail heads and creates a seamless appearance. Ensure that the nailer is properly adjusted to prevent the nails from protruding from the surface of the hardwood or from being driven too deep, which can damage the wood.
For larger installations, consider using a combination of adhesive and fasteners. This approach provides both immediate adhesion and long-term mechanical support. Apply adhesive to the back of the plank as described above, and then secure the plank to the wall studs using screws or nails. The adhesive will provide an initial bond, while the fasteners will prevent the plank from shifting or detaching over time.
Addressing Specific Challenges
Installing hardwood flooring on walls can present unique challenges, particularly when dealing with corners, edges, and obstacles such as electrical outlets and light switches. Careful planning and precise execution are essential for overcoming these challenges and achieving a professional-looking result.
When approaching corners, accurately measure and cut the hardwood planks to fit snugly against the adjacent wall. Using a miter saw to create precise angled cuts is highly recommended. Ensure that the corner joints are tight and seamless. If necessary, apply wood filler to any gaps and sand smooth after the filler has dried.
When working around electrical outlets and light switches, turn off the power to the circuit before proceeding. Use a hole saw or a jigsaw to cut out the necessary openings in the hardwood planks. Ensure that the openings are slightly larger than the outlets or switches to allow for easy access and to prevent the hardwood from interfering with their operation. Install outlet extenders or switch spacers to ensure that the outlets and switches are flush with the surface of the hardwood.
At the edges of the wall, consider installing trim or molding to create a finished look. Trim can cover any gaps or imperfections along the edges of the hardwood and can also provide a decorative element. Choose trim that complements the style of the hardwood and that is appropriate for the room's overall design aesthetic. Attach the trim to the wall using finishing nails or construction adhesive.
Maintaining consistent spacing between planks is vital for a visually appealing installation. Using spacers to ensure uniform gaps during installation is highly recommended. These spacers, often readily available from flooring suppliers, help maintain a consistent and even pattern across the entire wall surface. This is especially important when installing tongue-and-groove hardwood flooring, as consistent spacing allows for proper engagement of the tongue and groove.
Proper ventilation behind the installed hardwood can prevent moisture accumulation and potential damage. If installing hardwood in potentially damp areas, consider creating a small air gap between the back of the hardwood and the wall surface. This can be achieved by using furring strips or by applying a layer of breathable membrane to the wall before installing the hardwood. This allows air to circulate behind the hardwood, preventing moisture buildup and reducing the risk of mold or mildew growth.
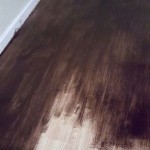
Finally, inspect the finished installation carefully, paying attention to any imperfections or areas that require attention. Touch up any nail holes or gaps with wood filler, and sand smooth. Apply a finish or sealant to the hardwood to protect it from moisture and wear. Allow the finish to dry completely before using the room.

How To Install Wood Flooring On The Wall Esb

Going Up The Wall Installing Flooring Vertically Floor Trends Installation

Laying Hardwoods Around A Wall Or Cabinet Peninsula New First Board

Wall Installation Of Engineered Hardwood Floor Expert

How To Install Laminate Flooring On Walls 7 Easy Steps Inc

How To Handle Corners And Walls When Installing Flooring Kaltimber Timber Merchant

Installing A Hardwood Floor Connecting Row Up Against Wall

Installing A Wood Floor Against The Wall

How To Install Hardwood Wall Coverings Quora

How To Install A Hardwood Floor Build This Weekend
Related Posts