Installing Hardwood Flooring on a Stair Landing: A Comprehensive Guide
Installing hardwood flooring on a stair landing can significantly enhance the aesthetic appeal and value of a home. While seemingly straightforward, this project requires careful planning, precise execution, and an understanding of the nuances involved. This article provides a comprehensive guide to installing hardwood flooring on a stair landing, covering preparation, installation techniques, and finishing considerations.
The stair landing, acting as a transition point between flights of stairs, often experiences high foot traffic. Therefore, selecting durable and aesthetically pleasing hardwood is crucial. The type of hardwood chosen should complement the existing flooring on the stairs and adjacent hallways. Common hardwood options include oak, maple, hickory, and engineered hardwood. Solid hardwood offers longevity and can be refinished multiple times, while engineered hardwood provides greater stability in fluctuating humidity conditions. The choice depends on the specific environment and individual preferences.
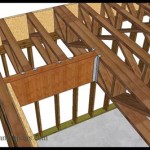
Before commencing the installation, a thorough assessment of the existing landing is essential. This includes checking for structural integrity, leveling issues, and the presence of any existing flooring materials that need to be removed. Addressing these issues early will prevent complications and ensure a successful installation. Ensuring proper subfloor preparation is particularly vital, as it directly impacts the stability and longevity of the hardwood flooring.
Key Point 1: Preparing the Stair Landing for Hardwood Installation
The preparation phase is arguably the most critical aspect of installing hardwood on a stair landing. A properly prepared landing ensures a level, stable, and secure base for the hardwood flooring. This involves several key steps:
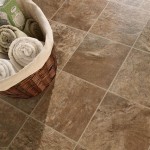
1. Removal of Existing Flooring: Begin by removing any existing flooring materials, such as carpet, vinyl, or tile. Use appropriate tools like a utility knife, pry bar, and scraper to carefully remove the existing flooring without damaging the subfloor. Pay close attention to removing all nails, staples, and adhesives.
2. Subfloor Inspection and Repair: Once the existing flooring is removed, thoroughly inspect the subfloor. Look for signs of damage, such as rot, water stains, or loose boards. Repair any damaged sections by replacing them with new plywood or OSB. Ensure that the replacement material is of the same thickness as the existing subfloor to maintain a level surface.
3. Leveling the Subfloor: Unevenness in the subfloor can cause the hardwood flooring to creak, flex, or even separate over time. Use a long level to identify any high or low spots. Level high spots by sanding them down with a belt sander or hand plane. Fill low spots with a self-leveling compound, following the manufacturer's instructions carefully. Allow the self-leveling compound to dry completely before proceeding.
4. Cleaning the Subfloor: After leveling and repairing the subfloor, thoroughly clean it to remove any dust, debris, or residue. Use a vacuum cleaner followed by a damp cloth to ensure a clean surface. A clean subfloor promotes better adhesion of adhesives and prevents the accumulation of moisture that can damage the hardwood.
5. Moisture Barrier Installation: Depending on the type of subfloor and the hardwood being installed, a moisture barrier may be necessary. This barrier protects the hardwood from moisture rising from the subfloor, preventing warping and cupping. Options include asphalt felt paper, polyethylene film, or specialized underlayment with a built-in moisture barrier. Overlap the edges of the moisture barrier by several inches and tape them securely to create a continuous seal.
6. Acclimation of Hardwood: Before installation, the hardwood flooring must acclimate to the environment in which it will be installed. This involves storing the hardwood in the room for several days, allowing it to adjust to the temperature and humidity levels. This prevents expansion or contraction of the hardwood after installation, minimizing the risk of gaps or buckling. Follow the manufacturer's recommendations for acclimation time and humidity levels.
Proper subfloor preparation is not solely based on addressing structural issues. The flatness and smoothness of the subfloor are equally important. Using a straightedge across the subfloor in multiple directions can reveal subtle variations that may not be visible to the naked eye. These variations, if not addressed, can lead to uneven flooring and potential problems down the line.
Key Point 2: Installing the Hardwood Flooring on the Landing
With the landing properly prepared, the next step involves the actual installation of the hardwood flooring. This requires careful planning, precise measurements, and the use of appropriate tools and techniques.
1. Planning the Layout: Before starting the installation, plan the layout of the hardwood flooring. Determine the direction in which the planks will be laid and consider any aesthetic or structural factors that may influence the layout. Aim to minimize cuts and waste by aligning the planks with the longest dimension of the landing. In some cases, running the flooring in the same direction as the stair treads can create a visually cohesive look.
2. Measuring and Cutting: Accurately measure the landing and the dimensions of the hardwood planks. Use a measuring tape, square, and pencil to mark the cutting lines on the planks. Use a circular saw or miter saw to make clean, precise cuts. Wear safety glasses and a dust mask to protect yourself from debris.
3. Adhesive Application (if applicable): If installing engineered hardwood or using an adhesive-assisted installation method, apply a thin, even layer of adhesive to the subfloor using a notched trowel. Follow the manufacturer's instructions for the type of adhesive and the trowel size. Work in small sections to prevent the adhesive from drying out before the planks are installed.
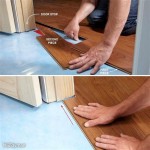
4. Installing the First Row: Begin by installing the first row of planks along the longest straight edge of the landing. Ensure that the first row is perfectly straight and aligned, as this will serve as the foundation for the rest of the installation. Use spacers along the walls to create a consistent expansion gap. This gap allows the hardwood to expand and contract without putting pressure on the surrounding walls.
5. Installing Subsequent Rows: Continue installing the remaining rows of planks, ensuring a tight fit between the planks. Use a tapping block and a hammer to gently tap the planks together, creating a seamless surface. Avoid excessive force, as this can damage the planks. If using a nail gun, ensure the correct air pressure is set to avoid damaging the tongue or groove of the wood.
6. Cutting Around Obstacles: When encountering obstacles such as posts or pipes, carefully measure and cut the planks to fit around them. Use a jigsaw or coping saw to make intricate cuts. Leave a small gap around the obstacles to allow for expansion and contraction. Cover the gaps with trim or molding to conceal them.
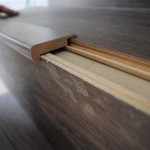
7. Completing the Installation: Once all of the planks are installed, remove the spacers along the walls. Install baseboards or quarter-round molding to cover the expansion gaps and provide a finished look. Secure the molding to the walls with nails or adhesive.
The use of proper tools significantly impacts the quality and efficiency of the installation. A high-quality jamb saw, for example, allows for precise undercutting of door casings, ensuring a seamless fit for the hardwood flooring. Similarly, a pneumatic nailer, if used correctly, can significantly speed up the installation process while providing a secure fastening solution.
Key Point 3: Finishing and Maintaining the Hardwood Landing
After the hardwood flooring is installed, the final step involves finishing and maintaining the surface to protect it from wear and tear and enhance its aesthetic appeal. Proper finishing and maintenance will ensure the longevity and beauty of the hardwood flooring for years to come.
1. Sanding the Surface (if necessary): If the hardwood flooring has any imperfections or unevenness after installation, sand the surface to create a smooth, even finish. Use a drum sander or orbital sander with varying grits of sandpaper, starting with a coarse grit and gradually progressing to a finer grit. Vacuum up the sanding dust thoroughly before proceeding.
2. Staining the Wood (optional): If desired, stain the hardwood flooring to achieve the desired color and tone. Apply the stain evenly with a brush, rag, or applicator pad. Allow the stain to penetrate the wood for the recommended time, then wipe off any excess stain. Allow the stain to dry completely before applying a finish.
3. Applying a Finish: Apply a clear finish to protect the hardwood flooring from scratches, stains, and moisture. Common finish options include polyurethane, varnish, and lacquer. Apply multiple coats of finish, allowing each coat to dry completely before applying the next. Lightly sand between coats to create a smooth, even surface. Follow the manufacturer's instructions for application and drying times.
4. Curing and Drying Time: Allow the finish to cure and dry completely before walking on the hardwood flooring. The curing time can vary depending on the type of finish and the environmental conditions. Avoid placing heavy furniture on the newly finished floor until it is fully cured.
5. Routine Cleaning: Regularly clean the hardwood flooring with a soft broom, vacuum cleaner, or dust mop to remove dust and debris. Avoid using harsh chemicals or abrasive cleaners, as these can damage the finish. Use a damp cloth or mop to clean up spills immediately. Ensure that the cloth or mop is only slightly damp, as excessive moisture can damage the wood.
6. Preventative Measures: Take preventative measures to protect the hardwood flooring from scratches and dents. Use rugs or mats in high-traffic areas to reduce wear and tear. Place felt pads under furniture legs to prevent scratches. Avoid wearing shoes with hard soles on the hardwood flooring.
The selection of the appropriate finish is crucial for both the aesthetic appeal and the longevity of the hardwood flooring. Water-based polyurethane finishes, for instance, offer excellent durability and low VOC emissions, making them a popular choice for environmentally conscious homeowners. Oil-based finishes, on the other hand, provide a richer, warmer tone and enhanced durability, albeit with a higher VOC content. Regular maintenance, including the occasional recoating with a fresh layer of finish, can significantly extend the lifespan of the hardwood flooring and maintain its pristine appearance.
Installing hardwood flooring on a stair landing is a rewarding project that can significantly enhance the value and beauty of a home. By carefully following these steps and paying attention to detail, homeowners can achieve professional-quality results that will last for years to come.

Stairs Installation Installing Hardwood On Stair Landing Mryoucandoityourself

Stair Landings Installing Hardwood Flooring On Your Steps

Landings In The Staircase

How To Put Hardwood On Stair Landing All Details From A Z Mryoucandoityourself

Hardwood Flooring On Stair Landing Laminate Stairs Remodel Wood

Stairs Installation How To Hardwood On Two Stair Landings In A Row Plan Of

Landings In The Staircase

110821 Lower Landing

Installing Laminate Flooring On Stairs Diy

7 Simple Steps To Install Hardwood Flooring On Stair Landing Tidy Floor Jahidul Alam
Related Posts