Installing Floating Laminate Flooring Over Ceramic Tiles: A Comprehensive Guide
Installing new flooring can dramatically transform the aesthetic of a room. When faced with the decision to update flooring, the option of installing floating laminate flooring over existing ceramic tiles often presents itself as a convenient and cost-effective solution. This method avoids the labor-intensive and potentially messy process of removing the old tiles, streamlining the renovation process. However, successful installation requires careful planning, preparation, and adherence to specific guidelines.
This article provides a comprehensive guide to installing floating laminate flooring over ceramic tiles, covering essential steps, considerations, and best practices. It aims to equip homeowners and contractors with the necessary knowledge to achieve a professional-looking and long-lasting result.
Key Point 1: Assessing the Suitability of the Subfloor
Before commencing any installation, a thorough assessment of the existing ceramic tile subfloor is crucial. The suitability of the existing tile directly impacts the longevity and performance of the new laminate flooring. Several factors must be considered.
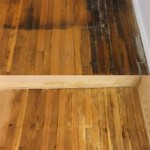
Firstly, the existing tile surface must be structurally sound. This entails checking for loose, cracked, or uneven tiles. Loose tiles must be securely reattached using appropriate adhesive. Cracked tiles should ideally be replaced, but if replacement is not feasible, they must be thoroughly filled with a leveling compound that is compatible with both ceramic and laminate flooring materials. A stable and solid subfloor is the foundation for a successful floating floor installation.
Secondly, the ceramic tile surface must be as level as possible. Significant unevenness can lead to flexing in the laminate flooring, potentially causing joint separation, premature wear, and an uncomfortable walking surface. A self-leveling compound can be used to correct minor imperfections and create a smooth, even base. This is particularly important if the grout lines are deep or wide, as these can telegraph through the laminate and create an uneven appearance.
Thirdly, the height difference between the tiled area and adjacent flooring must be considered. Installing laminate flooring adds to the overall floor height, potentially creating a tripping hazard or interfering with door clearance. Assess the height difference and determine if adjustments need to be made to doors, thresholds, or surrounding floor coverings to ensure a smooth transition. In some cases, the height difference might necessitate removing the existing tile after all.
Finally, moisture levels should be checked. Excess moisture can damage laminate flooring, causing it to warp or buckle. Use a moisture meter to test the moisture content of the ceramic tiles and the subfloor beneath. If excessive moisture is detected, the source must be identified and addressed before installing the laminate. Moisture barriers are crucial to prevent future moisture-related problems. A proper underlayment will provide that barrier, but further investigation into the source of the moisture is also required.
Careful evaluation of these factors ensures that the existing ceramic tile provides a suitable base for installing floating laminate flooring. Addressing any issues before installation prevents costly problems down the line and contributes to a durable and aesthetically pleasing final product.
Key Point 2: Preparing the Subfloor for Laminate Installation
Once the suitability of the ceramic tile subfloor has been established, meticulous preparation is essential. Proper preparation ensures that the laminate flooring is installed on a clean, smooth, and level surface, which is critical for its performance and longevity. This preparation involves a series of steps.
The first step is thoroughly cleaning the ceramic tile surface. Remove any dirt, dust, debris, and adhesive residue. This can be accomplished using a combination of sweeping, vacuuming, and mopping with a suitable cleaning solution. Pay particular attention to grout lines, as these can harbor dirt and grime. Ensure the floor is completely dry before proceeding to the next step. Any lingering moisture can interfere with the underlayment and laminate flooring.
The second step involves addressing any imperfections in the tile surface. As mentioned earlier, any cracks or unevenness should be corrected. Fill cracks with a concrete patching compound, allow to dry completely, and sand smooth. Use a self-leveling compound to address any significant unevenness across the entire surface. This compound should be applied according to the manufacturer's instructions, ensuring that it flows evenly and creates a smooth, level plane. Allow the self-leveling compound to cure completely before proceeding.
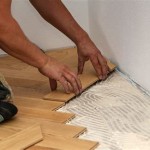
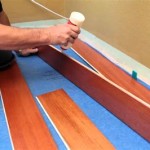
The third step is installing an appropriate underlayment. The underlayment serves several important functions. It provides a moisture barrier, cushioning, and sound insulation. It also helps to compensate for minor imperfections in the subfloor. Select an underlayment specifically designed for use with laminate flooring over hard surfaces like ceramic tile. Ensure the underlayment is rolled out and properly aligned, following the manufacturer's recommendations. Seams should be taped together to prevent moisture penetration and movement. Some laminate flooring products come with an attached underlayment, which simplifies the installation process. However, even with attached underlayment, it is sometimes recommended that a moisture barrier is installed separately in areas prone to higher humidity.
The final step is acclimatizing the laminate flooring. This involves allowing the laminate flooring to sit in the room where it will be installed for at least 48 to 72 hours before installation. This allows the laminate to adjust to the room's temperature and humidity, minimizing expansion and contraction after installation. Stacking the boxes in an overlapping way, with airflow between them, will help with the acclimatization process. Failure to acclimatize the laminate can result in gaps or buckling after installation.
By following these preparation steps diligently, the ceramic tile subfloor will be properly prepared for the installation of floating laminate flooring, resulting in a successful and long-lasting flooring solution.
Key Point 3: Installing the Laminate Flooring
With the subfloor properly prepared, the actual installation of the laminate flooring can begin. This process requires careful attention to detail and adherence to the manufacturer's instructions to ensure a professional-looking and durable result. While the general principles remain consistent, specific installation techniques may vary depending on the type and brand of laminate flooring.
The first step is planning the layout. Before starting the installation, carefully plan the layout of the laminate flooring. Determine the direction in which the planks will be laid, taking into account the room's dimensions and the direction of light. It is generally recommended to lay the planks parallel to the longest wall or the main source of light. This often creates a more visually appealing and spacious look. Consider the placement of transition strips and expansion gaps, ensuring adequate spacing along walls and around fixed objects.
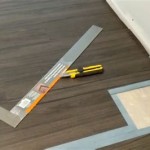
The second step involves installing the first row of planks. Begin by installing the first row of planks along a straight wall, leaving an expansion gap of approximately 1/4 to 3/8 inch between the planks and the wall. Use spacers to maintain the correct expansion gap. Most laminate flooring systems utilize a tongue-and-groove locking mechanism. Carefully align the tongue of the first plank with the groove of the adjacent plank and gently tap them together using a tapping block and hammer. Ensure the planks are securely locked together, forming a straight and even row.
The third step is proceeding with subsequent rows. Continue installing subsequent rows of planks, offsetting the end joints to create a staggered pattern. This enhances the aesthetic appeal and adds structural stability to the floor. Use the tapping block and hammer to ensure each plank is securely locked into place. Periodically check the alignment of the planks to ensure they remain straight and even. Cut planks as needed to fit around corners, doorways, and other obstacles. Use a saw with a fine-tooth blade to achieve clean and precise cuts.
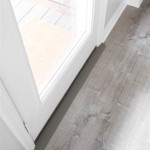
The fourth step is addressing doorways and transitions. At doorways and transitions to other flooring types, use transition strips to create a smooth and seamless transition. Transition strips are available in various materials and styles to match the laminate flooring and surrounding floor coverings. Ensure the transition strips are securely fastened to the subfloor, providing a safe and aesthetically pleasing transition.
The fifth step is installing baseboards and trim. Once the laminate flooring is installed, install baseboards and trim to cover the expansion gaps along the walls and create a finished look. The baseboards and trim should be securely attached to the wall, but not to the laminate flooring itself, to allow for expansion and contraction. This prevents the laminate from becoming trapped and potentially buckling. Quarter round molding can also be added where the baseboard meets the floor for a more decorative finish.
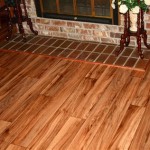
Finally, it is important to clean up the work area. After installing the laminate flooring, thoroughly clean the work area, removing any debris, dust, and scraps. Inspect the floor for any imperfections or gaps and address them as needed. With proper installation, following these steps will result in a beautiful and durable floating laminate floor over the existing ceramic tile.

Quick Guide To Laying Hybrid And Other Hard Flooring Over A Tile Floor

Installing Luxury Vinyl Over Existing Tiles Choices Flooring

Install Hardwood Flooring Over Tile Floor Double Glue Down Method

Laminate Flooring In Basement Install A Floating Floor Over Existing Tile The Money Pit

Can You Put Wood Floorboards Over Tiles Havwoods

How To Install A Floating Tile Floor

Can You Put Wood Floorboards Over Tiles Havwoods

Can You Put Laminate Flooring Over Tile Twenty Oak

How To Install Floating Vinyl Flooring Over Old Floors Simply2moms

Can You Install Vinyl Plank Flooring Over Tile Crystal Lake Il Area
Related Posts