Installing Engineered Hardwood Flooring: Essential Aspects
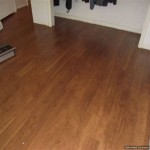
Engineered hardwood flooring is a versatile and durable flooring option that combines the beauty of natural hardwood with the stability and ease of maintenance of engineered flooring. Installing engineered hardwood flooring can be a rewarding DIY project, but it's important to understand the essential aspects to ensure a successful installation.
1. Preparation and Planning
Before starting the installation, prepare the subfloor by ensuring it is level, dry, and free from imperfections. Measure the room carefully to determine the amount of flooring required and calculate the layout, leaving sufficient expansion gaps around the perimeter.
2. Acclimation and Installation Method
Acclimate the engineered hardwood flooring to the room conditions for 24-48 hours before installation. Decide on the installation method, such as floating, nailing, or gluing, based on the manufacturer's instructions and the subfloor type.
3. Underlayment and Moisture Barrier
Install an underlayment, such as cork or foam, under the engineered hardwood flooring to provide a moisture barrier, reduce noise, and enhance comfort. Ensure a moisture barrier is used to prevent moisture damage to the flooring.
4. Starting Point and Plank Arrangement
Start the installation in the corner of the room and work towards the opposite side. Stagger the planks randomly to create a natural look and minimize the appearance of seams. Use spacers to maintain the expansion gaps and ensure a uniform appearance.
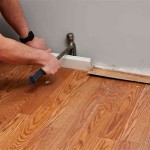
5. Cutting and Fitting
Measure, mark, and cut the engineered hardwood planks to fit around obstacles or at the end of rows. Use a sharp utility knife or saw to make clean cuts. For tight fits, use a tapping block and hammer to gently tap the planks into place.
6. Finishing Touches
Once the engineered hardwood flooring is installed, install baseboards, moldings, and transition strips to conceal the expansion gaps and create a finished look. Clean the floor thoroughly to remove any debris or dust.
Conclusion
Installing engineered hardwood flooring can be an achievable DIY project with careful planning and preparation. By following these essential aspects, you can create a beautiful and long-lasting flooring solution that enhances the value and aesthetic appeal of your home.

How To Install Lock Engineered Hardwood Flooring

How To Install An Engineered Hardwood Floor

How To Install Lock Engineered Hardwood Flooring

Installing Engineered Hardwood On Concrete Twenty Oak

How To Install Lock Engineered Hardwood Flooring

How To Install Lock Engineered Hardwood Flooring

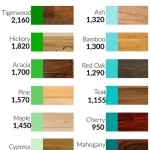
How Much Does It Cost To Install Engineered Hardwood Floors Floorings

How To Install Lock Engineered Hardwood Flooring

3 Methods For How To Install Engineered Hardwood Flooring

Engineered Hardwood Flooring Installation Errors And How To Avoid Them Reallyfloors America S Est
Related Posts