Installing 3/8 Inch Hardwood Flooring: A Comprehensive Guide
Installing 3/8-inch hardwood flooring can transform your home's interior with its timeless beauty and durability. While it may require some patience and precision, it's a rewarding DIY project that can add value to your property. Here's a comprehensive guide to walk you through the essential aspects of installing 3/8-inch hardwood flooring:
1. Preparation:
Before you start, ensure your subfloor is level, dry, and free from imperfections. Use a moisture meter to test the moisture content, which should be below 12%. Remove any baseboards or trim to accommodate the new flooring.
2. Underlayment:
An underlayment is essential for soundproofing, reducing squeaks, and providing a moisture barrier. Install a vapor barrier underlayment if there's no existing subfloor underlayment. Ensure the underlayment is smooth and free from wrinkles.
3. Starting Row:
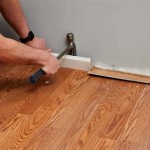
Start installing the flooring in a corner of the room and leave a 1/2-inch expansion gap around the edges to allow for natural expansion and contraction. Install a spacing wedge or a scrap piece of underlayment against the wall to maintain the gap.
4. Tongue-and-Groove Installation:
3/8-inch hardwood flooring typically features a tongue-and-groove system for seamless installation. Align the tongue of one plank into the groove of another, ensuring a tight fit. Use a tapping block and hammer to gently tap the planks together, ensuring they are flush.
5. Staggering Joints:
To prevent buckling or warping, stagger the joints of consecutive rows. Avoid lining up the end joints of adjacent planks directly above each other. This will distribute weight evenly and reduce the risk of damage.
6. Cutting and Fitting:
Use a miter saw or a circular saw to cut planks for corners or around obstacles. Measure carefully and use spacers to ensure proper fit. For corners, miter the ends at a 45-degree angle to create seamless transitions.
7. Nailing or Stapling:
Secure the flooring to the subfloor using nails or staples. Use an angled nailer for nails and a flooring stapler for staples. Drive nails or staples at a 45-degree angle through the tongue of the planks into the subfloor. Ensure the nails are recessed slightly below the surface.
8. Finishing Touches:
Once all the planks are installed, remove the spacing wedges and reinstall the baseboards and trim. Caulk the expansion gaps to seal them and prevent moisture penetration. Sand down any uneven transitions and apply a protective finish, such as polyurethane or wax, to enhance durability and protect the flooring.
By following these steps and taking your time, you can successfully install 3/8-inch hardwood flooring and enjoy its beauty and timeless appeal for years to come.

How To Install Hardwood Flooring The Home Depot

How To Install Hardwood Flooring The Home Depot

How To Install Hardwood Flooring Step By Forbes Home

How To Install Hardwood Flooring The Home Depot

How To Install Engineered Hardwood Floors 4 Easy Installation Options

How Thick Is Hardwood Flooring A Thickness Guide Reallyfloors America S Est

How To Install Lock Engineered Hardwood Flooring

How To Install Hardwood Flooring The Home Depot

How To Install Lock Engineered Hardwood Flooring

How To Install Hardwood Flooring The Home Depot
Related Posts


