Installing Vinyl Flooring Over Concrete: A Comprehensive Guide
Vinyl flooring stands as a popular choice for both residential and commercial spaces due to its durability, water resistance, and ease of maintenance. One common substrate for vinyl flooring installation is concrete. However, successful installation requires careful preparation and adherence to specific guidelines. This article provides a comprehensive guide on installing vinyl flooring over concrete, outlining the necessary steps, considerations, and best practices to ensure a long-lasting and aesthetically pleasing result.
The type of vinyl flooring selected will influence the installation process. Sheet vinyl, vinyl planks, and vinyl tiles each have unique installation requirements. Sheet vinyl typically requires a full adhesive bond to the subfloor and is best suited for areas with high moisture exposure, such as bathrooms or laundry rooms. Vinyl planks and tiles offer more design flexibility and can be installed using a variety of methods, including glue-down, click-lock, or peel-and-stick options.
Before beginning any installation, proper assessment and preparation of the concrete subfloor are paramount. Neglecting this crucial step can lead to issues such as adhesive failure, uneven flooring, and premature wear. The following sections detail the necessary steps to ensure a successful vinyl flooring installation over concrete.
Preliminary Assessment of the Concrete Subfloor
The first step in preparing for vinyl flooring installation is a thorough assessment of the concrete subfloor. This involves checking for moisture content, flatness, and any existing damage. Identifying potential problems early allows for corrective measures to be taken before the flooring is installed, preventing future complications.
Moisture Testing: Concrete is inherently porous, and excess moisture can migrate through the slab, leading to adhesive failure and mold growth beneath the vinyl flooring. Several methods exist for testing moisture levels. A calcium chloride test, also known as an anhydrous calcium chloride test, measures the moisture vapor emission rate (MVER) of the concrete. This involves placing a measured amount of calcium chloride on the concrete surface under a sealed dome for a specific period. The increase in weight of the calcium chloride indicates the amount of moisture absorbed. Manufacturers of vinyl flooring typically specify the maximum acceptable MVER for their products. A relative humidity (RH) test, which involves drilling a small hole in the concrete and inserting a probe to measure the humidity within the slab, is another common method. Again, the manufacturer's specifications should be consulted to determine acceptable RH levels.
Flatness Assessment: Vinyl flooring requires a relatively flat and even surface for proper adhesion and a uniform finished appearance. Use a straightedge, typically 6 to 10 feet long, to identify any high or low spots in the concrete. Place the straightedge on the floor in multiple directions and measure the gaps between the straightedge and the concrete surface. Small imperfections can often be addressed with a self-leveling compound. However, significant variations may require more extensive surface preparation.
Damage Inspection: Carefully inspect the concrete for cracks, holes, and other damage. Small cracks can be filled with a concrete patching compound. Larger cracks, especially those that are actively moving, may indicate structural problems and require professional evaluation and repair. Remove any loose debris, old adhesive, or paint from the surface. A scraper or floor grinder can be used to remove stubborn materials.
Cleaning the Subfloor: Once the initial assessment is complete, thoroughly clean the concrete surface. Vacuum the entire area to remove dust and debris. Then, scrub the floor with a mild detergent solution to remove any remaining dirt or stains. Rinse the floor thoroughly with clean water and allow it to dry completely before proceeding. Avoid using harsh chemicals or solvents, as they can interfere with the adhesion of the vinyl flooring.
Preparing the Concrete Subfloor for Installation
After assessing the concrete, the next step involves preparing the surface to ensure a strong bond with the vinyl flooring adhesive. This includes addressing any issues identified during the assessment process, such as moisture problems, unevenness, and surface contaminants.
Moisture Mitigation: If moisture testing reveals unacceptable levels of moisture, moisture mitigation measures must be taken. Several options are available, including applying a moisture barrier coating to the concrete surface. These coatings are designed to prevent moisture from migrating through the slab and damaging the flooring. Follow the manufacturer's instructions carefully when applying a moisture barrier, ensuring proper coverage and cure time. Another option is to install a subfloor system with a built-in moisture barrier. These systems typically consist of interlocking tiles or planks that create a barrier between the concrete and the vinyl flooring.
Leveling the Subfloor: Unevenness in the concrete subfloor can be corrected using a self-leveling compound. This liquid mixture is poured onto the floor and spreads to fill in low spots and create a smooth, level surface. Before applying the self-leveling compound, prime the concrete surface according to the manufacturer's instructions. This helps to improve adhesion and prevent the compound from drying too quickly. Pour the self-leveling compound in a consistent thickness, following the manufacturer's recommendations. Use a gauge rake or spreader to ensure even distribution. Allow the compound to dry completely before proceeding with the vinyl flooring installation.
Surface Preparation: Ensure the concrete surface is clean, dry, and free of any contaminants that could interfere with adhesion. Grinding the surface with a concrete grinder can create a slightly rough texture, which improves the bond between the adhesive and the concrete. This is especially important for smooth, polished concrete surfaces. After grinding, vacuum the floor thoroughly to remove any dust or debris. Applying a primer specifically designed for vinyl flooring can further enhance adhesion. Choose a primer that is compatible with the adhesive being used. Follow the manufacturer's instructions for application and drying time.
Acclimation of Vinyl Flooring: Before installation, allow the vinyl flooring to acclimate to the room's temperature and humidity for at least 48 to 72 hours. This allows the material to expand or contract, minimizing the risk of gaps or buckling after installation. Store the vinyl flooring in the room where it will be installed, ensuring it is laid flat and not exposed to direct sunlight or extreme temperatures.
Installation Techniques and Best Practices
The final step is the actual installation of the vinyl flooring. The specific techniques used will depend on the type of vinyl flooring and the chosen installation method. This section outlines general guidelines and best practices for installing vinyl flooring over concrete.
Glue-Down Installation: Glue-down installation is a common method for sheet vinyl, vinyl planks, and vinyl tiles. Choose an adhesive that is specifically designed for vinyl flooring and compatible with the concrete subfloor. Apply the adhesive to the concrete surface using a trowel with the appropriate notch size, following the manufacturer's recommendations. Work in small sections to prevent the adhesive from drying out before the flooring is installed. Carefully position the vinyl flooring and press it firmly into the adhesive. Use a flooring roller to ensure full contact and remove any air pockets. Wipe away any excess adhesive immediately.
Click-Lock Installation: Click-lock vinyl planks and tiles feature interlocking edges that allow them to be joined together without adhesive. This method is relatively easy and quick, making it a popular choice for DIY projects. Start by laying the first row of planks or tiles along a straight edge, such as a wall. Align the interlocking edges and snap the pieces together. Use a tapping block and hammer to gently secure the joints. Continue laying the flooring row by row, ensuring the seams are tightly fitted. Leave a small expansion gap around the perimeter of the room to allow for expansion and contraction.
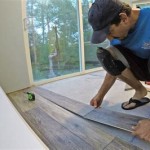
Peel-and-Stick Installation: Peel-and-stick vinyl tiles have a self-adhesive backing that allows them to be easily applied to the concrete subfloor. Ensure the subfloor is clean, dry, and level before installation. Peel off the protective backing and carefully position the tile on the floor. Press firmly to ensure a strong bond. Use a flooring roller to further secure the tile. This method is suitable for small areas and is relatively easy to install, but the long-term durability may be less than glue-down or click-lock installations.
Cutting and Fitting: Accurate cutting and fitting are essential for a professional-looking installation. Use a sharp utility knife and a straightedge to cut the vinyl flooring to the desired size and shape. When cutting around obstacles, such as pipes or door frames, use a template or measure carefully to ensure a precise fit. For sheet vinyl, consider making a paper template of the room to ensure accurate cuts.
Finishing Touches: After the vinyl flooring is installed, install baseboards or quarter-round molding to cover the expansion gap around the perimeter of the room. This provides a finished look and protects the edges of the flooring. Clean the floor thoroughly to remove any dust or debris. Allow the adhesive to fully cure before placing furniture or heavy objects on the floor, following the manufacturer's recommendations.
By following these guidelines and best practices, a successful and long-lasting vinyl flooring installation over concrete can be achieved. Careful preparation, proper installation techniques, and attention to detail are crucial for ensuring a beautiful and durable finished product.

How To Prepare A Concrete Floor For Vinyl Flooring Parrys

Tips For Installing Vinyl Plank Over Concrete Floors Lemon Thistle

Easy Ways To Install Vinyl Plank Flooring On Concrete

Easy Ways To Install Vinyl Plank Flooring On Concrete

Best How To Install Vinyl Plank Flooring Four Generations One Roof

How To Install Vinyl Or Laminate Floors In A Basement Over Concrete Slab

Laminate Flooring On Concrete Basement Floors Expert Installation Guide Csg Renovation

Best How To Install Vinyl Plank Flooring Four Generations One Roof

Installing Vinyl Floor Tile On Cement Garage Basement

How To Install Vinyl Plank Flooring On Concrete Step By Guide
Related Posts