How To Whitewash a Wooden Floor
Whitewashing a wooden floor is a popular technique for creating a light, airy, and rustic aesthetic. It allows the natural grain of the wood to show through while imparting a subtle white or light-colored hue. This method can transform a dark and dated floor into a bright and modern focal point. The process involves applying a diluted paint or specialized whitewash product to the wood surface, followed by wiping away the excess to achieve the desired level of transparency.
Proper preparation is crucial for a successful whitewashing project. This involves thorough cleaning, sanding, and, in some cases, the application of a primer. The type of wood, its existing finish, and the desired final look all influence the specific steps required. This article provides a comprehensive guide to whitewashing a wooden floor, covering everything from necessary materials to application techniques.
Key Considerations Before You Begin
Before starting the whitewashing process, several factors should be carefully considered. These considerations will impact the final appearance and longevity of the whitewashed floor.
Firstly, the type of wood floor you have is a significant factor. Softer woods like pine absorb more stain and paint, leading to a more pronounced whitewashed effect. Hardwoods like oak or maple are less porous, resulting in a subtler effect. Understanding the wood's characteristics will help you adjust the whitewashing technique accordingly.
Secondly, the existing finish on the floor needs to be addressed. If the floor has a thick polyurethane coating, it must be sanded down to the bare wood for the whitewash to properly penetrate. Conversely, if the floor has a thin or worn finish, a light sanding may suffice. Skipping this step can result in poor adhesion and an uneven finish.
Thirdly, the desired level of transparency should be determined. Some prefer a very subtle whitewash, allowing the wood grain to be highly visible. Others prefer a more opaque finish, where the white is more pronounced. Experimenting with different dilutions of the whitewash product on a small, inconspicuous area is recommended to determine the optimal mixture for your desired outcome. Consider the overall lighting in the room and how the whitewashed floor will interact with it.
Materials and Tools Required
Having the right tools and materials is essential for a smooth and efficient whitewashing process. The following is a list of necessary items:
Sandpaper: A variety of grits will be needed. Coarse grits (e.g., 40-60 grit) are suitable for removing existing finishes, while finer grits (e.g., 120-180 grit) are used for smoothing the surface and preparing it for the whitewash. A very fine grit (220 grit or higher) may be needed between coats of the whitewash and sealant.
Sander: A floor sander is recommended for large areas. An orbital sander can be used for smaller areas and edges. Ensure the sander is appropriate for the type of wood and the amount of material that needs to be removed.
Vacuum Cleaner: A powerful vacuum cleaner with a brush attachment is necessary for removing sanding dust. Cleanliness is crucial for proper adhesion of the whitewash.
Tack Cloth: Tack cloths are used to remove any remaining fine dust particles after vacuuming. These cloths are treated with a sticky substance that attracts and traps dust.
Whitewash Product: Choose a product specifically designed for whitewashing wood. Options include diluted latex paint, lime wash, and specialized whitewash stains. Consider the desired finish, durability, and ease of application when selecting a product. Latex paint is often a cost-effective and readily available option.
Paintbrushes/ Applicator Pads: High-quality paintbrushes or applicator pads are needed for applying the whitewash. The size and type of brush or pad will depend on the size of the area and the desired application technique.
Rags: Clean, lint-free rags are essential for wiping away excess whitewash and achieving the desired level of transparency. Microfiber cloths are a good option.
Buckets: Buckets are needed for mixing the whitewash solution and for rinsing brushes and rags.
Painter's Tape: Painter's tape is used to protect baseboards, walls, and other areas from accidental splatters or spills.
Safety Gear: Safety glasses, a dust mask, and gloves are essential for protecting yourself from dust, fumes, and chemicals. A respirator is highly recommended during sanding.
Sealer/Topcoat: A durable sealer or topcoat is necessary to protect the whitewashed floor from wear and tear. Polyurethane, water-based acrylic, or wax are common options. Consider the desired sheen level (matte, satin, or gloss) and durability requirements when selecting a sealer.
Step-by-Step Whitewashing Process
The whitewashing process involves several key steps that need to be followed carefully to achieve a professional-looking result.
Preparation:
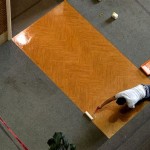
Begin by thoroughly cleaning the floor with a wood cleaner to remove any dirt, grime, or grease. Allow the floor to dry completely before proceeding.
Next, sand the floor to remove any existing finish and create a smooth surface for the whitewash. Start with a coarse grit sandpaper (40-60 grit) to remove the bulk of the finish, then gradually move to finer grits (120-180 grit) to smooth the surface. Ensure the sanding is even and consistent across the entire floor.
Vacuum the floor thoroughly to remove all sanding dust. Pay close attention to corners, edges, and crevices. Following vacuuming, wipe the floor with a tack cloth to remove any remaining fine dust particles.
Use painter's tape to protect baseboards, walls, and other areas from accidental splatters or spills. This will save time and effort during the cleanup process.
Application:
Prepare the whitewash solution according to the manufacturer's instructions. If using latex paint, dilute it with water to achieve the desired level of transparency. A common ratio is 1 part paint to 1 part water, but experimentation may be necessary to find the optimal mixture.
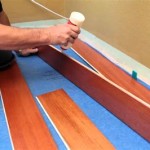
Apply the whitewash to the floor using a paintbrush or applicator pad. Work in small sections, following the grain of the wood. Apply the whitewash evenly and avoid applying too much at once.
Immediately after applying the whitewash, use a clean, lint-free rag to wipe away the excess. This step is crucial for achieving the desired level of transparency and allowing the wood grain to show through. The amount of wiping will determine the final look. For a more subtle whitewash, wipe more aggressively. For a more opaque finish, wipe more lightly.
Allow the first coat of whitewash to dry completely according to the manufacturer's instructions. Drying times can vary depending on the product and environmental conditions.
Inspect the floor for any unevenness or imperfections. If necessary, lightly sand the floor with a very fine grit sandpaper (220 grit or higher) to smooth out any rough spots. Vacuum and wipe the floor with a tack cloth again to remove any sanding dust.
Apply a second coat of whitewash if desired. Repeat the application and wiping process as described above. Multiple coats may be necessary to achieve the desired level of opacity.
Allow the final coat of whitewash to dry completely.
Sealing:
Once the whitewash is completely dry, apply a durable sealer or topcoat to protect the floor from wear and tear. Polyurethane, water-based acrylic, or wax are common options. Follow the manufacturer's instructions for application. Apply the sealer evenly and avoid applying too much at once.
Allow the sealer to dry completely according to the manufacturer's instructions. Drying times can vary depending on the product and environmental conditions.
Apply additional coats of sealer as needed, following the manufacturer's instructions. Multiple coats will provide greater protection and durability.
Allow the final coat of sealer to dry completely before walking on the floor. Avoid placing furniture on the floor for at least 24-48 hours to allow the sealer to fully cure.
Remove the painter's tape and clean up any spills or messes.
The floor should now be ready for use. Regular cleaning and maintenance will help to preserve its beauty and extend its lifespan.

Wood Floor Refinishing And Whitewashing The Honeycomb Home

Diy Whitewashed Wood Floors Renovation Semi Pros

Sanding And Whitewashing Wood Floors

Diy Whitewashed Wood Floors Renovation Semi Pros

Nostalgiecat How To Whitewash Wooden Flooring

Diy Whitewashed Wood Floors Renovation Semi Pros

Whitewash Hardwood Floors Wood Flooring La

How To White Wash Lime Wood Flooring Oak Timber
:strip_icc()/10194750920whitewash20floors20step202-99eae86a2dd746d9b89b35a639a0973a.jpg?strip=all "How To Whitewash Hardwood Flooring For A Fresher Aesthetic")
How To Whitewash Hardwood Flooring For A Fresher Aesthetic

How To Whitewash Hardwood Floors The Right Way Flooring Girl
Related Posts