How To Whitewash Wood Floors: A Comprehensive Guide
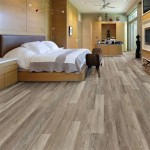
Whitewashing wood floors is a popular technique for achieving a light, airy, and subtly rustic aesthetic. It involves applying a diluted paint or stain to the wood surface, allowing the natural grain to remain visible. This method creates a translucent effect, brightening the room while retaining the character of the underlying wood. This article provides a detailed guide on how to effectively whitewash wood floors, covering preparation, application, and finishing techniques.
Before initiating the whitewashing process, it's crucial to understand the potential benefits and considerations. Whitewashing can significantly brighten a room, making it feel larger and more inviting. It also complements a variety of interior design styles, from Scandinavian to coastal. However, it's important to note that whitewashing is not a surface-level treatment; it penetrates the wood, making it a relatively permanent finish. Therefore, careful planning and execution are essential to achieve the desired outcome.
The type of wood floor will also influence the final result. Hardwoods like oak and maple tend to absorb the whitewash more evenly than softer woods like pine, which may show more pronounced variations in color. The existing finish on the floor must also be considered. If the floor has a varnish or polyurethane coating, it must be removed before whitewashing to allow the whitewash to properly penetrate the wood. Ignoring these considerations can lead to an uneven or undesirable finish.
Key Point 1: Thorough Preparation is Paramount
Successful whitewashing hinges on meticulous preparation. The floor must be clean, smooth, and free of any existing finishes. Neglecting this stage can result in an uneven and unprofessional-looking outcome. This section details the necessary steps for preparing your wood floors for whitewashing.
Step 1: Cleaning the Floor: Start by thoroughly cleaning the wood floor. Sweep or vacuum to remove any loose debris, dust, and dirt. Subsequently, use a wood floor cleaner and a damp mop (not soaking wet) to remove any remaining grime or surface contaminants. Allow the floor to dry completely before proceeding.
Step 2: Removing the Existing Finish: If the floor has an existing varnish, polyurethane, or other sealant, it must be removed. There are two primary methods for removing the finish: sanding and chemical stripping. Sanding is often the preferred method, particularly for larger areas, as it provides a consistent and controllable means of removing the finish. For intricate areas or floors with multiple layers of finish, chemical stripping may be more effective. Always follow the manufacturer's instructions when using chemical strippers and ensure adequate ventilation.
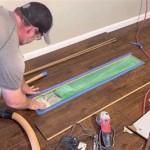
Step 3: Sanding the Floor: Sanding is a critical step in preparing the wood floor for whitewashing. It creates a smooth, even surface that allows the whitewash to penetrate uniformly. Begin with a coarse-grit sandpaper (e.g., 40- or 60-grit) to remove the bulk of the existing finish. Proceed to medium-grit sandpaper (e.g., 80- or 100-grit) to further refine the surface. Finally, use fine-grit sandpaper (e.g., 120- or 150-grit) to achieve a smooth, paint-ready finish. Always sand in the direction of the wood grain to avoid scratching the surface. Use a floor sander for large areas and an edge sander for corners and along walls.
Step 4: Cleaning After Sanding: After sanding, thoroughly vacuum the floor to remove all sanding dust. Use a tack cloth to wipe down the surface, ensuring that no dust particles remain. Dust particles can interfere with the whitewash application and result in a textured finish.
Step 5: Addressing Imperfections: Inspect the floor for any imperfections, such as nail holes, cracks, or gouges. Fill these imperfections with wood filler that matches the color of the wood. Allow the wood filler to dry completely according to the manufacturer's instructions. Once dry, sand the filled areas smooth, blending them seamlessly with the surrounding wood.
Step 6: Spot Testing: Before applying the whitewash to the entire floor, it's highly recommended to test it in an inconspicuous area, such as a closet or under furniture. This allows you to assess the color and opacity of the whitewash and make any necessary adjustments before committing to the entire floor.
Key Point 2: Selecting the Right Whitewashing Product and Application Technique
Choosing the appropriate whitewashing product and applying it correctly are crucial for achieving the desired aesthetic. The selection depends on the desired opacity, durability, and the type of wood being treated. This section details various options and application techniques.
Product Options: There are several product options available for whitewashing wood floors, each offering a slightly different effect:
- Whitewash Paint: This is a diluted latex or acrylic paint. It provides a broader range of color options and opacity control.
- Whitewash Stain: This is a specifically formulated stain designed to penetrate the wood while maintaining its natural grain. It typically offers less opacity than paint.
- Pickling Stain: Similar to whitewash stain, pickling stain often contains a pigment that enhances the grain and adds a subtle color.
Dilution: Whether using paint or stain, dilution is key to achieving the whitewashed effect. The ratio of paint or stain to water (or the appropriate thinner, as recommended by the manufacturer) will determine the opacity of the finish. A common starting point is a 1:1 ratio (one part paint/stain to one part water/thinner). However, this can be adjusted based on the desired effect and the absorbency of the wood. Experiment with different ratios during the spot testing phase to determine the ideal dilution for your specific floor.
Application Techniques: Several application methods can be employed, each resulting in a slightly different finish:
- Brush Application: Applying the whitewash with a brush is suitable for smaller areas or for achieving a more textured look. Use a high-quality brush and apply the whitewash in the direction of the wood grain.
- Roller Application: A roller is efficient for covering larger areas quickly and evenly. Use a low-nap roller for a smooth finish.
- Rag Application: Applying the whitewash with a rag creates a softer, more subtle effect. Dip a lint-free rag into the diluted whitewash and wipe it onto the floor. Immediately wipe off any excess with a clean rag. This method allows for greater control over the opacity and creates a more distressed look.
Application Process: Regardless of the chosen application method, apply the whitewash in thin, even coats. Avoid applying too much whitewash at once, as this can lead to an uneven finish. Work in manageable sections and overlap each section slightly to ensure complete coverage. After applying the whitewash, allow it to penetrate the wood for a few minutes before wiping off the excess with a clean, dry rag (if using the rag application method) or allowing it to dry completely (if using the brush or roller application method). The longer the whitewash is left on the wood, the more opaque the finish will be.
Multiple Coats: Depending on the desired opacity, multiple coats of whitewash may be necessary. Allow each coat to dry completely before applying the next. Lightly sand the floor with fine-grit sandpaper between coats to ensure a smooth finish. Remove any sanding dust before applying the subsequent coat.
Key Point 3: Protecting the Whitewashed Floor with a Topcoat
Whitewashing alone doesn't provide sufficient protection for wood floors. A topcoat is essential to protect the whitewash and the wood beneath from wear and tear, moisture, and stains. This section details the selection and application of a suitable topcoat.
Topcoat Options: Several topcoat options are available, each offering different levels of durability and sheen:
- Water-Based Polyurethane: This is a popular choice due to its durability, low odor, and quick drying time. It is also available in a variety of sheens, from matte to glossy.
- Oil-Based Polyurethane: This offers greater durability than water-based polyurethane but has a stronger odor and takes longer to dry. It also tends to yellow over time, which may alter the color of the whitewash.
- Wax: Wax provides a natural, matte finish and is easy to apply. However, it offers less protection than polyurethane and requires more frequent maintenance.
Sheen Selection: The sheen of the topcoat will significantly impact the overall appearance of the floor. Matte finishes provide a natural, understated look, while glossy finishes create a more reflective and dramatic effect. Satin sheens offer a balance between matte and glossy. Consider the room's lighting and the desired aesthetic when selecting the sheen. Matte and satin sheens tend to hide imperfections better than glossy sheens.
Application: Apply the topcoat according to the manufacturer's instructions. Typically, multiple thin coats are preferable to one thick coat. This ensures even coverage and minimizes the risk of drips or runs. Use a high-quality brush or roller designed for applying polyurethane. Apply the topcoat in the direction of the wood grain and overlap each section slightly.
Sanding Between Coats: Lightly sand the floor with fine-grit sandpaper (e.g., 220-grit) between coats of topcoat to ensure a smooth finish. This removes any imperfections or bubbles that may have formed during the drying process. Remove any sanding dust before applying the subsequent coat.
Drying Time: Allow each coat of topcoat to dry completely according to the manufacturer's instructions before applying the next. Proper drying time is crucial for achieving a durable and long-lasting finish. Avoid walking on the floor during the drying process.
Whitewashing wood floors requires careful planning and execution. By thoroughly preparing the floor, selecting the right whitewashing product and application technique, and protecting the finish with a suitable topcoat, it is possible to achieve a beautiful and durable whitewashed floor that enhances the aesthetic of any room.

Wood Floor Refinishing And Whitewashing The Honeycomb Home

Sanding And Whitewashing Wood Floors

Diy Whitewashed Wood Floors Renovation Semi Pros

Diy Whitewashed Wood Floors Renovation Semi Pros

Nostalgiecat How To Whitewash Wooden Flooring

Diy Whitewashed Wood Floors Renovation Semi Pros

Whitewash Hardwood Floors Wood Flooring La

How To Whitewash Hardwood Floors The Right Way Flooring Girl
:strip_icc()/10194750920whitewash20floors20step202-99eae86a2dd746d9b89b35a639a0973a.jpg?strip=all "How To Whitewash Hardwood Flooring For A Fresher Aesthetic")
How To Whitewash Hardwood Flooring For A Fresher Aesthetic

How To White Wash Lime Wood Flooring Oak Timber
Related Posts