How To Replace a Damaged Laminate Flooring Piece in the Middle of the Floor
Laminate flooring offers a cost-effective and aesthetically pleasing alternative to hardwood, but it is not impervious to damage. Scratches, gouges, stains, and even water damage can necessitate the replacement of individual planks. Replacing a piece located in the middle of the floor, rather than along the edge, requires a slightly different approach than a standard replacement. This article provides a comprehensive guide to tackling this task, ensuring a seamless and professional-looking repair.
Before beginning any repair, it is important to assess the extent of the damage. Superficial scratches can often be addressed with touch-up kits specifically designed for laminate flooring. Deeper gouges might be filled with a laminate filler compound and then colored to match the surrounding floor. However, if the damage is significant, such as swelling due to water exposure or a large, irreparable crack, replacing the entire plank is the most effective solution.
Gathering Necessary Tools and Materials
Successful laminate flooring repair hinges on having the right tools and materials at hand. Rushing into the project without proper preparation is a recipe for frustration and potential damage to the surrounding floor. Below is a detailed list of essential items:
*Replacement Laminate Plank:
Sourcing an exact match is crucial. If the original flooring installation left behind extra planks, this task is simplified. If not, a diligent search through retailers who carry the original manufacturer's product line will be necessary. Pay careful attention to the color, texture, and thickness of the replacement plank. Even slight variations can be noticeable. *Safety Glasses:
Protecting the eyes from flying debris is paramount. Laminate flooring can splinter during cutting and prying, making safety glasses an indispensable safety measure. *Work Gloves:
Protecting the hands from cuts and abrasions is also important, especially when using sharp tools. Work gloves provide a secure grip and safeguard against potential injuries. *Tape Measure:
Accurate measurements are vital for precise cuts. A quality tape measure ensures that the replacement plank fits seamlessly within the existing flooring. *Pencil:
Marking the cut lines on the damaged and replacement planks requires a reliable pencil. A sharp pencil ensures clean and accurate lines. *Circular Saw or Multi-Tool with a Fine-Tooth Blade:
A circular saw, equipped with a fine-tooth laminate blade, is ideal for making long, straight cuts. A multi-tool with a similar blade offers greater maneuverability for plunge cuts and working in tight spaces. The blade must be specifically designed for laminate to prevent chipping. *Chisel:
A sharp chisel is required to remove fragments of the damaged plank after initial cuts. Different sizes can be useful for varying degrees of precision. *Hammer:
A hammer is used in conjunction with the chisel to carefully break away the damaged plank. A rubber mallet can be used to gently tap replacement pieces into place. *Pry Bar:
A small pry bar assists in lifting the damaged plank fragments from the floor. Exercise caution to avoid damaging the surrounding flooring. *Vacuum Cleaner:
Keeping the work area clean is vital. A vacuum cleaner removes dust and debris, preventing them from becoming lodged between the replacement plank and the subfloor. *Wood Glue (Optional):
In some cases, a small amount of wood glue may be applied to the edges of the replacement plank for added stability, especially if the locking mechanism is compromised. Ensure the glue is compatible with laminate flooring. *Tapping Block and Pull Bar (Optional):
These tools may be used to ensure a tight fit when installing click-lock laminate. They help to protect the edges of the laminate during hammering.Removing the Damaged Laminate Plank
The removal process is perhaps the most delicate part of the entire operation. Careless actions can easily damage the surrounding planks, turning a single-plank replacement into a more extensive and costly repair. It's important to proceed slowly and methodically.
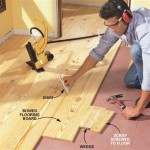
The initial step involves creating access to remove the damaged section. This is achieved by making several cuts within the damaged plank using the circular saw or multi-tool. Set the blade depth to match the thickness of the laminate flooring to avoid cutting into the subfloor. Make sure to wear safety glasses during this process.
The first cut should be made lengthwise, down the center of the damaged plank. Then, make several perpendicular cuts, dividing the plank into smaller, manageable pieces. The goal is to create sections that can be easily pried up and removed without putting undue stress on the adjacent planks. Leave approximately one inch of material uncut along the edges to prevent damage to surrounding pieces until the inner section is removed.
Once the grid of cuts is complete, use the chisel and hammer to carefully break away the individual pieces. Position the chisel at the edge of a section and gently tap it with the hammer to lift the piece. Work gradually, avoiding excessive force, which could crack or chip the surrounding planks. Use the pry bar to carefully lift any stubborn sections, taking care not to damage the subfloor.
With the interior sections removed, focus on the remaining edges. Use the chisel to carefully separate the tongue and groove connections of the damaged plank from the adjacent planks. This step is critical, as these connections hold the flooring together. Work slowly and patiently, using small, controlled taps with the hammer. Avoid forcing the pieces apart, as this can easily damage the locking mechanisms of the surrounding planks.
After the damaged piece is removed, thoroughly clean the area with the vacuum cleaner. Remove any residual debris, such as small pieces of laminate or dust, which could interfere with the proper installation of the replacement plank. Inspect the subfloor for any damage or irregularities. If necessary, repair any imperfections before proceeding.
Installing the Replacement Laminate Plank
With the damaged plank removed and the area prepared, the final step involves installing the replacement plank. This process requires precision and attention to detail to ensure a seamless and secure fit.
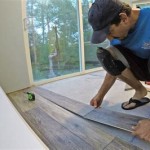
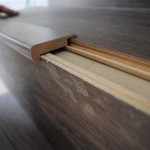
The first task is to prepare the replacement plank. Because it is not possible to simply click the new plank into place from above, the bottom edges of the tongue-and-groove system must be removed to let it fit under the adjacent planks. Using the circular saw or multi-tool, carefully trim the bottom edges of the groove on the long side and both short sides of the replacement plank. This will allow the plank to be slid into place horizontally.
Test fit the replacement plank before applying any adhesive. Carefully slide the plank into the prepared space, aligning the trimmed edges with the adjacent planks. Ensure that the plank sits flush with the surrounding flooring, with no gaps or overlaps. If the fit is not perfect, make small adjustments to the trimmed edges until a seamless fit is achieved.
Apply a small bead of wood glue to the trimmed edges of the replacement plank. Use a glue that is specifically designed for laminate flooring and apply it sparingly to avoid excess glue squeezing out onto the surface. The glue will provide added stability and prevent the plank from shifting over time.
Carefully slide the glued replacement plank into place, ensuring that it aligns perfectly with the surrounding planks. Press down firmly on the plank to ensure good contact with the adhesive. If necessary, use the tapping block and pull bar to gently tap the plank into place, ensuring a tight and secure fit.
Wipe away any excess glue that may have squeezed out along the edges with a damp cloth. Allow the glue to dry completely according to the manufacturer's instructions. Avoid walking on the repaired area until the glue has fully cured.
After the glue has dried, inspect the repaired area for any imperfections. If necessary, use a laminate floor repair kit to fill any small gaps or scratches. Clean the floor thoroughly to remove any remaining dust or debris.
Replacing a damaged laminate flooring plank in the middle of the floor requires patience, precision, and the right tools. By following these detailed instructions, anyone can successfully complete this repair and restore their floor to its original condition.

How To Replace A Damaged Laminate Board That S In The Middle Of Floor

Laminate Floor Repair Diy Family Handyman

How To Fix Or Replace Laminate Floor Board

3 Ways To Repair Laminate Flooring Wikihow

Quick And Easy Way To Replace A Damaged Wood Laminate Plank

Avoid Costly Mistakes Repairing Vinyl Plank Flooring Made Easy

How To Replace Laminate Flooring Episode 7 Howtospecialist Build Step By Diy Plans

3 Ways To Repair Laminate Flooring Wikihow

How To Repair Laminate Flooring The Home Depot

How To Repair Laminate Flooring Forbes Home
Related Posts