How To Repair Tongue and Groove Flooring
Tongue and groove flooring, a popular choice for its aesthetic appeal and structural integrity, can sometimes suffer damage over time. Wear and tear, moisture exposure, and impact can lead to issues such as splintering, warping, squeaking, and even complete board failure. This article provides a comprehensive guide on identifying common problems in tongue and groove flooring and outlines the steps required for effective repair.
Identifying Common Issues and Their Causes
Before embarking on any repair project, it's crucial to accurately diagnose the underlying problem affecting the tongue and groove flooring. Several issues are common, each often stemming from specific causes.
Splintering: This typically arises from surface wear and abrasion. High-traffic areas are particularly susceptible. As the protective finish erodes, the wood fibers become exposed and prone to splintering. The type of wood also plays a role; softer woods are more likely to splinter than hardwoods.
Warping: Uneven moisture exposure is the primary culprit behind warping. When one area of the floor absorbs more moisture than another, the wood expands unevenly, leading to cupping (edges higher than the center) or crowning (center higher than the edges). Leaks, spills that are not promptly cleaned, and high humidity levels can all contribute to warping.
Squeaking: Squeaks typically indicate that the floorboards are rubbing against each other or the subfloor. This friction can be caused by loose nails, inadequate subfloor support, or changes in humidity that cause the wood to expand and contract. Identifying the precise location of the squeak is essential for targeted repair.
Loose Boards: Over time, the nails or adhesive holding the tongue and groove boards in place can loosen. This results in boards that shift or move when walked upon. In some cases, the tongue or groove itself may be damaged, further exacerbating the problem.
Gaps: Gaps between boards are often a consequence of seasonal changes in humidity. During dry periods, the wood shrinks, leading to noticeable gaps. While minor gaps are generally considered normal, excessive gaps can indicate a more significant problem, such as improper installation or significant moisture fluctuations.
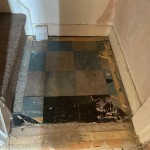
Water Damage/Staining: Water damage appears as dark spots, discoloration, or even fungal growth. It's crucial to address the source of the moisture before attempting to repair the affected boards. Mold and mildew can thrive in damp environments, posing health risks and further damaging the wood.
Tools and Materials Required for Repair
Having the right tools and materials on hand is essential for a successful tongue and groove flooring repair. The specific items needed will depend on the nature and extent of the damage.
Safety Gear: Safety glasses, a dust mask, and work gloves are fundamental for protecting against debris, dust, and potential hand injuries.
Pry Bar and Wood Chisel: These tools are used for carefully removing damaged boards without causing further damage to adjacent boards.
Hammer and Nail Set: A hammer is required for driving nails or brads. A nail set is used to countersink the nail heads below the surface of the wood, allowing for a smooth finish.
Wood Glue: High-quality wood glue is necessary for securing replacement boards and repairing minor damage.
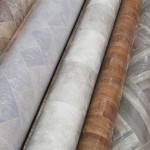
Replacement Boards: It's crucial to have replacement boards that match the existing flooring in terms of species, dimensions, and finish. Sourcing these boards from the same manufacturer or batch as the original flooring is ideal.
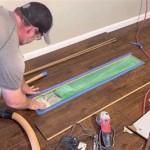
Circular Saw or Hand Saw: A saw is needed for cutting replacement boards to the correct size and shape. A circular saw offers faster and more precise cuts, while a hand saw provides greater control in tight spaces.
Measuring Tape and Pencil: Accurate measurements are essential for ensuring that the replacement boards fit properly. A pencil is used for marking cut lines.
Wood Filler: Wood filler is used to fill small gaps, nail holes, and imperfections in the repaired areas. Choose a wood filler that matches the color of the flooring or can be stained to match.
Sandpaper (Various Grits): Sandpaper is used to smooth the repaired areas and blend them with the surrounding flooring. Start with a coarser grit (e.g., 80-grit) and gradually move to finer grits (e.g., 120-grit, 220-grit) for a smooth finish.
Stain and Finish: Stain is used to match the color of the replacement boards to the existing flooring. Finish is applied to protect the repaired areas and provide a consistent sheen. Ensure the stain and finish are compatible with the existing flooring.
Palm Sander or Orbital Sander: For larger areas, an electric sander will make the sanding process much faster and more efficient. Be sure to use the correct grit sandpaper for each stage of sanding
Step-by-Step Repair Process for Common Issues
Once the problem has been identified and the necessary tools and materials have been gathered, the repair process can begin. The specific steps will vary depending on the type of damage.
Repairing Splintered Boards: For minor splintering, carefully remove any loose splinters with a sharp utility knife. Apply wood glue to the affected area and clamp it until the glue dries. Once the glue is dry, sand the area smooth with fine-grit sandpaper. Apply a matching stain and finish to blend the repaired area with the surrounding flooring.
Addressing Warped Boards: If the warping is minor, it may be possible to flatten the boards by applying weight to them. Place heavy objects (e.g., books, weights) on the warped area and leave them for several days or weeks. In some cases, applying moisture to the concave side of the board can help it return to its original shape. For severe warping, the affected boards may need to be replaced.
Silencing Squeaky Floors: Locate the source of the squeak. If the squeak is caused by loose nails, drive them in further with a nail set. If the squeak persists, consider inserting shims between the floorboards and the subfloor to eliminate movement. Apply wood glue to the shims before insertion to ensure a secure fit. In some cases, lubricating the edges of the boards with powdered graphite can help reduce friction and eliminate squeaks.
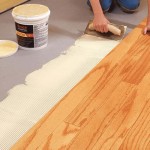
Replacing Damaged Boards: This is often necessary for severely damaged, warped, or water-damaged boards. First, carefully remove the damaged board using a pry bar and chisel. Be careful not to damage the adjacent boards. If the tongue of the damaged board is trapped under the adjacent board, it may be necessary to cut it off with a chisel or saw. Prepare the replacement board by cutting it to the correct length and width. If necessary, remove the bottom groove of the replacement board to allow it to fit into place. Apply wood glue to the subfloor and the edges of the adjacent boards. Position the replacement board and tap it into place with a hammer and tapping block. Secure the replacement board with nails or brads, countersinking the nail heads. Fill the nail holes with wood filler and sand the repaired area smooth. Apply a matching stain and finish to blend the repaired area with the surrounding flooring.
Filling Gaps Between Boards: For small gaps (less than 1/8 inch), wood filler can be used. Clean the gaps thoroughly and apply the wood filler, ensuring it is packed tightly. Allow the filler to dry completely and sand it smooth. Apply a matching stain and finish. For larger gaps, consider inserting wood shims or thin strips of wood that match the flooring. Apply wood glue to the shims and tap them into place. Trim any excess shim material and sand the area smooth. Apply a matching stain and finish.
Repairing Water Damage: The first step is to identify and eliminate the source of the moisture. Allow the affected area to dry completely. Remove any mold or mildew with a bleach solution (follow safety precautions). If the water damage is superficial, sanding and refinishing the affected area may be sufficient. For more severe water damage, the affected boards may need to be replaced. Remember to fully dry any area affected by moisture before attempting repairs to prevent future mold or mildew issues.
Once finished, ensure the repaired area blends seamlessly with the existing flooring. This often involves finesse in matching stain precisely. The goal is to create a seamless repair that doesn't draw the eye, restoring the beauty and integrity of the tongue and groove floor.

How To Repair Replace Old Tongue And Groove Plank Subfloor In Bathroom Home Improvement Stack Exchange

Diy Tounge And Groove Floor Board Replacement Creative Cain Cabin

Fixing A Rotten Tongue And Groove Porch Floor The Craftsman Blog

Fixing A Rotten Tongue And Groove Porch Floor The Craftsman Blog

A Guide On How You Can Patch Wooden Floor Ron Hazelton

How To Repair Hardwood Floors The Craftsman Blog

Diy Tounge And Groove Floor Board Replacement Creative Cain Cabin

How To Repair A Tongue And Groove Wood Floor This Old House

How To Remove A Single Piece Of Hardwood Flooring The Art Doing Stuff

A Little Hardwood Floor Repair The Space Between
Related Posts