How To Put Wood Flooring On A Wall
Utilizing wood flooring on walls has emerged as a popular design trend, offering a unique blend of texture, warmth, and visual interest to interior spaces. This application extends beyond traditional flooring, transforming ordinary walls into statement features. While the installation process may appear daunting, it is manageable with careful planning, proper tools, and adherence to specific techniques. This article provides a comprehensive guide on how to install wood flooring on a wall, covering essential aspects from preparation to finishing.
Planning and Preparation
The initial phase of any successful wall installation involves meticulous planning and preparation. This includes assessing the wall's suitability, selecting appropriate materials, and gathering necessary tools. Neglecting these preliminary steps can lead to complications during installation and compromise the final aesthetic.
Assessing the Wall: Before proceeding, it is crucial to inspect the wall thoroughly. Ensure the surface is structurally sound, clean, and free from any moisture. Repair any cracks or damage that may affect adhesion or stability. Walls with significant imperfections may require patching and leveling to provide a smooth, even base for the wood flooring. Consider the wall's material composition. Drywall, plaster, and concrete walls each require specific preparation techniques and fastening methods. For instance, concrete walls may necessitate pre-drilling pilot holes for secure attachment.
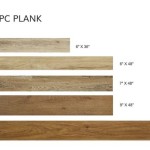
Material Selection: The choice of wood flooring significantly impacts the overall look and installation process. Solid hardwood, engineered wood, and laminate flooring are all viable options, each with its own advantages and disadvantages. Solid hardwood offers exceptional durability and a classic aesthetic but is more susceptible to moisture fluctuations, making it less suitable for humid environments. Engineered wood provides a more stable alternative, resisting warping and expanding in response to changes in humidity. Laminate flooring is a cost-effective option that mimics the look of real wood, but it generally lacks the same level of durability and authentic feel. Beyond the material, consider the wood's color, grain pattern, and texture. These elements should complement the existing décor and desired ambiance of the room. It is advisable to purchase approximately 10% extra material to account for cuts, waste, and any potential errors during installation.
Gathering Tools and Materials: Having the right tools and materials on hand is essential for efficient and accurate installation. The following list provides a comprehensive overview of the necessary items:
*Wood flooring (sufficient quantity plus 10% extra)
*Construction adhesive (appropriate for the wall type and flooring material)
*Finishing nails or brad nails (length dependent on flooring thickness and wall material)
*Nail gun or hammer
*Level
*Measuring tape
*Pencil
*Miter saw or circular saw
*Safety glasses
*Dust mask
*Spacers (for creating consistent gaps, if desired)
*Caulk (for sealing edges and gaps)
*Caulking gun
*Putty knife (for applying caulk smoothly)
*Stud finder (for locating wall studs, especially important for heavier wood flooring)
Installation Process
The installation process involves several key steps, including establishing a level starting point, applying adhesive, securing the flooring planks, and addressing edge details. Each step requires careful attention to detail to ensure a professional-looking and structurally sound installation.
Establishing a Level Starting Point: The foundation of a straight and even installation lies in establishing a level starting point. Use a level to draw a horizontal line along the wall, typically a few inches above the floor. This line serves as a guide for the first row of flooring planks. If the floor is uneven, you may need to adjust the starting line accordingly to maintain a consistent appearance. It is essential to double-check the levelness of the line at multiple points to ensure accuracy.
Applying Adhesive: Apply construction adhesive to the back of each flooring plank, following the manufacturer's instructions. The amount of adhesive required will vary depending on the type of adhesive and the weight of the flooring material. Apply the adhesive in a consistent pattern, ensuring full coverage to maximize adhesion to the wall. Avoid applying excessive adhesive, as this can create a messy installation and potentially damage the wall surface. Wipe away any excess adhesive immediately with a damp cloth.
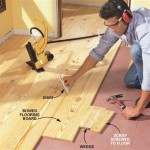
Securing the Flooring Planks: Align the first plank with the level starting line and press it firmly against the wall. Use finishing nails or brad nails to secure the plank in place. The nail placement should be strategic, aiming for areas where the nails will be concealed by subsequent planks or trim. If using a nail gun, adjust the pressure setting to avoid damaging the wood. Continue installing the remaining planks in a row, ensuring they are tightly butted together. Use spacers to maintain consistent gaps between planks if desired. Check the levelness of each row as you proceed to make any necessary adjustments. For subsequent rows, stagger the seams to create a more visually appealing and structurally sound installation. This involves cutting planks to varying lengths to avoid aligning seams directly above or below each other.
Cutting and Fitting Planks: Cutting planks to fit around obstructions, such as outlets, windows, or door frames, requires precision and patience. Use a miter saw or circular saw to make accurate cuts. Measure the space carefully and transfer the dimensions to the plank. It is often helpful to create a template from cardboard to ensure a perfect fit. When cutting around irregularly shaped objects, consider using a jigsaw for greater maneuverability. Remember to wear safety glasses and a dust mask while cutting wood.
Addressing Edge Details and Finishing Touches
The final stage of the installation involves addressing edge details, such as corners and transitions, and adding finishing touches to enhance the overall appearance. This includes caulking gaps, installing trim, and performing any necessary touch-ups.
Caulking Gaps: After the flooring is installed, inspect the edges and seams for any gaps. These gaps can be filled with caulk to create a seamless and professional-looking finish. Choose a caulk that matches the color of the wood flooring or the surrounding trim. Apply the caulk sparingly using a caulking gun and smooth it out with a putty knife. Wipe away any excess caulk with a damp cloth. Allow the caulk to dry completely before proceeding to the next step.
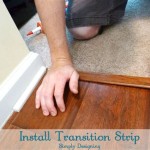
Installing Trim: Trim pieces, such as baseboards, crown molding, or corner guards, can be used to conceal any imperfections along the edges of the flooring and create a more finished look. Choose trim pieces that complement the style of the wood flooring and the surrounding décor. Measure and cut the trim pieces to the appropriate lengths and angles. Secure the trim pieces to the wall using finishing nails or construction adhesive. Fill any nail holes with wood filler and sand smooth. Paint or stain the trim to match the wood flooring or the surrounding trim.
Performing Touch-Ups: Inspect the installed flooring for any imperfections, such as scratches, dents, or uneven areas. Use wood filler or touch-up markers to repair any minor damage. Sand any rough spots smooth and apply a coat of finish to protect the wood and enhance its appearance. Clean the installed flooring with a damp cloth to remove any dust or debris. Allow the finish to dry completely before placing any furniture or other objects against the wall.

How To Install Wood Flooring On The Wall Esb

Installing Wood Flooring On Walls And Beyond Blog

Installing Wood Flooring On Walls Newlywoodwards

Going Up The Wall Installing Flooring Vertically Floor Trends Installation

How To Install Vinyl Plank Flooring On Walls Europine

How To Install Laminate Flooring On Walls 7 Easy Steps Inc

Engineered Wood Flooring As An Accent Wall Builddirect Blog

How To Install Laminate Planks Horizontally On A Wall

How To Install A Wood Flooring Feature Wall

Laying Hardwoods Around A Wall Or Cabinet Peninsula New First Board
Related Posts