How To Install Vinyl Flooring: A Comprehensive Guide
Vinyl flooring, renowned for its durability, water resistance, and aesthetic versatility, presents a cost-effective and practical solution for various areas within a property. The relatively straightforward installation process makes it a popular choice for both professional installers and homeowners embarking on DIY projects. Successful vinyl flooring installation necessitates meticulous preparation, precise execution, and adherence to established techniques. This article provides a comprehensive guide to the vinyl flooring installation process, outlining essential steps and best practices to ensure a professional and long-lasting result.
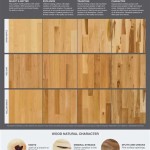
The type of vinyl flooring being installed significantly impacts the installation method. Vinyl comes in various forms, including sheet vinyl, vinyl tiles, and vinyl planks. Each type possesses unique characteristics that influence the subfloor preparation, adhesive requirements (if any), and installation techniques. Furthermore, vinyl planks and tiles often feature different installation systems, such as glue-down, click-lock, or loose-lay, each demanding specific tools and procedures. Understanding the specific requirements of the chosen vinyl flooring type is paramount to achieving a successful installation.
Key Point 1: Preparation is Paramount: Ensuring a Smooth and Level Subfloor
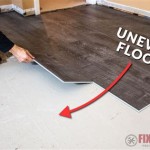
Adequate subfloor preparation is the most crucial factor influencing the final outcome of a vinyl flooring installation. The subfloor, the structural layer beneath the finished flooring, must be clean, level, dry, and structurally sound. Any imperfections or deficiencies in the subfloor will telegraph through the vinyl flooring, resulting in an uneven and aesthetically displeasing surface. Furthermore, moisture issues stemming from the subfloor can lead to adhesive failure (in glue-down applications) or warping and buckling of the vinyl flooring over time.
The initial step involves thoroughly cleaning the subfloor. This includes removing all debris, such as dust, dirt, paint flecks, adhesive residue, and any loose particles. A vacuum cleaner equipped with a hard floor attachment is ideal for removing loose debris. For stubborn residue, a scraper or appropriate solvent can be used, followed by thorough cleaning with a damp mop. In cases of significant adhesive residue, a mechanical floor scraper may be required.
Next, the subfloor must be inspected for levelness. Unevenness exceeding the manufacturer's specifications will necessitate leveling. A long, straight edge or a self-leveling compound can be used to identify and rectify uneven areas. Small dips or imperfections can be filled with patching compound, ensuring it is properly smoothed and allowed to dry completely before proceeding. Larger areas requiring significant leveling may benefit from the application of a self-leveling compound, which is poured onto the floor and allowed to flow and self-level before hardening. Always follow the manufacturer's instructions for mixing and application of patching or self-leveling compounds.
Moisture testing is a critical step to prevent future problems. High moisture levels in the subfloor can cause adhesive failure or promote mold growth. Various moisture testing methods are available, including the calcium chloride test (anhydrous calcium chloride method) and electronic moisture meters. The acceptable moisture content varies depending on the type of subfloor and the vinyl flooring being installed. Consult the vinyl flooring manufacturer's specifications for recommended moisture limits. If moisture levels exceed acceptable limits, remediation measures must be taken, such as installing a moisture barrier or addressing the source of the moisture.
Finally, the subfloor must be structurally sound. Loose or damaged sections of the subfloor must be repaired or replaced. Loose plywood or OSB subflooring should be secured with screws. Damaged sections should be cut out and replaced with new material of the same thickness. Cracks in concrete subfloors should be filled with a concrete patch. Any squeaks or movement in the subfloor should be addressed before installing the vinyl flooring.
Key Point 2: Installation Techniques: Glue-Down, Click-Lock, and Loose-Lay
The choice of installation technique depends on the type of vinyl flooring being installed and the specific requirements of the project. Glue-down installations involve applying adhesive to the subfloor and then adhering the vinyl flooring to the adhesive. Click-lock installations feature interlocking edges that connect the vinyl planks or tiles without the need for adhesive. Loose-lay installations rely on the weight of the vinyl flooring and a high-friction backing to hold the flooring in place.
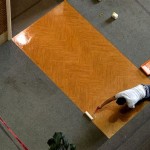
Glue-Down Installation: Glue-down vinyl flooring offers a strong and permanent bond to the subfloor, making it suitable for high-traffic areas and areas prone to moisture. A suitable adhesive, recommended by the vinyl flooring manufacturer, must be selected. The adhesive is applied to the subfloor using a notched trowel, ensuring even and consistent coverage. The vinyl flooring is then carefully placed onto the adhesive while it is still wet and pressed firmly into place. Air pockets must be avoided, and any excess adhesive should be wiped away immediately. A roller can be used to further ensure proper adhesion. Following the adhesive manufacturer’s recommended open time and working time is crucial for achieving optimal bond strength.
Click-Lock Installation: Click-lock vinyl flooring offers a relatively simple and fast installation process, requiring no adhesive. The vinyl planks or tiles feature interlocking edges that snap together, creating a floating floor. The first row of flooring is typically installed along a straight edge, such as a wall. Subsequent rows are then connected to the first row by aligning the interlocking edges and snapping them together. A tapping block and rubber mallet can be used to gently tap the edges together for a tight and seamless fit. Expansion gaps must be left around the perimeter of the room to allow for expansion and contraction of the flooring. These gaps are typically covered by baseboards or quarter-round molding.
Loose-Lay Installation: Loose-lay vinyl flooring is the easiest type to install, requiring no adhesive and often no interlocking edges. The flooring is simply placed on the subfloor and held in place by its weight and a high-friction backing. This type of flooring is suitable for areas with minimal traffic and where easy removal is desired. While generally simple, proper planning is critical. The flooring should be accurately cut to fit the room, leaving a small expansion gap around the perimeter. Double-sided tape can be used in areas prone to movement, such as doorways, to further secure the flooring. Although technically "loose-lay", following the manufacturer's specific recommendations for layout and stabilization is vital.
Key Point 3: Cutting and Fitting: Precision and Accuracy for a Professional Finish
Accurate cutting and fitting are essential for a professional-looking vinyl flooring installation. Vinyl flooring can be cut using a utility knife, a vinyl flooring cutter, or a jigsaw. A sharp cutting blade is essential for clean and precise cuts. When using a utility knife, several passes may be required to cut through the flooring completely. A vinyl flooring cutter provides a cleaner and more precise cut, especially for straight lines. A jigsaw can be used for cutting around obstacles or making curved cuts.
When cutting vinyl flooring, it is important to measure accurately and mark the cutting line clearly. A straight edge or a T-square can be used to ensure straight cuts. For intricate cuts around obstacles, a template can be created using cardboard or paper. The template is then placed on the vinyl flooring and traced with a marker. The flooring is then cut along the marked line. Leaving slight gaps, particularly around fixed objects like pipes, allows for expansion and contraction without buckling.
Fitting the vinyl flooring around obstacles requires careful attention to detail. When installing around pipes, measure the diameter of the pipe and mark the center point on the vinyl flooring. Use a hole saw or a utility knife to cut a hole slightly larger than the diameter of the pipe. Make a relief cut from the edge of the flooring to the hole to allow the flooring to be fitted around the pipe. Cover plates are often used to conceal the gap around the pipe. Similar techniques can be used for fitting vinyl flooring around door jambs, cabinets, and other obstacles.
Seams in vinyl flooring should be carefully aligned and sealed to prevent moisture penetration and ensure a smooth transition. For sheet vinyl, seams should be located in inconspicuous areas, such as under furniture or along walls. The edges of the vinyl flooring should be butted together tightly and secured with seam sealer. For vinyl planks and tiles, stagger the seams to create a more natural look. Using a roller over the seams helps to ensure a secure bond and a smooth surface. Selecting the right seam sealer according to the manufacturer's instructions is important. Overlap and double-cut methods can also be used to create extremely tight and inconspicuous seams in sheet vinyl installations.
After installation, clean the vinyl flooring according to the manufacturer's instructions. This typically involves sweeping or vacuuming to remove loose debris and then mopping with a damp mop and a mild detergent. Avoid using harsh chemicals or abrasive cleaners, as these can damage the vinyl flooring. Install baseboards or quarter-round molding to cover the expansion gaps around the perimeter of the room. This provides a finished look and prevents dirt and debris from accumulating in the gaps. Consider adding transition strips where the vinyl flooring meets other types of flooring to create a smooth and seamless transition.
By adhering to these detailed steps and guidelines, individuals undertaking vinyl flooring installation projects can expect to achieve a professional and aesthetically pleasing outcome. Proper preparation, precise installation techniques, and careful attention to detail are critical for ensuring the longevity and performance of the installed vinyl flooring.

How To Install Vinyl Plank Flooring The Home Depot

How To Install Vinyl Plank Flooring As A Beginner Home Renovation

Installing Vinyl Floors A Do It Yourself Guide The Honeycomb Home

Post Nbl Express Eco Flooring

How To Install Vinyl Plank Flooring In A Bathroom Fixthisbuildthat

Installing Vinyl Floors A Do It Yourself Guide The Honeycomb Home

How To Install Vinyl Plank Flooring The Home Depot

Laying Vinyl Planks The Right Way Expert Guide By Fantastic Handyman

A Beginner S Guide To Installing Vinyl Plank Flooring Dumpsters Com

Installing Vinyl Plank Flooring How To Fixthisbuildthat
Related Posts