How to Install Hardwood Floors on a Concrete Slab
Installing hardwood flooring over a concrete slab presents a durable and aesthetically pleasing flooring solution. However, it requires meticulous preparation and adherence to specific installation techniques to ensure longevity and prevent moisture-related problems. Concrete, being porous, can wick moisture from the ground, which can negatively impact hardwood. This article provides a comprehensive guide on how to successfully install hardwood floors on a concrete slab.
Understanding the Challenges and Necessary Preparations
Concrete slabs are inherently different from wooden subfloors and require a different approach. The primary concerns revolve around moisture control, leveling the surface, and selecting the appropriate type of hardwood and installation method. Ignoring these aspects can lead to warping, buckling, or even mold growth beneath the flooring.
Before commencing any installation work, assessing the concrete slab for moisture content is paramount. This involves performing a moisture test, which can be conducted using various methods. The calcium chloride test (also known as a moisture vapor emission rate test) is a common method. This involves placing a small amount of calcium chloride under a sealed dome on the concrete surface for a specified period. The weight gain of the calcium chloride indicates the rate of moisture vapor emission. Alternatively, a relative humidity probe test can be used, which involves drilling small holes into the concrete and measuring the humidity within. The results of these tests will dictate the type of moisture barrier required.
Another crucial step is inspecting the concrete slab for levelness. Hardwood floors require a flat, even surface for proper installation and to prevent future issues like squeaking or uneven wear. Use a long level (at least 6 feet) to scan the slab for any dips, humps, or unevenness. Significant variations will require corrective action.
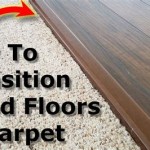
Finally, consider the existing height of the concrete slab in relation to adjacent flooring surfaces. Adding hardwood flooring will increase the overall floor height, potentially creating a transition issue at doorways or adjacent rooms. Planning for these transitions is crucial for a seamless and professional finish.
Selecting the Right Hardwood and Installation Method
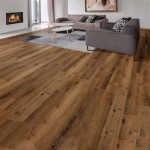
The type of hardwood you choose and the installation method implemented are dependent on the moisture test results and the desired aesthetic. Solid hardwood, while highly sought after for its natural beauty and longevity, is more susceptible to moisture damage than engineered hardwood. Engineered hardwood, constructed with multiple layers of wood veneer bonded together, offers greater dimensional stability and is generally a more suitable option for concrete slabs.
There are three primary methods for installing hardwood floors on concrete:
* Direct Glue-Down: This method involves applying a specialized adhesive directly to the concrete slab and bonding the hardwood flooring to it. * Floating Floor: This method involves installing a moisture barrier and a foam underlayment over the concrete slab, then laying the hardwood flooring on top of the underlayment. The flooring pieces are typically connected to each other using a tongue-and-groove system, creating a "floating" floor that is not directly attached to the concrete. * Installing a Plywood Subfloor: This method involves constructing a plywood subfloor over the concrete slab, creating a more traditional nailing surface for solid hardwood.The direct glue-down method is suitable for both solid and engineered hardwood, but requires meticulous surface preparation. The floating floor method is generally best suited for engineered hardwood, as it allows for slight movement and expansion/contraction due to changes in humidity. Installing a plywood subfloor provides the most stable base for solid hardwood, but it significantly raises the floor height and requires careful attention to ventilation and moisture control.
When selecting an adhesive for the direct glue-down method, opt for a high-quality, moisture-resistant adhesive specifically designed for hardwood flooring. These adhesives typically have low volatile organic compound (VOC) content and provide a strong, flexible bond. Consider the adhesive's open time (the amount of time you have to work with the adhesive after applying it) and its curing time (the amount of time it takes for the adhesive to fully set).
For the floating floor method, choose a high-quality underlayment with a built-in moisture barrier. The underlayment provides cushioning, sound insulation, and enhances the floor's overall comfort. Ensure the underlayment is compatible with the type of hardwood flooring you are installing.
Step-by-Step Installation Guide
The following provides a general overview of the installation process, but specific steps may vary depending on the chosen method and the manufacturer's instructions. Always consult the manufacturer's guidelines for your chosen flooring and adhesive.
Step 1: Concrete Slab Preparation: Begin by thoroughly cleaning the concrete slab. Remove any dirt, dust, debris, or existing coatings. Use a concrete grinder or scarifier to remove any high spots or unevenness. Fill any cracks or holes with a concrete patching compound. Allow the patching compound to fully cure according to the manufacturer's instructions.
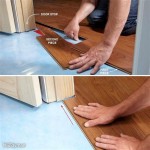
Step 2: Moisture Barrier Installation: Install a moisture barrier over the concrete slab. For the direct glue-down method, a liquid-applied moisture barrier is typically used. Apply the moisture barrier according to the manufacturer's instructions, ensuring complete coverage. For the floating floor method, use a polyethylene film or a specialized underlayment with a built-in moisture barrier. Overlap the edges of the moisture barrier and tape them securely to create a continuous seal.
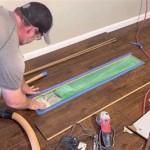
Step 3a: Direct Glue-Down Method - Adhesive Application: Apply the adhesive to the concrete slab using a notched trowel. The notch size should be specified by the adhesive manufacturer. Apply the adhesive in manageable sections, working in the direction of the flooring installation.
Step 3b: Floating Floor Method - Underlayment Installation: Roll out the underlayment over the moisture barrier, following the manufacturer’s instructions. Trim excess material, ensuring a snug fit along walls and other fixed objects.
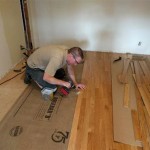
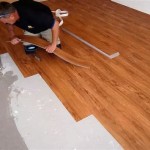
Step 4: Hardwood Flooring Installation: Begin installing the hardwood flooring, starting along a straight wall. For the direct glue-down method, carefully position each plank or tile onto the adhesive, pressing firmly to ensure proper adhesion. Use spacers along the walls to maintain a consistent expansion gap. For the floating floor method, connect the flooring pieces using the tongue-and-groove system, following the manufacturer's instructions. Use a tapping block and mallet to ensure a tight fit. For installing a plywood subfloor, securely fasten the plywood sheathing to the concrete using concrete screws, ensuring proper spacing and alignment.
Step 5: Cutting and Fitting: As you approach walls, doorways, or other obstacles, carefully measure and cut the flooring pieces to fit. Use a saw specifically designed for hardwood flooring. Ensure accurate cuts for a professional finish.
Step 6: Finishing: Once the flooring is installed, remove the spacers and install baseboards or quarter-round molding to cover the expansion gap along the walls. Clean the floor thoroughly to remove any dust or debris. Apply a polyurethane finish (if required by the flooring type) to protect the surface and enhance its appearance.
Specific Considerations for Installing a Plywood Subfloor: When installing a plywood subfloor over concrete, ventilation is critical to prevent moisture buildup. Install sleepers (treated lumber strips) between the concrete and the plywood to create an air gap. Ensure adequate ventilation throughout the subfloor by drilling holes in the plywood along the perimeter. Consider using pressure-treated plywood for added moisture resistance.
Importance of Acclimation: Regardless of the installation method, acclimating the hardwood flooring to the job site's temperature and humidity conditions is crucial. Store the flooring in the room where it will be installed for several days before installation to allow it to adjust to the environment. This will help minimize expansion and contraction after installation.
Addressing Minor Slab Imperfections: Minor imperfections in the concrete slab, such as small cracks or minor unevenness, can often be addressed with self-leveling compound. Pour the self-leveling compound over the affected area and allow it to cure according to the manufacturer's instructions. This will create a smooth, level surface for the flooring installation.
Maintaining Proper Expansion Gaps: Maintaining proper expansion gaps along walls and around fixed objects is essential to allow for the natural expansion and contraction of the hardwood flooring. These gaps prevent the flooring from buckling or warping due to changes in temperature and humidity. The recommended expansion gap width varies depending on the flooring type and the size of the room.
Using Appropriate Fasteners: When securing plywood to the concrete slab, use concrete screws or powder-actuated fasteners specifically designed for this purpose. Ensure the fasteners are long enough to penetrate the concrete adequately and provide a secure hold. Follow the manufacturer's instructions for fastener spacing.
Addressing Potential Mold Growth: Mold growth can be a concern beneath hardwood floors installed over concrete slabs if moisture is not properly controlled. Use a mold inhibitor during the installation process, especially in areas prone to moisture. Ensure adequate ventilation to prevent moisture buildup.
Regular Maintenance and Cleaning: Once the hardwood flooring is installed, proper maintenance and cleaning are essential to preserve its appearance and longevity. Sweep or vacuum the floor regularly to remove dirt and debris. Use a damp mop with a pH-neutral cleaner specifically designed for hardwood floors. Avoid using excessive water, as it can damage the flooring.

How To Install Tongue Groove Hardwood Floors Over Concrete

How To Install A Wood Subfloor Over Concrete Rona

Q A Solid Wood Floors Over Concrete Slabs Jlc

Ask Fred How Do I Install Wood Floor Below Grade Schedule

Fitting Hardwood Floor To Concrete Wood And Beyond Blog

How Do I Install A Hardwood Floor On Concrete Slab The Carpet Guys

How To Install Engineered Flooring On Concrete Adm

Installing Hardwood Floors On Concrete

Glue Wood Flooring To A Concrete Slab Fine Homebuilding

Installing Engineered Hardwood On Concrete Villagio Guide
Related Posts