How to Put Down Vinyl Flooring: A Comprehensive Guide
Vinyl flooring, renowned for its durability, water resistance, and aesthetic versatility, is a popular choice for both residential and commercial spaces. Its relative ease of installation makes it an attractive option for DIY enthusiasts and professional installers alike. This article provides a comprehensive guide to the process of installing vinyl flooring, encompassing preparation, installation techniques, and essential considerations for a successful project.
I. Preparing for Vinyl Flooring Installation
The success of any vinyl flooring installation hinges on meticulous preparation. This phase ensures a smooth, level, and clean substrate, which is crucial for longevity and aesthetic appeal. Neglecting this stage can lead to unevenness, adhesive failure, and premature wear of the vinyl flooring.
A. Assessing the Subfloor: The subfloor is the foundation upon which the vinyl flooring will rest. Common subfloor materials include concrete, plywood, and existing flooring (such as tile or older vinyl). Each material requires specific preparation steps.
For concrete subfloors, it is imperative to check for cracks, voids, and unevenness. Cracks wider than 1/8 inch should be filled with a concrete patching compound. Leveling compounds may be necessary to correct significant dips or rises in the concrete surface. The concrete must also be thoroughly cleaned and dried to ensure proper adhesion.
Plywood subfloors must be inspected for damage, such as warping, rot, or loose fasteners. Damaged sections should be replaced. Any loose screws or nails should be tightened or replaced. Plywood seams should be filled with wood filler and sanded smooth to prevent telegraphing through the vinyl flooring.
Installing vinyl flooring over existing flooring is possible in some cases, but it requires careful consideration. The existing flooring must be securely bonded to the subfloor and free of any significant damage. Any loose tiles or damaged sections of existing vinyl must be repaired or removed. The existing flooring surface should be thoroughly cleaned and degreased to promote adhesion.
B. Cleaning and Leveling the Subfloor: Regardless of the subfloor material, thorough cleaning is essential. This involves removing any debris, dust, dirt, grease, and other contaminants that could interfere with the adhesive bond. Sweeping, vacuuming, and scrubbing with a suitable cleaning solution are typically required.
Leveling the subfloor is equally important. Minor imperfections (less than 1/8 inch) can often be addressed with self-leveling compounds. Larger imperfections require more extensive patching or grinding. A carpenter's level or laser level can be used to identify high and low spots.
C. Acclimatizing the Vinyl Flooring: Vinyl flooring is susceptible to expansion and contraction due to temperature fluctuations. Acclimatizing the vinyl flooring to the installation environment is crucial to prevent buckling or gapping after installation. The vinyl flooring should be stored in the room where it will be installed for at least 48 to 72 hours prior to installation. The room temperature should be maintained within the manufacturer's recommended range during this period.
D. Gathering Necessary Tools and Materials: Successful vinyl flooring installation requires a specific set of tools and materials. These include:
- Vinyl flooring planks or tiles
- Measuring tape
- Utility knife with sharp blades
- Straight edge or T-square
- Flooring adhesive (if required, depending on the type of vinyl flooring)
- Notched trowel (if using adhesive)
- Seam roller or hand roller
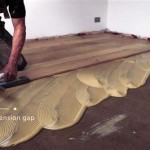
- Spacers (if installing planks with expansion gaps)
- Knee pads
- Safety glasses
- Cleaning supplies
II. Installing Vinyl Flooring: Step-by-Step Guide
The installation process varies slightly depending on the type of vinyl flooring being used. This section outlines the general steps for installing both vinyl planks and vinyl tiles.
A. Planning the Layout: Before commencing the installation, it is essential to plan the layout. This involves determining the direction in which the planks or tiles will be laid and ensuring that the layout is symmetrical and aesthetically pleasing. Consider the room's focal point and any architectural features that may influence the layout. Dry-laying a few rows of planks or tiles can help visualize the final result and make necessary adjustments.
B. Applying Adhesive (If Applicable): Some vinyl flooring products, particularly sheet vinyl and certain types of tiles, require adhesive. The adhesive should be applied according to the manufacturer's instructions, using a notched trowel to ensure even coverage. The trowel notch size will vary depending on the type of adhesive and the vinyl flooring product. Apply the adhesive in manageable sections to prevent it from drying out before the vinyl flooring is installed.
C. Installing Planks or Tiles: Begin installing the planks or tiles along a straight edge, such as a wall or a chalk line. Press each plank or tile firmly into the adhesive (if applicable) or against the adjacent plank or tile. Use a seam roller or hand roller to ensure proper adhesion and to eliminate any air pockets. Maintain consistent spacing between planks or tiles if the product requires expansion gaps. Spacers can be used to ensure uniform gaps.
For click-lock vinyl planks, angle the plank into the adjacent plank at a slight angle and then lower it into place until it clicks into position. Ensure that the planks are securely locked together to prevent gaps. For peel-and-stick vinyl tiles, simply peel off the backing and press the tile firmly onto the subfloor. Ensure that the tiles are aligned properly.
D. Cutting and Fitting: Cutting vinyl flooring accurately is crucial for a professional-looking installation. Use a utility knife with a sharp blade to score the vinyl flooring along the cut line. Then, snap the vinyl flooring along the score line. For more intricate cuts, such as around pipes or doorways, use a template or measure carefully and cut with a utility knife or jigsaw.
E. Addressing Obstacles: Obstacles such as pipes, doorways, and corners require careful consideration. Use a template or measure accurately to cut the vinyl flooring to fit around these obstacles. For pipes, use a hole saw or a utility knife to create a hole slightly larger than the diameter of the pipe. For doorways, use a transition strip to create a smooth transition between the vinyl flooring and the adjacent flooring.
III. Post-Installation Procedures and Considerations
Once the vinyl flooring is installed, several post-installation procedures should be followed to ensure its longevity and maintain its aesthetic appeal.
A. Rolling the Floor: After the installation is complete, roll the entire floor with a heavy floor roller. This will ensure proper adhesion and eliminate any remaining air pockets. Pay particular attention to the seams and edges.
B. Cleaning the Floor: Clean the floor with a damp cloth or mop to remove any adhesive residue or debris. Use a cleaning solution recommended by the vinyl flooring manufacturer.
C. Installing Baseboards and Trim: Install baseboards and trim to conceal the edges of the vinyl flooring and to provide a finished look. Baseboards and trim can be attached with nails, screws, or adhesive.
D. Allowing for Cure Time: Allow the adhesive (if used) to cure completely before placing furniture or heavy objects on the floor. The cure time will vary depending on the type of adhesive and the ambient temperature. Consult the adhesive manufacturer's instructions for specific cure time recommendations.
E. Ongoing Maintenance: Regular maintenance is essential to keep vinyl flooring looking its best. This includes sweeping or vacuuming regularly to remove dirt and debris, and mopping with a damp cloth or mop and a mild cleaning solution. Avoid using abrasive cleaners or scouring pads, as these can damage the surface of the vinyl flooring. Use floor protectors under furniture legs to prevent scratches and dents.
F. Repairing Damage: In the event of damage, such as scratches or tears, vinyl flooring can often be repaired. Minor scratches can be buffed out with a специальные полироль для винила. More significant damage may require patching or replacing the damaged section. Patching involves cutting out the damaged section and replacing it with a new piece of vinyl flooring. Replacement involves removing the damaged plank or tile and replacing it with a new one.
By following these guidelines, individuals can successfully install vinyl flooring, ensuring a durable, attractive, and long-lasting floor covering for their homes or businesses. Proper preparation, meticulous installation techniques, and ongoing maintenance are key to maximizing the lifespan and aesthetic appeal of vinyl flooring.

How To Install Vinyl Plank Flooring As A Beginner Home Renovation

How To Install Vinyl Plank Flooring The Home Depot

Installing Vinyl Plank Flooring How To Fixthisbuildthat

Laying Vinyl Planks The Right Way Expert Guide By Fantastic Handyman

Vinyl Tile Installation A Comprehensive Guide Gc Flooring Pros

How To Install Vinyl Plank Flooring In A Bathroom Fixthisbuildthat

Installing Vinyl Floors A Do It Yourself Guide The Honeycomb Home

How To Lay Vinyl Flooring Sheets Tiles And Planks Tarkett

Post Nbl Express Eco Flooring

Installing Vinyl Plank Flooring For Beginners Anika S Diy Life Bathroom
Related Posts