How to Make Wood Floors Look Rustic
Achieving a rustic aesthetic in a home often involves incorporating natural elements and textures, creating a warm and inviting atmosphere. Wood floors play a significant role in achieving this desired look. New or existing wood floors can be transformed to exude a rustic charm through various techniques. This article provides detailed instructions and considerations for creating a rustic wood floor, encompassing preparation, techniques, and finishing.
Preparing the Wood Floor for a Rustic Transformation
Before undertaking any rustic treatment, preparing the wood floor is crucial for optimal results. This preparation ensures the techniques applied adhere properly and the desired aesthetic is achieved. Whether working with new or existing floors, the initial steps are essential.
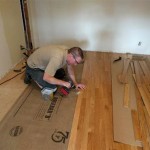
Cleaning and Inspection: Begin by thoroughly cleaning the existing wood floor. Remove all furniture, rugs, and obstructions. Sweep, vacuum, and mop the floor to eliminate dirt, dust, and debris. Once clean, conduct a thorough inspection of the floor. Identify any damaged or loose boards, protruding nails, or other imperfections. Mark these areas for repair.
Repairing Imperfections: Address any identified issues. Loose boards should be securely reattached using wood screws or nails. Replace damaged boards with new ones of a similar type and grain. Fill any nail holes or cracks with wood filler, allowing it to dry completely before sanding. Ensuring a structurally sound foundation is vital before implementing any rustic treatments.
Sanding the Floor: Sanding is a critical step in preparing the floor for a rustic look. The goal is to create a smooth, even surface for the subsequent treatments. Use a drum sander for large areas, starting with a coarse grit sandpaper (e.g., 36-grit) to remove the existing finish and any surface imperfections. Progress to medium-grit sandpaper (e.g., 60-grit) to smooth the surface further, followed by fine-grit sandpaper (e.g., 80-grit or 100-grit) for a final smooth finish. Pay particular attention to the edges and corners, using an orbital sander for these areas. After sanding, thoroughly vacuum the floor to remove all sanding dust.
Considerations for New Floors: When working with new wood floors, the sanding process might not be as extensive. However, it is still essential to lightly sand the surface to ensure proper adhesion of stains and finishes. This light sanding will also help to highlight the natural grain of the wood, contributing to the rustic aesthetic.
Techniques for Creating a Rustic Wood Floor
Several techniques can be employed to create a rustic appearance on wood floors. These techniques often involve distressing the wood, applying stains and finishes to mimic aged materials, and incorporating textures that evoke a sense of history and character. The choice of technique depends on the desired level of rustic charm and the specific characteristics of the wood floor.
Distressing the Wood: Distressing the wood is a common method for creating a rustic look. This involves intentionally adding imperfections to the surface, simulating the wear and tear that naturally occurs over time. Several tools and techniques can be used to distress wood.
Hammering and Scraping: Use a hammer or chain to lightly tap the surface of the wood, creating dents and indentations. A chisel or scraper can be used to create gouges and scratches. Vary the intensity and pattern of the distressing to achieve a natural and authentic look. Avoid creating uniform or repetitive marks, as this can detract from the rustic aesthetic.
Wire Brushing: Wire brushing involves using a wire brush to remove the softer grain of the wood, leaving the harder grain more prominent. This creates a textured surface that enhances the rustic appearance. A hand-held wire brush or a wire brush attachment for a drill can be used. Work along the grain of the wood, applying consistent pressure to achieve an even texture.
Creating Wormholes: Replicating the appearance of wormholes can add a unique touch to a rustic floor. Use a small nail or awl to create small, irregular holes in the wood surface. Vary the size and spacing of the holes to mimic the natural patterns of worm damage. Avoid creating too many holes, as this can look artificial. A subtle and strategic approach is key.
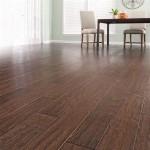
Staining and Antiquing: Staining the wood floor is crucial for achieving the desired color and tone. Choose a stain that complements the overall aesthetic of the space. For a rustic look, consider using stains in natural earth tones, such as browns, grays, and tans. Antiquing techniques can further enhance the rustic appearance.
Applying Stain: Apply the stain evenly using a brush, roller, or rag. Allow the stain to penetrate the wood for the recommended amount of time, then wipe off any excess stain with a clean cloth. The longer the stain remains on the wood, the darker the color will be. Experiment with different stain application times to achieve the desired shade.
Antiquing Techniques: Antiquing glazes can be applied over the stain to add depth and dimension to the wood floor. Apply the glaze using a brush or rag, then wipe off the excess to create a mottled effect. Darker glazes can be used to highlight the distressed areas, further enhancing the rustic appearance. Dry brushing, where a minimal amount of paint is applied with a dry brush, can also create interesting texture and visual interest.
Finishing the Rustic Wood Floor
The final step in creating a rustic wood floor is applying a protective finish. The finish protects the wood from wear and tear, while also enhancing its appearance. Several types of finishes are suitable for rustic wood floors, each with its own advantages and disadvantages.
Polyurethane Finishes: Polyurethane is a durable and water-resistant finish that is ideal for high-traffic areas. It provides a hard, protective layer that resists scratches and stains. Polyurethane finishes are available in various sheens, from matte to glossy. For a rustic look, a matte or satin finish is typically preferred, as it provides a more natural and less reflective appearance.
Oil Finishes: Oil finishes penetrate the wood, providing a natural and durable finish. They enhance the grain and color of the wood, creating a warm and inviting appearance. Oil finishes are relatively easy to apply and maintain, but they may require more frequent reapplication than polyurethane finishes. Tung oil and linseed oil are common choices for wood floors. Application typically involves multiple thin coats, allowing each coat to fully dry before applying the next.
Wax Finishes: Wax finishes provide a soft, natural luster to wood floors. Beeswax and carnauba wax are common ingredients in wax finishes. Wax finishes are easy to apply and maintain, but they are not as durable as polyurethane or oil finishes. They are suitable for low-traffic areas where a softer, more traditional look is desired. Application is typically done with a cloth, buffing the surface to a shine.
Applying the Finish: Before applying the finish, ensure the floor is clean and dry. Follow the manufacturer's instructions for the specific finish being used. Apply the finish evenly using a brush, roller, or applicator pad. Allow the finish to dry completely before applying additional coats. Multiple coats are typically required for optimal protection and durability. Lightly sand between coats to ensure a smooth and even finish. Always vacuum thoroughly after sanding between coats to remove any dust particles.
Maintaining the Rustic Wood Floor: Regular maintenance is essential for preserving the beauty and longevity of a rustic wood floor. Sweep or vacuum the floor regularly to remove dirt and debris. Mop the floor with a damp cloth and a mild cleaning solution. Avoid using harsh chemicals or abrasive cleaners, as these can damage the finish. Consider using rugs in high-traffic areas to protect the floor from wear and tear. Periodically reapply the finish as needed to maintain its protective qualities.

9 Distressed Wood Flooring Ideas For A Rustic Look Elmwood Reclaimed Timber

How To Make Distressed Wood Floors The Craftsman Blog

9 Distressed Wood Flooring Ideas For A Rustic Look Elmwood Reclaimed Timber

How To Make New Wood Look Old Rustic Young House Love

How To Make New Wood Look Old Rustic Young House Love

How To Make New Wood Look Old Rustic Young House Love

Make Your Own Plank Flooring Using 1 X 12 Lumber Hallstrom Home

Diy Rustic Wide Plank Plywood Flooring Our Project Ideas

24 Amazing Ideas Of Rustic Wood Flooring For Extravagant Look Floors Floor Design Reclaimed

Make Your Own Plank Flooring Using 1 X 12 Lumber Hallstrom Home
Related Posts