How to Lay Wooden Flooring on Tiles
Installing wooden flooring over existing tiles is a practical and cost-effective solution to upgrade your home's aesthetics. While it may seem like a complex task, it's surprisingly achievable with careful planning and the right techniques. Here's a comprehensive guide to help you lay wooden flooring on tiles:
1. Assess the Tiles and Subfloor
Before laying the flooring, ensure that the tiles are firmly attached to the subfloor and level. Any loose or uneven tiles should be secured or replaced to prevent problems later on. Inspect the subfloor for moisture and address any issues promptly.
2. Install Underlayment
Underlayment is essential for soundproofing, moisture protection, and providing a level base for the wooden flooring. Unroll the underlayment over the tiles and secure it using tape or a tacking gun. Overlap the joints by a few centimeters to ensure complete coverage.
3. Choose and Prepare the Wood Flooring
Select wood flooring planks that suit your desired style and durability requirements. Measure and cut the planks to fit the room layout. Acclimate the wood to the room temperature for at least 48 hours before installation to avoid expansion or contraction issues.
4. Install the First Row
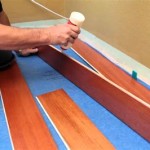
Start laying the flooring from a corner of the room. Align the first row of planks along a wall using spacers to maintain even gaps. Apply wood glue sparingly to the edge of the planks and connect them tightly.
5. Continue Laying the Planks
Repeat step 4 for subsequent rows, staggering the joints to ensure strength and stability. Gently tap the planks into place using a tapping block and hammer. Check for levelness and adjust the planks as needed.
6. Fit the Last Row
The last row may require cutting to fit snugly against the wall. Measure the gap and cut the planks accordingly. Use a pull bar to tighten the last row into place.
7. Trim and Install Moldings
Once the flooring is laid, install baseboards, quarter rounds, or other moldings to conceal the gaps and add a finished look. Secure the moldings with nails or screws.
8. Seal and Finish
To protect your wooden flooring and enhance its appearance, apply a sealant or finish. Follow the manufacturer's instructions for application and allow the finish to cure completely before walking on the floor.
Tips for Success:
- Use a trowel or spreader to apply wood glue evenly.
- Ensure the planks are tightly connected to prevent gaps.
- Clean up any excess glue immediately.
- Protect the floor from damage during installation by covering it with cardboard or plywood.
- Allow ample curing time for the glue and finish.

Wood Look Tile Flooring How To Lay That Looks Like

Step By Installation Guide For Wood Floor Tiles

Installing Tiles On Hardwood Flooring Expert Gui

How To Install Hardwood Flooring For Beginners

How To Install Wood Look Floor Tile

Installing Wood Look Tile Tips From A Pro Brepurposed

Installing Wood Look Tile Tips From A Pro Brepurposed

Installing Wood Look Tile 5 Insider Tips To Achieve Success Diytileguy

Tile Flooring Demo Installation Centsational Style

Install Hardwood Flooring Over Tile Floor Double Glue Down Method
Related Posts


