How to Lay Vinyl Plank Flooring on Steps
Vinyl plank flooring has become a popular choice for homeowners due to its durability, affordability, and stylish appearance. Its versatility extends beyond flat surfaces, as it can also be installed on steps, transforming them into a stylish and functional element of the home. Installing vinyl plank flooring on steps requires careful planning and execution, but with the right tools and techniques, it can be a rewarding DIY project.
Preparing the Steps for Installation
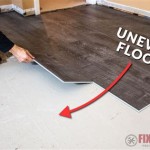
The first step in laying vinyl plank flooring on steps is preparing the surface. This involves removing any existing flooring, such as carpet or tile, and inspecting the subfloor for any imperfections. Any significant damage or unevenness should be addressed before proceeding. If the subfloor is made of wood, it should be sanded smooth and free of loose boards, ensuring a solid foundation for the vinyl planks. If the subfloor is concrete, it should be clean, dry, and free of cracks or chips.
Next, apply a leveling compound to any uneven areas, allowing it to cure completely before proceeding. This ensures a smooth and even surface for the vinyl planks. If the subfloor is made of wood, it's essential to install a moisture barrier to prevent moisture from impacting the flooring. This can be achieved using a plastic sheet or a moisture-resistant underlayment. Regardless of the subfloor material, it's important to consider the thickness of the vinyl planks and the desired height of the step. This will determine the amount of underlayment required.
Choosing the Right Vinyl Plank Flooring
When selecting vinyl plank flooring for steps, consider the following factors:
- Wear layer thickness: A thicker wear layer is essential for high-traffic areas like stairs, ensuring durability and longevity.
- Water-resistance: Steps are prone to spills and moisture, so opting for water-resistant vinyl plank flooring is crucial to prevent damage.
- Slip-resistance: The safety of your steps is paramount, and a slip-resistant finish helps prevent accidents, especially when the steps are wet.
- Color and style: Choose a color and style that complements your home’s decor while considering the overall aesthetic of the steps.
Installing Vinyl Plank Flooring on Steps
Once the steps are prepared and the vinyl plank flooring is chosen, you can begin the installation process. It's essential to start at the bottom step and work your way up, ensuring accurate measurement and cutting.
For each step, begin by installing the first plank at the bottom, leaving a small gap between the plank and the wall for expansion. Use a utility knife to cut planks to fit the specific dimensions of each step, ensuring a tight fit. Secure the planks in place using adhesive or a click-lock system, depending on the type of flooring chosen.
When installing planks on the riser, be sure to cut the plank slightly longer than the height of the riser. This will create an overhang that will be trimmed later with a miter saw. Use a level to ensure the planks are installed straight and flush, preventing any unevenness.
As you progress up the stairs, pay close attention to the transition between steps, ensuring a smooth and seamless flow. If necessary, use a scrap piece of flooring to create a transition strip between the tread and riser.
Once all the planks are installed, it's time to trim the overhang on the risers. Use a miter saw to cut the overhang flush with the top of the tread, creating a clean, finished look. Finally, install stair nosing at the top of each step to protect the edge of the vinyl planks and provide a visual accent.
Remember to follow the manufacturer's instructions for the specific vinyl plank flooring you've chosen. These instructions will provide detailed information on the installation process, including recommended adhesives, cutting techniques, and proper spacing for expansion.
Tips for a Successful Installation
To ensure a successful installation of vinyl plank flooring on steps, consider these additional tips:
- Use a saw specifically designed for cutting vinyl. This ensures accurate cutting and clean edges.
- Measure twice, cut once. Precision is key when cutting planks to fit the dimensions of each step.
- Use a level to ensure planks are installed straight and flush. This prevents uneven seating and an unprofessional look.
- Allow for proper expansion. Leave a small gap between the planks and walls to account for expansion and contraction due to temperature fluctuations.
- Be patient and take your time. Installing vinyl plank flooring on steps requires precision and attention to detail.

How To Install Lvp Stairs Diy

How To Install Luxury Vinyl Plank Laminate Flooring On Stairs

How To Install Vinyl Plank Flooring On Stairs In 6 Steps

How To Install Laminate On Stairs Step By For Beginners

Vinyl Plank On Stairs A Diy Guide How To Transform Your With Style Triad Flooring And Bath

Steps To Install Lvp On Stairs Flooring Insights

Luxury Vinyl Tile Seamless Upstairs And Downstairs Solution

Full Guide To Installing Lvp Stair Treads With Diy White Risers Builds By Maz Flooret

How To Install Vinyl Plank Flooring On Stairs In 6 Steps

How To Install Laminate Flooring On Staircase Step By Guide
Related Posts