How To Lay Vinyl Plank Flooring On OSB Subfloor
Laying vinyl plank flooring over an OSB (Oriented Strand Board) subfloor is a common practice in both new construction and renovation projects. Vinyl plank flooring offers durability, water resistance, and ease of installation, making it an attractive option for many homeowners. However, successful installation hinges on proper preparation and adherence to specific techniques. This article provides a comprehensive guide on how to effectively lay vinyl plank flooring on an OSB subfloor, ensuring a long-lasting and aesthetically pleasing result.
Before embarking on the installation, understanding the properties of both vinyl plank flooring and OSB subfloors is crucial. Vinyl plank flooring typically comes in two main types: click-lock (also known as floating) and glue-down. Click-lock planks interlock with each other, creating a floating floor that is not directly adhered to the subfloor. Glue-down planks, as the name suggests, are adhered directly to the subfloor using a suitable adhesive. The chosen type will influence the specific installation steps.
OSB is an engineered wood product manufactured by compressing and adhering strands of wood together with adhesives. It is commonly used as a subfloor due to its strength, stability, and cost-effectiveness. However, OSB is susceptible to moisture damage and can have surface irregularities that need to be addressed before installing vinyl plank flooring.
The success of any flooring project is directly related to the preparation undertaken before installation. This is particularly true when working with OSB subfloors. Comprehensive preparation minimizes potential issues and ensures optimal adhesion and longevity of the vinyl plank flooring. Proper preparation generally involves the following steps:
Assessing and Preparing the OSB Subfloor
The first step is a thorough assessment of the OSB subfloor. This involves checking for several key factors that can affect the final result.
Moisture Content: OSB is susceptible to moisture. High moisture content can cause the OSB to swell and warp, leading to problems with the vinyl plank flooring. Use a moisture meter to check the moisture content of the OSB. The acceptable moisture level will vary depending on the manufacturer's recommendations for both the OSB and the vinyl plank flooring. Consult the installation guides for specific tolerances. Generally, moisture content should be within the range of 6-12%. If the moisture content is too high, allow the OSB to dry completely before proceeding. This may involve improving ventilation within the space.
Levelness: The subfloor must be level. Significant dips, humps, or unevenness will telegraph through the vinyl plank flooring, resulting in an unattractive and potentially unstable surface. Use a long level (at least 6 feet) to check for levelness across the subfloor in multiple directions. Mark any high or low spots. Small variations (less than 3/16 inch over 10 feet) can often be accommodated with self-leveling compound. Larger variations will require more extensive leveling work, such as sanding down high spots or filling low spots with patching compound designed for wood subfloors.
Fastener Security: Ensure that all screws or nails used to secure the OSB to the joists are properly seated and secure. Protruding fasteners can create bumps under the vinyl plank flooring. Countersink any protruding fasteners and replace any loose or damaged fasteners. Inspect all seams of the OSB. Secure any loose seams with additional screws or nails.
Subfloor Stability: Check for areas where the OSB is deflecting significantly. Deflection can occur when the subfloor is not adequately supported by the joists or when the OSB itself is damaged. Addressing these structural deficiencies may require reinforcing the joists or replacing sections of the OSB. If the subfloor feels spongy in some areas, it's imperative to address this before installing any flooring.
Cleaning: Thoroughly clean the subfloor. Remove all debris, dust, dirt, and any other contaminants. Use a vacuum cleaner to remove loose particles, followed by a damp mop (ensure the OSB doesn't become overly saturated) to remove any remaining residue. Allow the subfloor to dry completely before proceeding. The presence of debris can impede adhesion and create imperfections under the finished floor.
Surface Preparation for Optimal Adhesion
Once the subfloor has been assessed and major issues have been addressed, the next step is to prepare the surface for optimal adhesion (particularly important for glue-down vinyl plank flooring, but beneficial even for click-lock flooring). This involves smoothing out any minor imperfections and ensuring a clean, receptive surface.
Sanding: Lightly sand the surface of the OSB to remove any gloss or surface contaminants. This creates a slightly rougher surface that promotes better adhesion. Use a fine-grit sandpaper (120-grit or higher) and a sanding block or orbital sander. Avoid excessive sanding, as this can damage the OSB. The aim is simply to create a slightly textured surface.
Filling Imperfections: Use a wood patching compound or floor leveling compound specifically designed for use on wood subfloors to fill any small cracks, holes, or imperfections. Apply the compound according to the manufacturer's instructions. Allow the compound to dry completely and then sand it smooth to blend with the surrounding surface. Repeat as necessary until the surface is smooth and even.
Underlayment (Optional): While not always necessary, installing an underlayment between the OSB subfloor and the vinyl plank flooring can provide several benefits. Underlayment can help to cushion the floor, reduce noise transmission, and provide an extra layer of moisture protection. If using an underlayment, choose one that is specifically designed for use with vinyl plank flooring and follow the manufacturer's instructions for installation. A thin foam underlayment is often recommended. Consult the vinyl plank flooring manufacturer’s recommendation before using an underlayment.
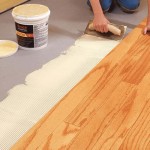
Priming (For Glue-Down Installations): For glue-down installations, applying a primer specifically designed for use with vinyl plank flooring and OSB subfloors is crucial. The primer improves adhesion between the adhesive and the subfloor, ensuring a strong and lasting bond. Apply the primer according to the manufacturer's instructions and allow it to dry completely before proceeding with the installation.
Installing the Vinyl Plank Flooring
With the subfloor properly prepared, the final step is to install the vinyl plank flooring. This involves careful planning, precise cutting, and proper installation techniques.
Acclimation: Allow the vinyl plank flooring to acclimate to the room's temperature and humidity for at least 48 hours before installation. This allows the planks to expand or contract to their final size, minimizing the risk of gaps or buckling after installation. Store the planks in the room where they will be installed, laying them flat and allowing for air circulation. Consult the manufacturer's instructions for specific acclimation requirements.
Layout Planning: Plan the layout of the flooring before beginning the installation. Determine the direction in which the planks will be laid and calculate the number of rows needed. Consider the placement of seams and try to minimize short pieces at the ends of rows. It's generally recommended to run the planks parallel to the longest wall of the room. Also, consider the location of doorways and other transitions. Creating a detailed layout ensures an aesthetically pleasing final result.
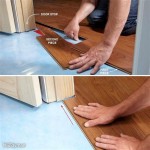
Cutting: Use a utility knife, a scoring tool, or a vinyl plank flooring cutter to cut the planks to the required size. For straight cuts, use a straight edge as a guide. For more complex cuts, such as around pipes or doorways, use a jigsaw or a coping saw. Precise cutting is essential for a professional-looking installation.
Click-Lock Installation: For click-lock flooring, begin by laying the first row of planks along a straight edge, such as a wall or a chalk line. Ensure that the planks are properly aligned and that the tongue and groove edges are interlocking correctly. Use a tapping block and a hammer to gently tap the planks together to create a tight and seamless joint. Continue laying rows of planks, staggering the seams to create a more natural look. Leave a small expansion gap (typically ¼ inch) around the perimeter of the room to allow for expansion and contraction. This gap will be covered by baseboards or quarter-round molding.
Glue-Down Installation: For glue-down flooring, apply the adhesive to the subfloor according to the manufacturer's instructions. Use a notched trowel to spread the adhesive evenly and ensure proper coverage. Work in small sections to prevent the adhesive from drying out. Carefully place the planks onto the adhesive, ensuring that they are properly aligned and that the seams are tight. Use a roller to press the planks firmly into the adhesive, ensuring good contact. Remove any excess adhesive with a damp cloth. Allow the adhesive to cure completely before allowing foot traffic on the floor.
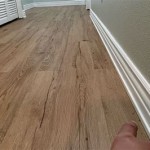
Finishing: Once the flooring has been installed, install baseboards or quarter-round molding around the perimeter of the room to cover the expansion gap. Install transition strips at doorways and other transitions to create a smooth and safe transition between different flooring types. Clean the floor thoroughly to remove any dust or debris.
Successfully laying vinyl plank flooring on an OSB subfloor requires careful preparation, attention to detail, and adherence to the manufacturer's instructions. By following these guidelines, homeowners can achieve a beautiful and durable floor that will last for years to come.

How To Install Glue Down Luxury Vinyl Plank Flooring On Osb Sub Floor

How To Prep Wood Subfloor For Luxury Vinyl Plank Flooring Beginners Fix High And Low Spots

How To Level A Plywood Or Osb Subfloor Using Asphalt Shingles Construction Felt

Complete Guide Underlayment For Vinyl Sheet Flooring

How To Install Vinyl Plank Flooring In A Bathroom Fixthisbuildthat

A Guide To Subfloors Used Under Wood Flooring Floor Business

Easy Ways To Dry Osb Subfloors 12 Steps With S Wikihow

How To Level A Plywood Or Osb Subfloor Using Asphalt Shingles Construction Felt

How To Level A Plywood Or Osb Subfloor Using Asphalt Shingles Construction Felt

Subfloor 101 Everything You Need To Know Flooringmaestro
Related Posts