How To Lay Vinyl Flooring In A Basement: A Comprehensive Guide
Vinyl flooring is a popular choice for basements due to its water resistance, durability, and ease of installation. However, successfully installing vinyl flooring in a basement requires careful preparation and execution to prevent potential problems like moisture damage and uneven surfaces. This article provides a detailed guide on how to lay vinyl flooring in a basement correctly, covering all essential steps from preparation to finishing.
1. Assessing and Preparing the Basement Floor
Before even considering the purchase of vinyl flooring, a thorough assessment of the basement floor is crucial. This step determines the feasibility of installation and identifies any potential challenges that need to be addressed. Neglecting this stage can lead to significant problems down the line, compromising the integrity and longevity of the flooring.
The first consideration is moisture. Basements are inherently prone to humidity and dampness due to their below-grade location. Examine the concrete slab for signs of moisture, such as discoloration, efflorescence (a white, powdery deposit), or even standing water. A simple moisture test can be performed by taping a plastic sheet (approximately 1 foot square) to several areas of the floor with duct tape. After 24-48 hours, check underneath the plastic. If condensation is present, it indicates excessive moisture levels that need to be addressed before installing any flooring. This might involve installing a dehumidifier, improving drainage around the foundation, or applying a waterproof membrane directly to the concrete.
Next, evaluate the evenness and condition of the concrete slab. Use a long level (at least six feet) to check for dips, bumps, and cracks. Minor imperfections (less than ¼ inch) can often be corrected with a self-leveling compound. Larger cracks or significant unevenness require more extensive repairs, such as patching with a concrete crack filler or applying a thicker layer of self-leveling compound. Ensure that all repairs are fully cured and dry before proceeding.
Finally, clean the concrete slab thoroughly. Sweep away any loose debris, dirt, and dust. Scrub the surface with a concrete cleaner to remove any oil, grease, or other contaminants. Rinse thoroughly and allow the floor to dry completely. A clean, dry, and level surface is essential for proper adhesion and a long-lasting installation.
2. Selecting and Preparing the Appropriate Vinyl Flooring
Choosing the right type of vinyl flooring for a basement environment is crucial for durability and longevity. Several options are available, each with its own advantages and disadvantages. Luxury Vinyl Plank (LVP) and Luxury Vinyl Tile (LVT) are popular choices due to their realistic appearance, water resistance, and ease of installation. Sheet vinyl offers a seamless surface, providing superior water protection but can be more challenging to install.
Consider the thickness of the vinyl flooring. Thicker options generally offer better durability and cushioning underfoot. Also, look for vinyl flooring specifically designed for basement use, which often includes enhanced moisture resistance and antimicrobial properties. Check the manufacturer's specifications regarding suitability for below-grade installations.
Once the vinyl flooring is selected, proper acclimation is essential. Bring the flooring into the basement environment at least 48-72 hours before installation. This allows the vinyl to adjust to the temperature and humidity levels, preventing expansion or contraction after installation. Stack the boxes of flooring in a single layer, allowing air to circulate around them.
Before starting the installation, carefully plan the layout of the vinyl flooring. Measure the dimensions of the room and determine the best direction to run the planks or tiles. Consider the placement of seams and try to minimize their visibility. If using LVP or LVT, consider staggering the end joints to create a more visually appealing and structurally sound floor. It's often helpful to dry-lay a few rows of flooring to visualize the final appearance and make any necessary adjustments to the layout.
3. Installation Techniques for Different Types of Vinyl Flooring
The installation process varies depending on the type of vinyl flooring chosen. Understanding the specific techniques for each type is crucial for a successful and aesthetically pleasing result.
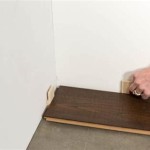
For LVP and LVT, the most common installation method is a floating floor system using a click-lock mechanism. Start by installing a suitable underlayment to provide a smooth, even surface and added cushioning. The underlayment also acts as a moisture barrier. Begin laying the first row of planks or tiles along a straight wall, leaving a small expansion gap (typically ¼ inch) between the flooring and the wall. Use spacers to maintain a consistent gap. Engage the click-lock mechanism by angling the planks or tiles and pressing them together until they click into place. Use a tapping block and hammer to ensure a tight and secure connection. Continue installing subsequent rows, staggering the end joints to create a random pattern. Cut planks or tiles as needed to fit around obstacles or at the end of rows, using a utility knife or a vinyl flooring cutter.
Sheet vinyl installation requires more precision and skill. Start by creating a template of the room using kraft paper or builder's paper. Lay the paper on the floor, overlapping the edges, and tape the pieces together. Carefully trace the outline of the room, including any obstructions like pipes or columns. Transfer the template to the sheet vinyl and cut it slightly larger than the room dimensions. Position the sheet vinyl in the room, carefully aligning it with the walls. Use a straight edge and utility knife to trim the edges precisely, ensuring a tight fit against the walls. For full-spread adhesive installations, apply adhesive to the subfloor according to the manufacturer's instructions. Carefully roll the sheet vinyl onto the adhesive, using a floor roller to ensure complete contact and remove any air bubbles. For perimeter-glued installations, apply adhesive only around the perimeter of the room and around any seams.
Regardless of the installation method, pay close attention to details. Ensure that all seams are tight and secure. Use a seam roller to press down on seams, especially when using sheet vinyl. Clean up any adhesive spills immediately with a damp cloth. Once the installation is complete, remove the spacers and install baseboards or quarter-round molding to cover the expansion gap and provide a finished look.
4. Addressing Potential Problems and Troubleshooting
Even with careful planning and execution, problems can arise during or after vinyl flooring installation. Being prepared to address these issues can prevent further damage and ensure a satisfactory outcome.
One common problem is uneven adhesion. This can occur if the subfloor is not properly prepared or if the adhesive is not applied correctly. If you notice areas where the vinyl flooring is not adhering properly, try lifting the flooring carefully and applying additional adhesive. Use a floor roller to press the flooring back into place. If the problem persists, it may be necessary to remove the affected section and start over.
Another potential issue is moisture damage. If moisture seeps under the vinyl flooring, it can lead to mold growth, mildew, and structural damage. To prevent this, ensure that the basement floor is properly sealed and waterproofed before installation. If you suspect moisture damage, address the source of the moisture immediately. Remove the affected section of flooring and allow the subfloor to dry completely before reinstalling the flooring. Consider using a dehumidifier to control humidity levels in the basement.
Gaps or cracks can also develop over time, especially if the vinyl flooring is not properly acclimated or if the subfloor is not stable. To repair small gaps or cracks, use a color-matched vinyl repair filler. Apply the filler to the gap or crack and smooth it out with a putty knife. For larger gaps or cracks, it may be necessary to replace the affected section of flooring.
5. Post-Installation Care and Maintenance
Proper care and maintenance are essential for prolonging the life of vinyl flooring and maintaining its appearance. Regular cleaning and preventative measures can help prevent damage and keep the flooring looking its best.
Sweep or vacuum the vinyl flooring regularly to remove dirt, dust, and debris. Use a soft-bristled broom or a vacuum cleaner with a floor brush attachment to avoid scratching the surface. For more thorough cleaning, mop the floor with a mild detergent and water. Avoid using harsh chemicals, abrasive cleaners, or steam mops, as these can damage the vinyl flooring. Always follow the manufacturer's recommendations for cleaning and maintenance.
Protect the vinyl flooring from scratches and dents by using furniture pads under the legs of tables, chairs, and other heavy objects. Avoid dragging heavy objects across the floor. Place mats or rugs in high-traffic areas to protect the flooring from wear and tear. Clean up spills immediately to prevent staining. Use doormats at entrances to prevent dirt and debris from being tracked onto the flooring.
Periodically inspect the vinyl flooring for signs of damage, such as scratches, dents, or tears. Repair any damage promptly to prevent it from worsening. Consider applying a vinyl floor polish or sealant to protect the flooring from wear and tear and enhance its appearance. Follow the manufacturer's instructions for application and maintenance.

Vinyl Plank Flooring On Concrete Basement Pros Cons

Lvp Flooring Installation How To Install Luxury Vinyl Plank In A Basement Diy

Best How To Install Vinyl Plank Flooring Four Generations One Roof

Vinyl Plank Flooring Installation Basement Remodel Before And After

Installing Vinyl Floors A Do It Yourself Guide The Honeycomb Home

Vinyl Plank Flooring On Concrete Basement Pros Cons

How To Install Vinyl Plank Flooring On Concrete Step By Guide

Tips For Installing Vinyl Plank Over Concrete Floors Lemon Thistle

Best How To Install Vinyl Plank Flooring Four Generations One Roof

Ep5 Finishing A Basement How To Install Vinyl Plank Flooring Diy
Related Posts