How to Lay Out Laminate Flooring In Multiple Rooms
Laminate flooring is a popular choice for homeowners due to its durability, affordability, and ease of installation. When tackling a project that involves laying laminate flooring across multiple rooms, meticulous planning and execution are crucial for achieving a seamless and professional finish. This article will outline the necessary steps and considerations for successfully installing laminate flooring throughout multiple rooms.
Planning and Preparation: The Foundation for Success
Before commencing any physical work, a comprehensive plan is essential. This stage involves accurately measuring the rooms, selecting the appropriate laminate flooring, and gathering the necessary tools and materials. Neglecting this initial phase can lead to costly errors and delays later in the process.
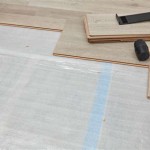
Accurate Measurements: The first step is to meticulously measure the length and width of each room where the laminate flooring will be installed. It is imperative to measure at the widest points in each room, accounting for any irregularities or alcoves. Add these measurements together to determine the total square footage required. Add an additional 5-10% to the total square footage to account for waste due to cuts, damaged planks, and future repairs. This overage is paramount, especially when dealing with multiple rooms, as slight variations in cuts can quickly deplete your supply. Record all measurements and calculations accurately. Using graph paper can assist in visualizing the layout and minimizing waste.
Laminate Flooring Selection: Selecting the appropriate laminate flooring is critical. Consider factors such as the desired aesthetic, durability requirements, and budget. Different laminate flooring products offer varying levels of scratch resistance, water resistance, and thickness. For high-traffic areas or rooms prone to moisture, such as kitchens or bathrooms, opt for a thicker laminate with a higher AC (Abrasion Class) rating. Ensure that the chosen laminate flooring is suitable for installation across multiple rooms and that sufficient quantities are ordered, taking into account the previously calculated waste factor. It is also highly recommended to order all the flooring at the same time from the same lot number to ensure color consistency across all rooms. Slight variations in dye lots can be noticeable if flooring is purchased at different times.
Tool and Material Acquisition: Assemble all the necessary tools and materials before beginning the installation. Essential tools include a measuring tape, pencil, saw (either a circular saw, jigsaw, or laminate flooring cutter), tapping block, pull bar, spacers, hammer, safety glasses, and kneepads. Additional materials include underlayment (if not already attached to the laminate planks), moisture barrier (if required based on the subfloor and laminate flooring specifications), shims, and transition strips. Ensure all tools are in good working condition and that you have sufficient material to complete the entire project. A sharp cutting blade is crucial for clean, splinter-free cuts, particularly when working with laminate.
Subfloor Preparation: The subfloor must be clean, level, and dry before installing the laminate flooring. Sweep or vacuum the subfloor thoroughly to remove any dirt, debris, or existing flooring remnants. Inspect the subfloor for any imperfections, such as cracks, holes, or unevenness. Repair any imperfections with a suitable patching compound or self-leveling compound. Ensure the subfloor is level to within 3/16 inch over a 10-foot span. Use a long level to check for unevenness and correct any discrepancies as needed. Moisture testing of the subfloor is also crucial. Excessive moisture can damage the laminate flooring and lead to mold growth. Use a moisture meter to check the moisture content of the subfloor, ensuring it falls within the manufacturer's recommended range. If necessary, install a moisture barrier to prevent moisture migration from the subfloor to the laminate flooring.
Acclimation: Allow the laminate flooring to acclimate to the environment for at least 48 to 72 hours prior to installation. This allows the planks to adjust to the temperature and humidity of the rooms, preventing expansion or contraction after installation. Store the boxes of laminate flooring flat in the rooms where they will be installed. This acclimation period is critical, especially when installing laminate across rooms with varying temperatures and humidity levels. Failure to properly acclimate the flooring can result in gaps, buckling, or other issues after installation.
Strategic Layout and Installation Techniques
Once the preliminary preparation is complete, the focus shifts to laying out the flooring and applying the correct installation techniques. This phase requires careful consideration of the layout, expansion gaps, and locking mechanisms to ensure a visually appealing and structurally sound floor.
Determining the Layout: Before starting the installation, plan the layout of the laminate flooring to minimize waste and create a visually appealing result. Consider the direction of the light and the shape of the rooms. Generally, it is recommended to lay the laminate flooring parallel to the longest wall of the room or in the direction of the primary light source. This can create a more spacious and visually appealing effect. Avoid short pieces at the end of rows by calculating the width of the last row and adjusting the width of the first row accordingly. A balanced layout is particularly important in open-concept spaces or when the flooring flows seamlessly between multiple rooms.
Expansion Gaps: Expansion gaps are crucial for allowing the laminate flooring to expand and contract with changes in temperature and humidity. Leave a 1/4-inch to 3/8-inch expansion gap around the perimeter of each room, as well as around any fixed objects such as pipes or door frames. Use spacers to maintain the expansion gap during installation. These gaps are often hidden by baseboards and trim after the installation is complete. In larger rooms or when transitioning between rooms, larger expansion gaps may be necessary, particularly if the rooms experience significant temperature or humidity fluctuations. Ignoring expansion gaps will almost certainly result in buckling or warping of the flooring.
Underlayment Installation: If the laminate flooring does not have an attached underlayment, install it before laying the planks. The underlayment provides cushioning, reduces noise, and helps to level minor imperfections in the subfloor. Unroll the underlayment and cut it to fit the room, leaving a slight overlap at the seams. Tape the seams together with seam tape. Ensure the underlayment is properly aligned and free of wrinkles or creases. Choose an underlayment appropriate for the specific type of laminate flooring and subfloor. Some underlayments are better suited for concrete subfloors, while others are designed for wood subfloors. Follow the manufacturer's instructions for underlayment installation.
Laminate Flooring Installation: Begin installing the laminate flooring along the longest straight wall of the room. Start in a corner and work outwards. Use spacers to maintain the expansion gap against the wall. Interlock the planks according to the manufacturer's instructions. Typically, laminate flooring uses a click-lock system, where the planks simply snap together. Use a tapping block and hammer to gently tap the planks together, ensuring a tight and secure fit. Avoid using excessive force, as this can damage the planks. Stagger the end joints of the planks from row to row to create a more visually appealing and structurally sound floor. A general rule of thumb is to maintain a minimum of 6-inch stagger between end joints. Use a pull bar to tighten the last row against the wall. When cutting planks to fit around corners or obstacles, use a jigsaw or laminate flooring cutter. Always wear safety glasses when cutting laminate flooring.
Transition Strips: Transition strips are used to create a smooth transition between different flooring types or between rooms with different floor heights. Install transition strips at doorways and other transition areas. Transition strips help to protect the edges of the laminate flooring and prevent tripping hazards. Choose transition strips that match the color and style of the laminate flooring. Secure the transition strips to the subfloor with screws or adhesive. Ensure the transition strips are properly aligned and level with the surrounding flooring.
Maintaining Consistency and Addressing Challenges Across Rooms
Maintaining consistency throughout the installation process is crucial for achieving a professional-looking result. This involves ensuring proper alignment, consistent expansion gaps, and addressing common challenges that may arise when working across multiple rooms.
Maintaining Alignment: Throughout the installation process, regularly check the alignment of the laminate flooring. Use a straight edge or level to ensure that the rows are straight and parallel. Minor misalignment can become more noticeable across multiple rooms. Make adjustments as needed to maintain a consistent alignment. Particularly in open-concept areas, proper alignment is critical for visual continuity. Slight variations in alignment can disrupt the flow and detract from the overall aesthetic.
Consistent Expansion Gaps: Ensure that the expansion gaps are consistent around the perimeter of each room. Varying expansion gaps can lead to uneven expansion and contraction of the flooring, resulting in buckling or gaps. Regularly check the expansion gaps during installation and make adjustments as needed. Use spacers to maintain a consistent gap. Pay particularly close attention to expansion gaps around doorways and other transition areas. Insufficient expansion gaps in these areas are a common cause of problems.
Addressing Doorways and Transitions: Doorways and transitions between rooms often present unique challenges. Carefully plan the layout of the flooring around doorways to ensure a smooth and aesthetically pleasing transition. Use transition strips to cover any gaps or differences in floor height. When installing laminate flooring around door frames, undercut the door frame with a jamb saw to allow the flooring to slide underneath. This creates a clean and professional finish. Consider the direction of the door swing when planning the layout around doorways. Avoid placing short pieces of laminate flooring directly in front of doorways.
Dealing with Obstacles: Rooms often contain obstacles such as pipes, radiators, or built-in furniture. Carefully measure and cut the laminate flooring to fit around these obstacles. Use a jigsaw or laminate flooring cutter to make precise cuts. Create templates to ensure accurate cuts. For pipes, use a hole saw to cut a hole in the laminate flooring slightly larger than the diameter of the pipe. Cover the gap around the pipe with a pipe collar. When installing laminate flooring around radiators, leave an expansion gap around the radiator legs. Secure the expansion gap with shims.
Addressing Uneven Subfloors: Uneven subfloors can cause problems when installing laminate flooring. Use a self-leveling compound to level any uneven areas in the subfloor. Allow the self-leveling compound to dry completely before installing the laminate flooring. Alternatively, use a thicker underlayment to compensate for minor imperfections in the subfloor. Identify and address any significant unevenness before starting the installation. Failure to do so can result in an uneven floor that is prone to damage.
By adhering to a detailed plan, paying close attention to detail during installation, and proactively addressing potential challenges, individuals can successfully lay laminate flooring across multiple rooms, resulting in a beautiful and durable floor that enhances the aesthetic appeal of their home or building.

How To Install Laminate Flooring Without Room Transitions

Installing Laminate Down Hallways From Another Room

How Do I Lay System Laminate Flooring Across An Opening Installing Laying

Which Direction To Lay Vinyl Plank Flooring In Multiple Rooms Step By Guide 2024

Installing Planks Into Multiple Rooms Laminate And Vinyl Plank Installation Part 2

Installing Laminate Down Hallways From Another Room

Determining The Direction To Lay Install Hardwood Laminate Or Luxury Vinyl Plank Flooring

How To Install Vinyl Plank Flooring In Multiple Rooms Or Whole Floor

A Beginner S Guide To Installing Vinyl Plank Flooring Dumpsters Com

How To Transition Between Two Diffe Floors Flooring America
Related Posts