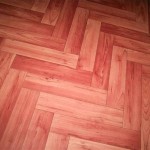
How To Lay Laminate Wood Flooring Over Concrete
Laminate flooring is a popular choice for homeowners seeking a durable, aesthetically pleasing, and relatively affordable flooring option. Its versatility and ease of installation make it a viable project for many do-it-yourself enthusiasts. Laying laminate over concrete presents specific considerations, primarily concerning moisture management and substrate preparation. This article will provide a detailed guide to successfully installing laminate flooring over a concrete subfloor.
Before commencing any installation, meticulous preparation is paramount. This includes assessing the concrete slab, gathering the necessary tools and materials, and acclimating the laminate flooring to the environment. Neglecting these preliminary steps can lead to issues such as buckling, warping, and mold growth, ultimately compromising the integrity and longevity of the flooring.
1. Assessing the Concrete Subfloor and Moisture Testing
The initial step involves a thorough inspection of the concrete slab. The concrete must be structurally sound, free from cracks exceeding 1/8 inch in width, and relatively level. Larger cracks indicate potential structural problems that necessitate professional evaluation and repair before proceeding. Minor cracks can typically be filled with a concrete patching compound.
Levelness is crucial for ensuring a smooth, even laminate floor. Use a long level (at least 6 feet) to check for variations in height across the slab. Significant deviations, generally exceeding 3/16 inch over a 10-foot span, will require leveling. This can be achieved using a self-leveling concrete compound. Follow the manufacturer's instructions carefully when applying self-leveler, ensuring proper mixing and application for optimal results.
Moisture testing is arguably the most critical aspect of preparing a concrete subfloor for laminate installation. Concrete is porous and can wick moisture from the ground, which can damage the laminate. Excessive moisture can lead to swelling, warping, and mold growth beneath the flooring. Several methods are available for testing moisture levels.
A common method is the plastic sheet test. Secure a 2x2 foot square of clear plastic sheeting to the concrete floor using duct tape, sealing all edges. Leave it in place for 24-72 hours. After the designated time, inspect the plastic. If condensation forms on the underside or the concrete beneath the plastic appears darkened, the moisture level is too high. This indicates the need for further investigation and mitigation strategies.
Another method involves using a calcium chloride test kit. This test measures the rate of moisture vapor emission (MVE) from the concrete. The kit typically contains a small container of calcium chloride that is weighed and placed on the concrete under a sealed dome for a specific period (usually 72 hours). After the designated time, the container is weighed again. The difference in weight indicates the amount of moisture absorbed by the calcium chloride, which is then used to calculate the MVE rate. Laminate manufacturers typically specify the maximum allowable MVE rate for their products; adherence to these specifications is essential for warranty compliance and long-term performance.
If moisture levels are deemed too high, several mitigation strategies can be employed. These include applying a concrete sealer designed to reduce moisture vapor transmission or installing a subfloor with a built-in moisture barrier. In severe cases, a more comprehensive waterproofing system may be required.
2. Selecting and Installing an Underlayment
An underlayment is an essential component of a laminate flooring installation over concrete. It provides several benefits, including moisture protection, sound absorption, and cushioning. When selecting an underlayment, consider its thickness, material, and vapor barrier properties. A vapor barrier is crucial for preventing moisture from migrating from the concrete into the laminate flooring.
Underlayments come in various materials, including foam, cork, and rubber. Foam underlayments are generally the most affordable option and provide basic cushioning and sound insulation. Cork underlayments offer superior sound absorption and are a more sustainable choice. Rubber underlayments provide excellent cushioning and are particularly suitable for areas with heavy foot traffic.
When installing the underlayment, follow the manufacturer's instructions meticulously. Typically, the underlayment is rolled out across the floor, with the vapor barrier side facing down toward the concrete. Overlap the seams slightly and tape them securely with moisture-resistant tape to create a continuous moisture barrier. Ensure the underlayment is smooth and free from wrinkles or creases before proceeding to install the laminate flooring.
In some cases, the laminate flooring itself may have an attached underlayment. While this simplifies the installation process, it is still crucial to conduct thorough moisture testing of the concrete subfloor. If moisture levels are elevated, even laminate with an attached underlayment may require an additional vapor barrier for adequate protection.
Before you start installing the underlayment, consider running it up the wall base approximately 2-3 inches. This provides an additional layer of protection against moisture around the perimeter of the room. Once the laminate flooring is installed, this extra bit of underlayment can be trimmed away and hidden behind the baseboards or trim.
3. Laminate Flooring Installation Techniques
Acclimating the laminate flooring is a critical step often overlooked. Laminate flooring needs to adjust to the room's temperature and humidity levels before installation. Store the unopened boxes of laminate in the room where they will be installed for at least 48-72 hours. This allows the material to expand or contract, minimizing the risk of gaps or buckling after installation.
Before starting the installation, plan the layout carefully. Determine the direction in which the planks will be laid, taking into account the room's dimensions and light sources. Ideally, the planks should run parallel to the longest wall or toward the primary light source to minimize the visibility of seams. Calculate the number of rows required to cover the floor and adjust the width of the first row if necessary to avoid ending with a narrow strip on the opposite wall.
Begin the installation along a straight wall, leaving an expansion gap of approximately ¼ inch between the laminate planks and the wall. This gap allows for the natural expansion and contraction of the flooring due to temperature and humidity changes. Use spacers to maintain a consistent expansion gap around the perimeter of the room.
Most laminate flooring systems utilize a click-lock mechanism, which allows the planks to be easily joined together. Angle the first plank into the second plank and gently press down until they click into place. Use a tapping block and a hammer to ensure a tight, secure fit. Avoid hitting the laminate directly with the hammer, as this can damage the edges.
When cutting laminate planks to fit around obstacles or at the end of a row, use a jigsaw or a laminate flooring cutter. Be sure to measure accurately and cut the planks cleanly to avoid gaps or uneven edges. For intricate cuts, consider using a template to ensure precise results.
Stagger the end joints of the planks in each row to create a more visually appealing and structurally sound floor. A good rule of thumb is to maintain a minimum of 6 inches between end joints in adjacent rows. Use the cut-off piece from the end of one row to start the next row, provided it is at least 6 inches long. This can help minimize waste and create a more random pattern.
As you progress across the floor, regularly check for alignment and ensure that the planks are locking together properly. Use a pull bar to tighten the seams in areas where space is limited. Once the entire floor is installed, remove the spacers and install baseboards or trim to cover the expansion gap around the perimeter of the room.
Be particularly aware of areas where the flooring transitions to other types of flooring, like tile or carpet. Proper transitions can prevent tripping hazards and give the flooring a more professional look. There are specific transition strips available at most home improvement stores that are designed for these purposes.
Pay attention to the placement of expansion joints, especially in larger rooms. Expansion joints allow for movement in the flooring to relieve pressure from temperature and humidity fluctuations. Depending on the manufacturer's recommendations and the size of the room, consider incorporating T-molding to serve as an expansion joint. This is typically recommended for rooms exceeding a certain length or width.
Following these steps meticulously will contribute to a successful and long-lasting laminate flooring installation over concrete. Ongoing maintenance, such as regular sweeping and occasional damp mopping with a laminate-specific cleaner, will help preserve the beauty and durability of the floor for years to come.

Installing Wood Flooring Over Concrete Diy

Installing Laminate Flooring Over Concrete The Ultimate Guide Aa Floors

How To Install Vinyl Or Laminate Floors In A Basement Over Concrete Slab

Laminate Flooring On Concrete Basement Floors Expert Installation Guide Csg Renovation

How To Install Laminate Over Concrete Day 1

How To Lay Laminate Flooring On Concrete Howtospecialist Build Step By Diy Plans Laying Installing

How To Install Laminate Flooring Over Concrete

Easy Ways To Install Vinyl Plank Flooring On Concrete

How To Install Laminate Flooring For Beginners

How To Install Laminate Flooring On Concrete Making Maanita
Related Posts