How to Lay Laminate Wood Flooring In Multiple Rooms
Laying laminate wood flooring can significantly enhance the aesthetic appeal and value of a home. When undertaking this project in multiple rooms, meticulous planning and execution are crucial for achieving a consistent and professional finish. This article outlines the necessary steps and considerations to successfully install laminate flooring throughout multiple rooms.
Preparation and Planning: The Foundation for Success
Before commencing any physical work, thorough preparation is paramount. This stage involves several critical steps that determine the overall quality and longevity of the flooring installation.
Accurate Measurement and Material Calculation: The first step is to accurately measure the square footage of each room where the laminate flooring will be installed. This includes measuring the length and width of each room and multiplying those figures. Add these individual room measurements together to determine the total square footage. It is always advisable to add an additional 5-10% to account for cuts, waste, and potential errors. This prevents the need for rushed orders and ensures a consistent dye lot across the entire project.
Subfloor Inspection and Preparation: The subfloor is the foundation upon which the laminate flooring will rest. It must be clean, level, and dry. Any imperfections, such as cracks, unevenness, or moisture issues, must be addressed before installation. Sweep or vacuum the subfloor thoroughly to remove dust, debris, and loose particles. Use a level or a self-leveling compound to correct any unevenness. Repair any cracks or holes with appropriate patching materials. Moisture is a significant enemy of laminate flooring, so test the subfloor’s moisture content using a moisture meter. The reading should be within the manufacturer's recommended range. If moisture levels are excessive, consider using a moisture barrier.
Acclimatization of Laminate Flooring: Laminate flooring needs to acclimatize to the environment in which it will be installed. This process allows the flooring to expand or contract based on the ambient temperature and humidity levels. Remove the laminate flooring from its packaging and spread the planks out in the rooms where they will be installed. Allow the flooring to acclimatize for at least 48-72 hours, following the manufacturer's specific recommendations. This step is crucial in preventing issues such as buckling or gapping after installation.
Gathering Tools and Materials: Having all the necessary tools and materials on hand before starting the installation can streamline the process and prevent delays. Essential tools and materials include: laminate flooring, underlayment, measuring tape, pencil, saw (circular saw, jigsaw, or laminate flooring cutter), tapping block, pull bar, hammer, spacers, safety glasses, and knee pads. Consider also having a dust mask, especially when cutting the laminate planks indoors.
Planning the Layout: Careful planning of the layout ensures an aesthetically pleasing and structurally sound installation. Consider the direction of the light source and the shape of the rooms. Typically, laminate planks are installed parallel to the longest wall or the primary light source to maximize visual appeal and minimize the visibility of seams. Plan to stagger the end joints of the planks to create a random pattern, which enhances the natural look of the flooring and provides added structural stability.
Installation Process: Step-by-Step Guide
The installation process requires precision and attention to detail. Following a systematic approach ensures a consistent and high-quality finish throughout the multiple rooms.
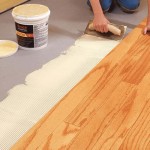
Installing the Underlayment: Underlayment provides a smooth, cushioned surface for the laminate flooring to rest on. It also helps to reduce noise and provide added insulation. Roll out the underlayment across the subfloor, ensuring that edges overlap slightly. Use tape to secure the seams and create a continuous, even surface. Choose an underlayment that is suitable for your specific needs, such as moisture resistance or soundproofing.
Laying the First Row: Begin installing the laminate flooring planks along the longest wall of the first room, leaving a consistent expansion gap of approximately 1/4 to 3/8 inch between the flooring and the wall. This gap allows for natural expansion and contraction of the flooring due to temperature and humidity changes. Use spacers to maintain the appropriate gap. Connect the first row of planks by aligning the tongue and groove edges and gently tapping them together with a tapping block and hammer. Ensure that the planks are securely locked together.
Continuing the Installation: Continue laying the laminate flooring planks row by row, ensuring that the end joints are staggered by at least 6 inches. This staggered pattern not only enhances the aesthetic appeal but also provides added structural stability. Use a tapping block and pull bar to ensure that the planks are tightly connected, especially in tight spaces or along walls. Cut planks to fit around obstacles such as pipes, door frames, and corners, using a saw or laminate flooring cutter. Accurate cutting is crucial for a professional-looking finish.
Working Around Obstacles: Obstacles such as pipes, door frames, and corners require careful cutting and fitting of the laminate planks. Use a template or a combination square to accurately measure and mark the required cuts. A jigsaw is particularly useful for making curved cuts around pipes. Remember to maintain the expansion gap around all obstacles. Consider using a transition strip or molding to cover any gaps between the laminate flooring and the obstacle.
Transitioning Between Rooms: When transitioning from one room to another, use transition strips to create a seamless and professional finish. Transition strips are typically installed at doorways to cover the expansion gaps and create a smooth transition between different flooring types or rooms. Choose transition strips that complement the laminate flooring and the surrounding decor. Ensure that the transition strips are securely attached to the subfloor.
Specific Considerations for Multiple Rooms
Installing laminate flooring in multiple rooms presents unique challenges and considerations that must be addressed to ensure a cohesive and successful outcome.
Maintaining Consistent Expansion Gaps: Ensuring consistent expansion gaps throughout all rooms is crucial for the long-term performance of the laminate flooring. Inconsistent expansion gaps can lead to buckling, gapping, or other issues. Use spacers consistently along all walls and obstacles to maintain the appropriate gap. Regularly check the expansion gaps as you progress through the installation to ensure they remain consistent.
Addressing Different Room Shapes and Sizes: Each room may have different shapes and sizes, requiring adjustments to the installation process. In irregularly shaped rooms, careful planning and precise cutting are essential. Consider creating a template for complex cuts. In larger rooms, consider installing expansion joints to accommodate larger areas of flooring. Expansion joints are breaks in the flooring that allow for movement and prevent buckling or other issues.
Synchronization of Patterns and Colors: Maintaining consistent patterns and colors throughout multiple rooms is essential for creating a cohesive and visually appealing result. When purchasing the laminate flooring, ensure that all boxes are from the same dye lot to minimize variations in color. Pay attention to the pattern of the laminate planks and ensure that the pattern flows consistently from one room to another. Avoid abrupt changes in pattern or color, which can disrupt the visual flow of the flooring.
Coordination with Doorways and Thresholds: Doorways and thresholds require careful attention to ensure a smooth and seamless transition between rooms. Measure the height of the laminate flooring and underlayment to determine the appropriate height of the transition strip. Trim the door frames and casings as necessary to allow the laminate flooring to slide underneath. Install the transition strips securely and ensure that they are flush with the top surface of the flooring.
Managing Workflow and Time: Installing laminate flooring in multiple rooms can be a time-consuming process. Plan your workflow carefully to minimize disruptions and maximize efficiency. Consider working on one room at a time to avoid spreading yourself too thin. Allow ample time for each stage of the installation process, from preparation to finishing. Be prepared to adjust your schedule as needed to accommodate unforeseen challenges.
After completing the installation in all rooms, thoroughly inspect the flooring for any imperfections or issues. Address any problems promptly to prevent them from escalating. Clean the flooring with a laminate-specific cleaner to remove dust and debris. Install baseboards and moldings to cover the expansion gaps and provide a finished look. By following these steps and considerations, a successful laminate flooring installation across multiple rooms can be achieved which enhances the beauty and value of the home for years to come.

Determining The Direction To Lay Install Hardwood Laminate Or Luxury Vinyl Plank Flooring

How To Install Laminate Flooring Without Room Transitions

How To Install Laminate Flooring In Multiple Rooms Time Lapse Diy Home Improvement 3

Which Direction To Lay Vinyl Plank Flooring In Multiple Rooms Step By Guide 2024

Installing Laminate Down Hallways From Another Room

How To Install Vinyl Plank Flooring In Multiple Rooms Or Whole Floor

The Same Floor Across Multiple Rooms

Best Direction To Lay Laminate Flooring Make Your Floor Stand Out April 2024

New Wood Floor Layout Between Adjoining Rooms With Doors Doityourself Com Community Forums

Can You Put 2 Diffe Wood Floors Next To Each Other Quora
Related Posts