How To Lay Laminate Wood Flooring In A Hallway
Laminate wood flooring is a popular choice for hallways because it is durable, easy to clean, and relatively inexpensive. It is also available in a wide variety of colors and styles, so you can find the perfect flooring to match your home's décor. If you are considering installing laminate wood flooring in your hallway, here are a few things you need to know.
1. Choose the right flooring
There are two main types of laminate wood flooring: floating and glue-down. Floating laminate flooring is installed by clicking the planks together, while glue-down laminate flooring is installed by gluing the planks to the subfloor. Floating laminate flooring is easier to install, but glue-down laminate flooring is more durable. For a hallway, either type of flooring is a good choice.
2. Prepare the subfloor
The subfloor is the surface that the laminate wood flooring will be installed on. The subfloor must be level, smooth, and dry. If the subfloor is not level, you will need to level it using a self-leveling compound. If the subfloor is not smooth, you will need to sand it down. If the subfloor is not dry, you will need to allow it to dry completely before installing the laminate wood flooring.
3. Install the underlayment
The underlayment is a layer of material that is installed between the subfloor and the laminate wood flooring. The underlayment helps to protect the laminate wood flooring from moisture and damage. It also helps to reduce noise and vibration. There are a variety of different types of underlayment available, so you should choose one that is appropriate for your needs.
4. Install the laminate wood flooring
Once the underlayment is installed, you can begin installing the laminate wood flooring. Start by laying out the planks in the desired pattern. Once you have the planks laid out, you can begin clicking them together. Be sure to tap the planks together firmly until they are fully engaged. Continue installing the laminate wood flooring until the entire hallway is covered.
5. Trim the flooring
Once the laminate wood flooring is installed, you will need to trim it around the edges of the hallway. You can do this using a jigsaw or a circular saw. Be sure to measure the flooring carefully before cutting it, so that you do not make any mistakes.
6. Install the molding
The molding is the finishing touch for the laminate wood flooring. Molding helps to hide the edges of the flooring and give it a more polished look. There are a variety of different types of molding available, so you should choose one that matches the style of your home.

Installing Laminate Flooring In Hallways Do It Yourself

Installing Laminate Flooring In Hallways Do It Yourself

Determining The Direction To Lay Install Hardwood Laminate Or Luxury Vinyl Plank Flooring

Installing Laminate Down Hallways From Another Room

Installing Laminate Down Hallways From Another Room

How To Cut Vinyl Plank Flooring L Shaped

Laminate Flooring Direction Cut Diy Home Improvement Forum

Installing Last Row Of Laminate Flooring In Hallways

Are Your Hardwood Floors Headed In The Right Direction You Tell Us

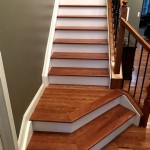
Upstairs Hallway Flooring Before And After Ugly Duckling House
Related Posts