How to Lay Laminate Flooring at the Top of Stairs
Laying laminate flooring at the top of stairs can add a touch of elegance and durability to your home. This project, while seemingly complex, can be undertaken by DIY enthusiasts with the right tools, materials, and a bit of patience. This guide will break down the process into manageable steps, ensuring a successful installation.
1. Prepare the Subfloor
A solid, level subfloor is crucial for a successful laminate flooring installation. Begin by removing any existing flooring or carpeting at the top of the stairs. Then, thoroughly inspect the subfloor for any damage or imperfections.
If you find any gaps or uneven areas, address them appropriately. For gaps, use wood filler or a similar product. Uneven areas can be leveled using self-leveling compound. Ensure the subfloor is clean and free of debris before proceeding.
2. Measure and Cut the Laminate Boards
Accurate measurement is essential for a professional-looking installation. Measure the width of the stair tread and then cut the laminate boards to size using a circular saw or a jigsaw.
To account for the slight overhang of the laminate, cut the boards slightly longer than the tread width. This overhang will provide a smooth transition from the tread to the riser. Be sure to make precise cuts for a good fit.
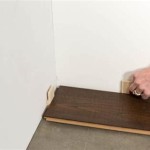
3. Install the First Row of Laminate Flooring
Start by laying the first row of laminate boards along the edge of the stair tread. Align the boards with the edge of the tread and ensure they are flush with the wall. Secure the boards to the subfloor using construction adhesive.
Leave a small gap between the first row and the wall to allow for expansion and contraction of the laminate flooring due to changes in temperature and humidity. This gap will be covered by the stair nosing later.
4. Install Subsequent Rows of Laminate Flooring
Once the first row is securely installed, proceed with laying the remaining rows of laminate flooring across the tread. Ensure that each board is tightly butted against the previous board.
Use a tapping block and rubber mallet to gently tap the boards into place. Don't hammer too hard, as this could damage the boards. Continue laying the boards until the entire tread is covered.
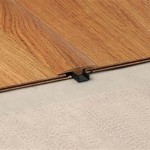
5. Install the Stair Nosing
The stair nosing is the decorative molding that covers the edge of the tread and provides a smooth transition to the riser. Measure the length of the tread and cut the stair nosing to size.
Apply construction adhesive to the underside of the nosing and then press it firmly into place. Be sure to align the nosing with the edge of the tread and the riser. Use a nail gun to secure the nosing in place. Finish by caulking the gaps between the nosing and the laminate flooring for a seamless finish.
6. Repeat for Each Step
After completing the installation for the first step, repeat the process for each subsequent step. Be sure to maintain consistent alignment and spacing between the rows of laminate flooring.
Remember to allow the adhesive to dry thoroughly before applying any weight to the newly installed flooring. This will help prevent gaps or unevenness in the finished flooring.
7. Enjoy Your New Flooring
Once the laminate flooring installation is complete, take a moment to admire your handiwork. Enjoy the sleek, durable, and aesthetically pleasing new flooring at the top of your stairs.

Installing Laminate On Top Stair To Carpet

Laminate Floor On Landing At Top Of Stairs Transition

How To Install Laminate Flooring On Stairs Direct Wood

Laminate Stair Nose Nosings For Vinyl

How To Install Laminate Flooring On Stairs 13 Steps

Installing Laminate On Top Stair To Carpet

How To Install Laminate Flooring On Staircase Step By Guide

Installing Laminate On Top Stair To Carpet

Transition Between Laminate Floor To Stairs Installation Of Stair Nose

Can You Laminate Stairs The Pros Cons
Related Posts