How To Lay Floating Wood Flooring Over Concrete
Installing floating wood flooring over concrete can transform a basement or any room with a concrete subfloor, adding warmth and aesthetic appeal. This method offers a relatively straightforward installation process compared to other flooring options, requiring no nails or adhesives to secure the flooring directly to the concrete. However, proper preparation and understanding of the necessary steps are crucial for a successful and long-lasting result.
The "floating" aspect of this flooring stems from the way the planks or tiles interlock, creating a unified surface that rests atop the subfloor. This allows for expansion and contraction due to changes in humidity and temperature, minimizing the risk of buckling or warping. A key element of this installation is the underlayment, which provides a moisture barrier, cushioning, and sound insulation.
Before embarking on this project, it’s imperative to gather the necessary tools and materials. This includes the floating wood flooring itself, the appropriate underlayment, a moisture meter, a measuring tape, a utility knife, a tapping block, a rubber mallet, spacers, a circular saw or jigsaw, safety glasses, and a dust mask. Depending on the specific underlayment chosen, seam tape might also be required.
Preparing the Concrete Subfloor
The success of any floating wood floor installation hinges on the condition of the concrete subfloor. A poorly prepared subfloor can lead to problems down the line, such as unevenness, moisture damage, and premature wear of the flooring. Therefore, thorough preparation is a non-negotiable step.
First, assess the concrete for any signs of moisture. Concrete is porous and can absorb moisture from the ground, which can eventually damage the wood flooring. Use a moisture meter to check the moisture content of the concrete. Ideally, it should be below the level recommended by the flooring manufacturer, typically around 2-3%. If the moisture level is too high, addressing the source of the moisture is critical before proceeding. This may involve improving drainage around the foundation, applying a concrete sealer, or installing a more robust moisture barrier.
Next, inspect the concrete subfloor for any cracks or imperfections. Small hairline cracks are generally not a concern, but larger cracks or uneven surfaces must be addressed. Use a concrete patching compound to fill any cracks or holes and allow it to dry completely according to the manufacturer's instructions. For larger uneven areas, self-leveling concrete can be used to create a smooth and level surface. This involves pouring a self-leveling compound over the entire floor, allowing it to spread and settle evenly. Ensure the self-leveling compound is fully cured before moving on to the next step.
Finally, thoroughly clean the concrete subfloor. Sweep and vacuum the entire area to remove any dust, debris, or loose particles. This will ensure proper adhesion of the underlayment and prevent any abrasive materials from damaging the flooring over time. A clean surface also allows for a more accurate assessment of the floor's levelness.
Installing the Underlayment
The underlayment is a critical component of a floating wood floor system. It provides a moisture barrier, cushioning, and sound insulation, all of which contribute to the comfort and longevity of the flooring. Selecting the right underlayment is essential for optimal performance.
There are various types of underlayment available, each with its own benefits and drawbacks. Foam underlayment is a common and affordable option that provides good cushioning and sound insulation. Cork underlayment is a more eco-friendly option that offers excellent insulation and moisture resistance. Rubber underlayment is a premium option that provides superior sound insulation and cushioning, but it is also more expensive.
Once the underlayment is chosen, unroll it across the concrete subfloor, following the manufacturer's instructions. Most underlayments are installed in parallel rows, overlapping the seams slightly. Use a utility knife to cut the underlayment to fit around any obstacles, such as pipes or columns. Secure the seams of the underlayment with seam tape, ensuring a continuous moisture barrier. The tape should be applied firmly to create a tight seal, preventing moisture from seeping through the seams.
Consider the specific requirements of the room when selecting the underlayment. For example, in a basement that is prone to moisture, a thicker underlayment with a built-in vapor barrier may be necessary. In an apartment building, a sound-reducing underlayment may be required to comply with building codes. Always consult with a flooring professional to determine the best underlayment for the specific application.
Laying the Floating Wood Flooring
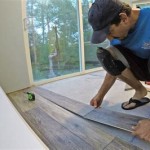
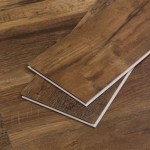
With the subfloor prepared and the underlayment installed, it is time to lay the floating wood flooring. This process involves interlocking the planks or tiles together, creating a seamless and aesthetically pleasing surface.
Begin by planning the layout of the flooring. Determine the direction in which the planks will run and consider any design elements, such as borders or patterns. It is generally recommended to run the planks parallel to the longest wall in the room, as this will create a more visually appealing and spacious effect.
Start laying the first row of planks along the longest straight wall in the room. Leave a gap of approximately ¼ inch between the flooring and the wall, using spacers to maintain this gap. This expansion gap allows the flooring to expand and contract with changes in humidity and temperature, preventing buckling or warping. The use of spacers around the perimeter of the room is crucial for a successful installation.
Interlock the planks together, following the manufacturer's instructions. Most floating wood flooring systems use a tongue-and-groove system, where the tongue of one plank fits into the groove of another. Use a tapping block and a rubber mallet to gently tap the planks together, ensuring a tight and secure connection. Avoid using excessive force, as this can damage the planks.
When you reach the end of a row, measure the remaining space and cut a plank to fit. Use a circular saw or jigsaw to make the cut, ensuring a clean and straight edge. Remember to leave the expansion gap at the end of the row. The cut-off piece can often be used to start the next row, minimizing waste.
Continue laying the flooring, row by row, until the entire room is covered. As you work, regularly check for any gaps or unevenness. If you encounter any problems, such as planks that are not interlocking properly, stop and reassess the situation. It may be necessary to remove the affected planks and start again.
Around door frames and other obstacles, carefully measure and cut the flooring to fit. Use a jigsaw to make any necessary curved or irregular cuts. Remember to leave the expansion gap around all obstacles.
Once the entire floor is laid, remove the spacers and install baseboards or quarter-round molding around the perimeter of the room. These moldings will cover the expansion gap and provide a finished look. Secure the moldings to the wall, not to the flooring, allowing the flooring to move freely underneath.
Finally, thoroughly clean the new floating wood floor. Sweep or vacuum the floor to remove any dust or debris. Use a damp mop with a mild cleaning solution to clean the floor. Avoid using excessive water, as this can damage the flooring over time. With proper care and maintenance, the new floating wood floor will provide years of enjoyment.
Addressing potential problems proactively, such as ensuring proper moisture control and adequate expansion gaps, will contribute significantly to the longevity and performance of the floating wood floor. Regularly cleaning the floor with appropriate cleaning products and avoiding excessive moisture will also help to maintain its appearance and prevent damage.

Installing Wood Flooring Over Concrete Diy

Q A Solid Wood Floors Over Concrete Slabs Jlc

Floating Engineered Hardwood

Fitting Hardwood Floor To Concrete Wood And Beyond Blog

Installing Laminate Flooring Over Concrete The Ultimate Guide Aa Floors

Installing Wood Subfloors Over Concrete Hardwood Floors

Installing Engineered Hardwood On Concrete Twenty Oak

Laminate Flooring On Concrete Basement Floors Expert Installation Guide Csg Renovation

How To Install Laminate Over Concrete Day 1

Pickndecor Com Floating Hardwood Floor Best Wood Flooring Laying Floors
Related Posts