How To Lay Engineered Wood Flooring: A Floating Floor Installation Guide
Engineered wood flooring offers a desirable alternative to solid hardwood, providing a similar aesthetic with enhanced stability and often at a more accessible price point. One of the most common and accessible installation methods for engineered wood is the floating floor technique. This method involves connecting the planks together without adhering them to the subfloor. This guide details the process of laying engineered wood flooring using the floating floor method, covering preparation, installation, and essential considerations for a successful project.
The floating floor method is characterized by its simplicity and speed, making it a suitable option for DIY enthusiasts. It allows for expansion and contraction of the wood due to changes in humidity and temperature, reducing the risk of warping or buckling. However, proper preparation of the subfloor and adherence to manufacturer instructions are crucial for achieving a professional and durable finish.
Preparing the Subfloor: Essential for a Successful Installation
The subfloor is the foundation upon which the engineered wood flooring will rest, and its condition directly impacts the final result. A properly prepared subfloor ensures a level, stable, and clean surface, preventing issues like squeaking, unevenness, and premature wear. Regardless of the type of subfloor (concrete or plywood), meticulous preparation is paramount.
For concrete subfloors, the initial step involves evaluating flatness. Significant variations in height can create challenges during installation and lead to instability. A long, straight edge (such as a six-foot level) should be used to identify any dips or humps. Minor imperfections (less than 3/16 inch over a 10-foot span) can often be addressed with self-leveling compound. Larger discrepancies require more extensive grinding or patching.
Moisture testing is equally critical for concrete subfloors. Excessive moisture can damage the engineered wood over time, voiding warranties and leading to costly repairs. A calcium chloride test or a relative humidity probe test can accurately measure the moisture content of the concrete. The moisture level must fall within the manufacturer's specified limits before proceeding with the installation. If moisture levels are too high, a moisture barrier must be applied to the subfloor.
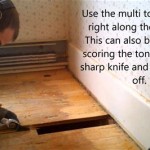
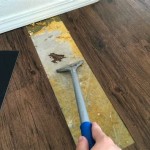
Cleaning the concrete subfloor is essential to remove any debris, dust, or contaminants that could interfere with the underlayment or the flooring itself. Sweeping, vacuuming, and even scrubbing with a mild detergent may be necessary to achieve a clean surface. Any adhesive residue or paint should be scraped or sanded away.
For plywood or OSB subfloors, similar principles apply. Flatness must be assessed, and any unevenness addressed by sanding down high spots or filling low spots with wood patch. Securing loose sections with screws is crucial to prevent squeaking. Ensure the subfloor is dry and free from any signs of water damage or mold. The subfloor should be structurally sound and capable of supporting the weight of the flooring and foot traffic.
Nail or screw heads should be driven flush with the surface to avoid protruding through the underlayment and causing damage to the flooring. A thorough cleaning, similar to the concrete subfloor preparation, is equally vital for plywood and OSB subfloors.
Regardless of the subfloor type, installing an underlayment is a necessary step in a floating floor installation. The underlayment provides cushioning, sound insulation, and a moisture barrier (if not already applied to the subfloor). Select an underlayment specifically designed for floating floors and engineered wood. Follow the manufacturer's instructions for installation, ensuring seams are properly taped to prevent moisture penetration and maintain a continuous barrier.
Understanding Expansion Gaps and Installation Techniques
Engineered wood, like all wood products, expands and contracts with fluctuations in temperature and humidity. To accommodate this natural movement, expansion gaps must be incorporated around the perimeter of the room and any fixed objects, such as pipes or columns. Neglecting these gaps can lead to buckling, warping, and eventual damage to the flooring.
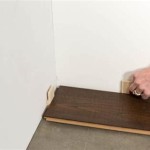
A typical expansion gap ranges from 1/4 inch to 3/8 inch, but the manufacturer's recommendations should always be followed. These gaps are typically concealed by baseboards, quarter-round molding, or other trim pieces after the installation is complete. To maintain the integrity of the expansion gaps during installation, spacers can be used to keep the flooring planks at the correct distance from the walls.
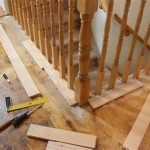
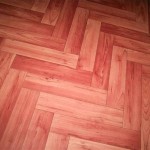
Before beginning the actual installation, it is advantageous to dry-lay a few rows of planks to determine the best layout and minimize the need for excessive cutting. This step also helps to identify any potential pattern irregularities or color variations within the flooring material. Consider the direction of the planks in relation to the room's longest dimension. Running the planks parallel to the longest wall can make the room appear larger.
When cutting planks, use a circular saw, jigsaw, or miter saw. Ensure the blade is sharp and appropriate for cutting wood to prevent splintering. Always wear safety glasses and ear protection when operating power tools. For intricate cuts around doorways or pipes, a coping saw or oscillating multi-tool can be helpful.
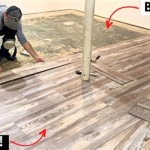
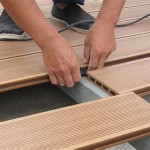
Most engineered wood flooring utilizes a click-lock system, which allows the planks to be easily connected without the need for glue or nails. The planks are typically angled together and then pressed down to create a secure connection. Follow the manufacturer's specific instructions for the click-lock system being used, as the mechanisms can vary between products.
Stagger the end joints of the planks from row to row to create a more visually appealing and structurally sound floor. A general guideline is to stagger the joints by at least 6 inches, but again, consult the manufacturer's recommendations. Use a tapping block and a rubber mallet to gently tap the planks together to ensure a tight and seamless fit. Avoid hitting the planks directly with the mallet, as this can damage the edges and compromise the click-lock system.
As each row is completed, ensure it is straight and aligned before proceeding to the next row. A chalk line can be used as a guide to maintain a straight line. If any gaps or imperfections are noticed, carefully disassemble the affected section and re-align the planks. Take the time to ensure each row is properly installed before moving on, as correcting mistakes becomes more difficult as the installation progresses.
Addressing Common Challenges and Post-Installation Care
Despite careful planning and execution, certain challenges may arise during the installation process. One common issue is dealing with obstacles such as door frames, pipes, and irregular wall shapes. Precise measurements and careful cutting are essential for navigating these challenges.
Undercutting door frames can allow the flooring to slide underneath, creating a clean and professional look. An oscillating multi-tool with a flush-cut blade is ideal for this task. For pipes, use a hole saw to create a hole slightly larger than the pipe diameter. Cut the flooring plank in half, create a notch leading to the hole, and then reassemble the plank around the pipe. Cover the gap with a pipe collar for a finished appearance.
Irregular wall shapes may require the use of a template to accurately transfer the shape onto the flooring plank. A piece of cardboard or paper can be used to create the template, which can then be traced onto the plank and cut accordingly.
Once the flooring is installed, the baseboards, quarter-round molding, or other trim pieces can be installed to cover the expansion gaps around the perimeter of the room. These trim pieces should be nailed or glued to the wall, not to the flooring, to allow for the natural expansion and contraction of the wood.
Proper post-installation care is crucial for maintaining the appearance and longevity of the engineered wood flooring. Regular sweeping or vacuuming to remove dirt and debris is essential. Use a damp mop with a cleaner specifically designed for engineered wood floors. Avoid excessive water, which can seep into the seams and damage the flooring. Promptly clean up spills to prevent staining.
Protect the flooring from scratches and dents by using furniture pads under the legs of chairs and tables. Avoid wearing shoes with high heels or cleats on the flooring. Consider placing area rugs in high-traffic areas to provide additional protection.
Maintaining a consistent humidity level in the home can help to minimize the expansion and contraction of the engineered wood flooring. A humidifier or dehumidifier may be necessary to maintain the ideal humidity range recommended by the manufacturer. Periodically inspect the flooring for any signs of damage or wear and address any issues promptly to prevent them from escalating.
By following these guidelines and paying close attention to detail, a successful engineered wood floating floor installation can be achieved. The result will be a beautiful and durable floor that enhances the aesthetic appeal of any room.

How To Install Lock Engineered Hardwood Flooring

How To Install An Engineered Hardwood Floating Floor With Finishing Tips

Floating A Wood Floor Hardwood Floors

Installing Engineered Hardwood On Concrete Villagio Guide

How To Install Lock Engineered Hardwood Flooring

How To Lay Engineered Timber Floor Guide Fantastic Handyman Au

How To Install Lock Engineered Hardwood Flooring

What Is A Floating Floor Essential Guide Tips

Floating Engineered Hardwood

Engineered Wood Flooring Project Step By Guide To Laying An Floor
Related Posts