How To Lay CoreLuxe Vinyl Plank Flooring
CoreLuxe vinyl plank flooring offers a durable and visually appealing alternative to traditional flooring options. Its waterproof nature, ease of installation, and wide range of designs make it suitable for various spaces within a home. This article provides a comprehensive guide to installing CoreLuxe vinyl plank flooring, ensuring a successful and long-lasting result.
Key Point 1: Preparation is Paramount
Successful installation of CoreLuxe vinyl plank flooring hinges on thorough preparation. This encompasses assessing the subfloor, acclimating the planks, and gathering the necessary tools. Neglecting any of these steps can lead to installation issues and compromise the lifespan of the flooring.
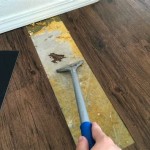
Subfloor Inspection and Preparation: The subfloor must be clean, level, and dry. Any imperfections, such as cracks, holes, or unevenness, must be addressed before proceeding. Sweep or vacuum the subfloor to remove all debris, dust, and remnants of previous flooring materials. For concrete subfloors, use a self-leveling compound to fill any dips or cracks larger than 3/16 inch over a 10-foot span. For wood subfloors, ensure there are no loose boards and that any squeaks are eliminated by securing the boards to the joists. If the wood subfloor is severely damaged, consider replacing it entirely. Verify the moisture content of both concrete and wood subfloors. Excessive moisture will prevent proper adhesion or cause warping of the planks. Use a moisture meter to confirm that the moisture level is within the manufacturer's recommended range. Typically, concrete should have a moisture vapor emission rate (MVER) of less than 3 lbs/1000 sq ft/24 hours or a relative humidity (RH) of less than 75%. Wood subfloors should have a moisture content of 6-12%. If moisture levels are too high, allow the subfloor to dry completely before proceeding.
Acclimation: CoreLuxe vinyl planks need to acclimate to the room's temperature and humidity for at least 48 to 72 hours before installation. This allows the planks to expand or contract, minimizing gaps or buckling after installation. Store the boxes of planks in the room where they will be installed, laying them flat. The ideal temperature range for acclimation is typically between 65°F and 85°F (18°C and 29°C). Maintain consistent temperatures throughout the acclimation period. Avoid stacking the boxes too high, as this can restrict airflow and hinder the acclimation process.
Gathering Essential Tools and Materials: Before starting, assemble all necessary tools and materials. This includes:
- CoreLuxe vinyl planks
- Measuring tape
- Pencil
- Utility knife with a sharp blade
- Straight edge or T-square
- Rubber mallet
- Spacers (1/4 inch)
- Tapping block
- Moisture meter (optional, but recommended)
- Safety glasses
- Knee pads
Ensure the utility knife has a fresh, sharp blade. A dull blade will make it difficult to cut the planks cleanly and accurately. Purchase a sufficient quantity of planks, accounting for waste due to cuts and potential errors. A general rule of thumb is to add 5-10% to the total square footage of the room.
Key Point 2: Installation Techniques for Optimal Results
The installation process involves carefully laying the planks, ensuring proper alignment, and utilizing the locking mechanism effectively. Paying attention to detail during this stage is crucial for a professional-looking finish.
Planning the Layout: Before laying the first plank, determine the layout of the flooring. Begin by measuring the room's width and length. Calculate how many full planks and partial planks will be needed to cover the entire area. Aim for planks that are at least half their original length at the end of each row. If you end up with narrow pieces (less than 2 inches) in the last row or against a wall, adjust the starting row by cutting the first row planks to the appropriate width. This ensures a more balanced and aesthetically pleasing appearance. Consider the direction of the planks. Running them parallel to the longest wall typically makes a room appear larger. Experiment with different layouts to find the most visually appealing arrangement. Use a chalk line to mark a straight starting line. This will serve as a guide for the first row and ensure that the entire floor is installed square.
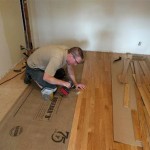
Laying the First Row: Start installing the planks along the longest straight wall in the room. Place spacers (1/4 inch) between the planks and the wall. These spacers will allow for expansion and contraction due to temperature and humidity changes. The tongue side of the plank should face the wall. Interlock the end joints of the first row planks, using a tapping block and rubber mallet to ensure a tight fit. Be careful not to damage the locking mechanism. Double-check that the first row is perfectly straight and aligned with the chalk line. Any deviation in the first row will be amplified in subsequent rows. Use a straight edge and level to verify the alignment.
Installing Subsequent Rows: Begin the second row by cutting the first plank to create a staggered pattern. This adds visual interest and strengthens the floor. Staggering the joints by at least 6 inches is recommended. Insert the tongue of the second row plank into the groove of the first row plank at a slight angle. Press down firmly until the locking mechanism engages. Use a tapping block and rubber mallet to ensure a tight fit. Continue installing the planks row by row, maintaining the staggered pattern. Ensure that the end joints of adjacent rows are not aligned. Maintain a consistent gap between the planks and the walls using spacers.
Cutting Planks: When you reach walls or other obstacles, you will need to cut the planks to fit. Measure the distance between the last full plank and the wall. Transfer the measurement to a new plank, marking the cutting line with a pencil and straight edge. Use a utility knife to score the surface of the plank along the cutting line. Snap the plank along the scored line. For more complex cuts, such as those around pipes or door frames, use a jigsaw. Create a template using cardboard to accurately trace the shape onto the plank. Always wear safety glasses when cutting planks.
Working Around Obtacles: When encountering pipes or other vertical obstructions, use a hole saw to create a hole in the plank that is slightly larger than the diameter of the pipe. Cut the plank from the hole to the edge. Install the plank around the pipe, then use adhesive to secure the cut section back in place. For door frames, use a jamb saw to undercut the frame. This allows the planks to slide underneath the frame, creating a clean and professional finish.
Key Point 3: Addressing Common Installation Challenges
While CoreLuxe vinyl plank flooring is relatively easy to install, certain challenges may arise. Understanding how to address these issues is essential for a successful installation.
Dealing with Gaps: Gaps between planks can occur if the subfloor is not level or if the locking mechanism is not properly engaged. If gaps appear, use a tapping block and rubber mallet to gently tap the planks together. If the gap persists, consider removing the affected planks and reinstalling them, ensuring that the locking mechanism is fully engaged. If the subfloor is uneven, use self-leveling compound to correct the issue before reinstalling the planks.
Addressing Squeaks: Squeaks can occur if the subfloor is not properly secured or if the planks are rubbing against the subfloor. To eliminate squeaks, ensure that the subfloor is securely fastened to the joists. If the squeaks persist, consider using shims to fill any gaps between the subfloor and the planks. Alternatively, you can apply a thin layer of construction adhesive to the back of the planks to prevent them from moving.
Handling Difficult Cuts: Complex cuts around irregular shapes can be challenging. Create a template using cardboard to accurately trace the shape onto the plank. Use a jigsaw to cut along the traced line. For intricate cuts, practice on a scrap piece of plank first to ensure accuracy.
Working in Small Spaces: Installing planks in small spaces, such as closets or bathrooms, can be difficult due to limited maneuverability. Cut the planks to size before bringing them into the space. Use a rubber mallet to gently tap the planks into place in tight corners.
Troubleshooting Locking Mechanism Issues: If the locking mechanism is damaged or not engaging properly, the planks will not stay together securely. Inspect the locking mechanism for any damage. If the damage is minor, you may be able to repair it with a small amount of adhesive. If the damage is severe, replace the affected plank. Ensure that the subfloor is clean and free of debris, as this can interfere with the locking mechanism.
Following these detailed instructions and tips will help ensure a successful installation of CoreLuxe vinyl plank flooring, resulting in a beautiful and durable floor that will enhance the aesthetic appeal of any room.

Diy How To Corelux Vinyl Installation Tips And Tricks Lumber Liquidators Lvp Plank Flooring Install

Diy Coreluxe Rigid Vinyl Plank Tips

Vinyl Plank Flooring Installation Guide Tap End Ll

Diy How To Corelux Vinyl Installation Tips And Tricks Lumber Liquidators Lvp Plank Flooring Install

How To Install Vinyl Plank Flooring Coreluxe Urban Loft Ash Tips And Tricks

Renature By Coreluxe 5mm W Pad Yorkshire Cottage Oak Waterproof Rigid Vinyl Plank Flooring 6 81 In Wide X 51 Long Ll

Coreluxe Ultra Review Install Tips Rocky Coast Pine W Pad

Installing Vinyl Plank The Money Pit

Coreluxe 5mm Rushmore Oak Waterproof Rigid Vinyl Flooring Floor Ers

Corelux Honey Mead Oak Waterproof Rigid 7x48 Vinyl Plank Flooring 7mm Household Items By Owner Housewares
Related Posts