How To Install Wood Flooring Around Door Frames
Installing wood flooring adds value and aesthetic appeal to any residence. However, achieving a professional-looking installation requires meticulous attention to detail, especially when navigating obstacles such as door frames. A properly executed flooring installation around door frames results in a seamless transition, enhancing the overall appearance of the floor and prolonging its lifespan. This article details the necessary steps and techniques involved in installing wood flooring around door frames, ensuring a clean, professional finish.
Before beginning the installation, it is crucial to gather the necessary tools and materials. The essential toolkit should include a measuring tape, pencil, circular saw, jamb saw (also known as an undercut saw or oscillating multi-tool), wood adhesive, tapping block, pull bar, shims, and safety glasses. Additionally, the appropriate wood flooring material must be selected, taking into consideration factors such as wood type, thickness, and the existing subfloor. Ensure that the flooring material is acclimatized to the room's environment for at least 72 hours prior to installation to minimize expansion and contraction issues post-installation.
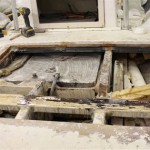
Preparation is key to a successful flooring installation. This includes removing existing flooring, cleaning the subfloor, and ensuring it is level and free of debris. Any imperfections in the subfloor, such as uneven areas or protruding nails, should be addressed before proceeding. A self-leveling compound might be necessary for more significant irregularities. Once the subfloor is prepared, the door frames must be assessed and prepared accordingly.
Preparing Door Frames for Wood Flooring Installation
The primary method for fitting wood flooring around door frames involves undercutting the door jambs and casings. Undercutting creates a space beneath the frame that allows the flooring to slide underneath, resulting in a clean and professional look. This eliminates the need to cut the flooring around the frame’s exact shape, which can be challenging and often results in visible gaps or uneven edges.
The initial step in preparing the door frames is to determine the appropriate height for the undercut. This height should be equal to the thickness of the wood flooring plus the thickness of any underlayment being used. Using a piece of the flooring material as a gauge is a practical approach. Place the flooring (and underlayment, if applicable) next to the door frame and mark the desired cutting height on the door jamb and casing.
Once the cutting height is marked, use a jamb saw or oscillating multi-tool to carefully undercut the door frame. These tools are specifically designed for this purpose, allowing for precise and controlled cuts in tight spaces. When using a jamb saw, ensure it is held flat against the floor to maintain a consistent cutting depth. For an oscillating multi-tool, attach a wood-cutting blade and adjust the cutting depth to match the previously determined height. It is recommended to practice on a scrap piece of wood before cutting the door frame to familiarize oneself with the tool and technique.
During the undercutting process, exercise caution to avoid damaging the door frame or surrounding walls. Work slowly and steadily, allowing the saw to do the work. After undercutting, remove any loose wood or debris from the undercut area. This will ensure a smooth and clean surface for the flooring to slide under.
Installing Wood Flooring Around Door Frames
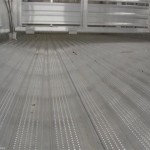
With the door frames properly prepared, the actual flooring installation can begin. Start by laying out the first row of flooring along the longest straight wall in the room, leaving an expansion gap of approximately ¼ to ⅜ inch between the flooring and the wall. This gap is essential to accommodate the natural expansion and contraction of the wood flooring due to changes in humidity and temperature.
As the flooring approaches the door frame, careful measurements and cuts are required. Measure the distance from the last full board to the door frame, taking into account the expansion gap. Transfer these measurements onto a new piece of flooring and use a circular saw or jigsaw to cut the flooring to the correct size. Ensure that the cut is precise and clean to avoid gaps or uneven edges.
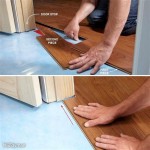
When placing the cut piece of flooring around the door frame, gently slide it under the undercut door jamb. Use a tapping block and hammer to gently tap the flooring into place, ensuring a tight fit against the adjacent boards. Avoid using excessive force, as this can damage the flooring or door frame. If the flooring is not sliding easily, double-check the measurements and make any necessary adjustments to the cut.
For tongue-and-groove flooring, ensure that the tongue and groove are properly aligned before tapping the boards together. A pull bar can be used to pull the boards tightly together in areas where space is limited, such as near walls or door frames. The pull bar hooks onto the edge of the flooring and provides leverage to pull the boards into place.
In cases where the flooring is being glued down, apply a thin, even layer of wood adhesive to the subfloor before placing the flooring. Follow the manufacturer's instructions for the specific adhesive being used. After placing the flooring, apply pressure to ensure good contact between the flooring and the subfloor. This can be achieved by using a heavy roller or by placing weights on the flooring.
Addressing Complex Door Frame Configurations
Some door frames may have more complex configurations, such as those with decorative moldings or irregular shapes. These situations require more advanced cutting and fitting techniques. One approach is to create a template of the door frame’s shape using cardboard or thin plywood. The template can then be traced onto the flooring material and used as a guide for cutting.
Another technique involves using a coping saw to carefully cut the flooring to match the contours of the door frame molding. This method requires a high level of skill and precision but can result in a seamless and visually appealing transition. When using a coping saw, work slowly and methodically, following the lines of the molding as closely as possible. It is often necessary to make multiple passes to achieve the desired shape.
For irregularly shaped door frames, consider using a scribe to transfer the shape onto the flooring. A scribe is a tool used to transfer an exact shape from one surface to another. Place the flooring next to the door frame and use the scribe to trace the outline of the frame onto the flooring. Then, use a jigsaw or other appropriate tool to cut the flooring along the traced line.
In some cases, it may be necessary to use a combination of techniques to achieve a satisfactory result. For example, one might undercut the majority of the door frame but use a coping saw to cut the flooring around decorative moldings. The key is to carefully assess the situation and choose the techniques that are best suited to the specific door frame configuration.
Once the flooring is installed around the door frames, inspect the area for any gaps or imperfections. Use wood filler or caulk to fill any small gaps and create a smooth, seamless surface. Choose a wood filler or caulk that matches the color of the flooring for best results. Wipe away any excess filler or caulk with a damp cloth.
Finally, install any necessary transition strips or moldings to cover the expansion gap and create a finished look. Transition strips are typically used between different types of flooring or between rooms. Choose a transition strip that complements the flooring and matches the overall style of the room. Secure the transition strip to the subfloor using nails or screws.
By following these steps and techniques, one can successfully install wood flooring around door frames, achieving a professional and aesthetically pleasing result. Attention to detail, patience, and the use of appropriate tools are essential for a successful installation. With proper planning and execution, the finished wood flooring will enhance the beauty and value of the residence for years to come.

How To Undercut A Door Frame Tutorial

How To Install Laminate Flooring Around Doors And Cabinets

Installing Engineered Flooring Around Door Jambs

How To Install Laminate Flooring Around Doors And Cabinets

How To Install Flooring Under A Door Frame

Amazing Tricks How To Pass Two Doors Jambs With Vinyl Plank Flooring Lvp In A Narrow Hallway Diy

How To Undercut Architrave Blog Floorsave

Fitting Solid Wood Through A Doorway

Avoid Hassles With This Lvp Quick Tip For Door Jambs

How To Cut A Door Frame For New Flooring In 3 Easy Steps
Related Posts