How To Install Vinyl Flooring In A Mobile Home
Installing vinyl flooring in a mobile home can be a cost-effective and visually appealing way to upgrade its interior. Vinyl flooring is known for its durability, water resistance, and ease of maintenance, making it a practical choice for mobile homes, which often experience fluctuations in temperature and humidity. This article will outline the necessary steps involved in installing vinyl flooring, ensuring a successful and long-lasting result.
Before embarking on the installation process, it is crucial to understand the specific considerations involved in working with mobile homes. Mobile homes often have subfloors made of particleboard or OSB (oriented strand board), which can be prone to moisture damage and require careful preparation. Furthermore, the relatively limited space within a mobile home necessitates efficient planning and execution.
Successful vinyl flooring installation hinges on thorough preparation, precise execution, and the use of appropriate tools and materials. Ignoring these aspects can lead to unsatisfactory results, including uneven surfaces, gaps, and premature wear and tear. Let's delve into the essential steps required for a proper vinyl flooring installation in a mobile home.
1. Preparation and Assessment of the Existing Subfloor
The foundation for any successful flooring installation is a sound and properly prepared subfloor. In the context of a mobile home, this step is particularly critical due to the common presence of particleboard or OSB subfloors, which are susceptible to damage from moisture and require careful attention.
The first step is a comprehensive inspection of the existing subfloor. Look for any signs of water damage, such as discoloration, swelling, or soft spots. Pay particular attention to areas around plumbing fixtures, windows, and exterior walls, as these are common areas for leaks to occur. Probe any suspect areas with a screwdriver or awl to check for structural integrity. If significant damage is present, the affected sections of the subfloor must be replaced before proceeding with the vinyl flooring installation.
Once you have identified and addressed any areas of water damage, the next step is to ensure that the subfloor is level and free from imperfections. Use a long straightedge or level to check for high and low spots. Minor imperfections can often be addressed with a self-leveling compound specifically designed for subfloors. Follow the manufacturer's instructions carefully when applying self-leveling compound, ensuring that it is properly mixed and allowed to cure completely before proceeding.
Any existing flooring, such as carpet, linoleum, or old vinyl flooring, must be completely removed. Scrape away any adhesive residue using a floor scraper or a specialized adhesive remover. Thoroughly clean the subfloor with a vacuum cleaner to remove any dust, dirt, or debris. A clean and smooth surface is essential for proper adhesion of the vinyl flooring.
After cleaning, consider applying a primer specifically designed for use with vinyl flooring. Primers improve adhesion, prevent the subfloor from absorbing moisture from the adhesive (if using glue-down vinyl), and can inhibit the growth of mold and mildew. Consult the vinyl flooring manufacturer's recommendations for the appropriate type of primer to use.
Finally, ensure that the subfloor is securely fastened to the floor joists. Check for loose or squeaky areas and tighten any loose screws or nails. Add additional fasteners if necessary to create a solid and stable base for the vinyl flooring. Any movement in the subfloor can cause the vinyl flooring to crack or buckle over time.
2. Selecting and Cutting the Vinyl Flooring
The selection of the appropriate vinyl flooring is a critical decision. Various types of vinyl flooring are available, including sheet vinyl, vinyl planks (LVP - Luxury Vinyl Plank), and vinyl tiles. The choice depends on aesthetic preferences, budget, durability requirements, and ease of installation. Sheet vinyl offers a seamless appearance and is relatively inexpensive, but can be challenging to install in tight spaces. Vinyl planks and tiles are easier to handle and install, allowing for more design flexibility.
Measure the dimensions of the room accurately, paying attention to any irregularities or obstacles, such as doorways, corners, and pipes. Add a few extra inches to your measurements to account for trimming and waste. Carefully plan the layout of the vinyl flooring, considering the direction of the planks or tiles and the placement of seams. It is generally recommended to run the planks or tiles parallel to the longest wall of the room.
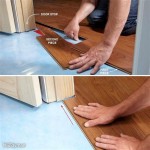
Once the layout is determined, begin cutting the vinyl flooring to size. Use a sharp utility knife with a new blade for clean and precise cuts. For sheet vinyl, roll it out flat on a clean surface and use a straightedge to guide your cuts. For vinyl planks and tiles, score the surface with the utility knife and then snap the plank or tile along the score line. A T-square can be helpful for making accurate square cuts.
When cutting around obstacles, create a template using cardboard or paper. Trace the shape of the obstacle onto the template and then transfer the template to the vinyl flooring. Carefully cut out the shape using the utility knife, ensuring a snug fit around the obstacle. It is better to cut slightly larger than necessary and then trim to fit, rather than cutting too small.
Before installing the vinyl flooring, allow it to acclimate to the room temperature for at least 48 hours. This will allow the material to expand or contract, preventing problems with buckling or gaps after installation. Store the vinyl flooring in the room where it will be installed, laying it flat on the floor or propping it up against a wall.
3. Installation Techniques: Glue-Down vs. Floating Floors
Vinyl flooring can be installed using two primary methods: glue-down and floating. The choice between these methods depends on the type of vinyl flooring being used, the condition of the subfloor, and personal preference. Each method has its own advantages and disadvantages.
Glue-Down Installation: This method involves applying adhesive to the subfloor and then pressing the vinyl flooring firmly into place. Glue-down installation is typically used for sheet vinyl and some types of vinyl planks and tiles. The primary advantage of glue-down installation is its stability and durability. The adhesive creates a strong bond between the vinyl flooring and the subfloor, preventing movement and reducing the risk of buckling or gaps. However, glue-down installation can be more labor-intensive and requires careful surface preparation. Ensure that the adhesive is applied evenly and according to the manufacturer's instructions. Use a notched trowel to spread the adhesive and allow it to tack up before installing the vinyl flooring.
Floating Installation: Floating vinyl flooring, typically in the form of planks or tiles, features interlocking edges that snap together to create a continuous surface. This method does not require adhesive and the flooring is not directly attached to the subfloor. The primary advantage of floating installation is its ease of installation. Floating floors can be installed quickly and easily, even by inexperienced DIYers. They are also relatively forgiving of minor imperfections in the subfloor. However, floating floors may not be as stable as glue-down floors and can be more susceptible to movement or buckling, particularly in areas with high traffic or temperature fluctuations. When installing a floating floor, be sure to leave an expansion gap of approximately ¼ inch around the perimeter of the room to allow for expansion and contraction.
Regardless of the installation method chosen, it is crucial to follow the manufacturer's instructions carefully. These instructions will provide specific guidance on the proper adhesive to use (for glue-down installations), the appropriate tools and techniques, and any special considerations for your particular type of vinyl flooring. Working methodically and paying close attention to detail will ensure a professional and long-lasting result.
Finally, after completion of the installation, inspect the entire floor for any imperfections, such as gaps, bubbles, or uneven areas. Use a seam roller to ensure that the seams are tightly sealed (especially for sheet vinyl). Clean up any excess adhesive or debris and allow the floor to cure completely before placing furniture or heavy objects on it. Proper installation and maintenance will help to extend the life of your vinyl flooring and keep it looking its best for years to come.

Installing Laminate Flooring In Mobile Homes

Mobile Home Makeover New Floors L And Stick Vinyl With Grout Complete Project

Installing Laminate Flooring In Mobile Homes

Installing New Floors In Single Wide Mobile Home Renovation Project

How To Install Vinyl Flooring In A Single Wide Trailer

The Right Floors For A Manufactured Home Ub Hardwoods Blog

Vinyl Plank In A Mobile Home

Mobile Homes Removing Vinyl Flooring Floor Prep For

Installing Laminate Flooring In Mobile Homes

Installing Laminate Flooring In Mobile Homes
Related Posts