How to Install Snap Together Laminate Wood Flooring
Installing snap-together laminate wood flooring is a popular do-it-yourself project that can significantly enhance the aesthetic appeal of a home. This type of flooring is relatively easy to install compared to traditional hardwood floors, requiring minimal specialized tools and expertise. The key to a successful installation lies in careful preparation, precise execution, and a thorough understanding of the process. This article provides a comprehensive guide on how to install snap-together laminate wood flooring, covering all essential steps from preparation to finishing touches.
Preparing for Installation
Proper preparation is crucial for a successful laminate flooring installation. This phase involves assessing the existing subfloor, acquiring the necessary tools and materials, and acclimating the laminate planks to the environment. Neglecting these preliminary steps can lead to problems later on, such as uneven flooring, gaps between planks, or warping.
Subfloor Assessment: The subfloor is the foundation upon which the laminate flooring will be installed. It must be clean, level, and dry. Any imperfections in the subfloor will telegraph through the laminate, resulting in an uneven and potentially unstable floor. For concrete subfloors, check for cracks and ensure the surface is free of dust, debris, and moisture. Use a self-leveling compound to fill in any low spots or cracks. For wood subfloors, inspect for loose boards, squeaks, and rot. Secure loose boards with screws and replace any damaged sections. A moisture meter should be used to verify that the subfloor's moisture content is within acceptable limits, typically below 12%. Excessive moisture can cause the laminate to warp or buckle.
Tool and Material Acquisition: Gathering the necessary tools and materials before starting the installation will streamline the process and prevent unnecessary delays. Essential tools include a measuring tape, pencil, safety glasses, a tapping block, a pull bar, a hammer, a saw (either a circular saw, jigsaw, or laminate cutter), a moisture meter, spacers, and a vacuum cleaner. Materials needed are the laminate flooring planks, underlayment, vapor barrier (if required), baseboards or quarter-round molding, and transition strips for doorways.
Acclimation of Laminate Flooring: Laminate flooring is susceptible to expansion and contraction due to changes in temperature and humidity. Therefore, it is essential to acclimate the planks to the room's environment for at least 48 to 72 hours before installation. This allows the planks to adjust to the room's temperature and humidity levels, minimizing the risk of gaps or buckling after installation. Store the boxes of laminate flooring in the room where they will be installed, spreading them out to allow for adequate air circulation. The ideal room temperature during acclimation and installation is between 65°F and 75°F (18°C and 24°C), with a relative humidity level between 30% and 60%.
Installing the Laminate Flooring
The installation process involves laying the underlayment, installing the first row of planks, and then systematically connecting the remaining planks. Accuracy and attention to detail are paramount during this phase to ensure a seamless and professional-looking result.
Laying the Underlayment: Underlayment is a thin layer of material that is installed between the subfloor and the laminate flooring. It provides cushioning, reduces noise transmission, and helps to even out minor imperfections in the subfloor. Roll out the underlayment, ensuring that it covers the entire subfloor area. Overlap the seams of the underlayment by a few inches and secure them with tape. Some laminate flooring products come with pre-attached underlayment, in which case this step can be skipped. If the subfloor is concrete, a vapor barrier should be installed beneath the underlayment to protect the laminate from moisture.
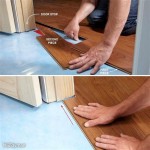
Installing the First Row: The first row of planks will set the foundation for the entire floor, so it is crucial to ensure that it is perfectly straight and aligned with the wall. Start in a corner of the room, leaving a ¼-inch expansion gap between the planks and the wall. Use spacers to maintain this gap. The expansion gap allows the laminate to expand and contract without putting pressure on the walls, preventing buckling. Connect the planks end-to-end, using the snap-together locking mechanism. If necessary, cut the last plank in the row to fit, ensuring that there is still a ¼-inch expansion gap at the end.
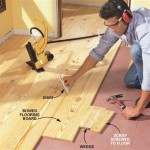
Connecting Subsequent Rows: With the first row in place, begin installing the subsequent rows. Stagger the end joints of the planks from row to row to create a more visually appealing and structurally sound floor. This helps to distribute the weight evenly and prevents long, continuous seams. When connecting a plank to the previous row, angle the plank slightly and insert the tongue into the groove of the adjacent plank. Then, gently press down on the plank until it snaps into place. Use a tapping block and hammer to gently tap the planks together if necessary. A pull bar can be used to tighten the planks against the wall in tight spaces. Continue this process until the entire floor is covered, cutting planks as needed to fit around obstacles such as pipes or door frames.
Finishing Touches
The final stage of the installation involves removing the spacers, installing baseboards or quarter-round molding, and adding transition strips at doorways. These finishing touches provide a polished and professional look to the newly installed floor.
Removing Spacers: Once the flooring is completely installed, carefully remove the spacers from around the perimeter of the room. These spacers were used to maintain the expansion gap and are no longer needed.
Installing Baseboards or Quarter-Round Molding: Baseboards or quarter-round molding are installed to cover the expansion gap between the flooring and the wall. This provides a clean and finished look while also protecting the walls from damage. Cut the molding to the appropriate lengths using a miter saw. Apply construction adhesive to the back of the molding and press it firmly against the wall, ensuring that it covers the expansion gap. Use finishing nails to secure the molding in place. Fill any nail holes with wood filler and paint or stain the molding to match the flooring or the wall trim.
Adding Transition Strips: Transition strips are used to seamlessly connect the laminate flooring to other types of flooring, such as tile or carpet, at doorways or other transitions. They also help to protect the edges of the laminate flooring from damage. Measure the width of the doorway or transition and cut the transition strip to the appropriate length. Depending on the type of transition strip, it may be attached to the subfloor with screws, adhesive, or a combination of both. Ensure that the transition strip is level with both the laminate flooring and the adjacent flooring.
Cleaning and Maintenance: After the installation is complete, vacuum the floor thoroughly to remove any dust or debris. Clean the floor with a damp mop and a laminate floor cleaner. Avoid using excessive water, as this can damage the laminate. Regularly sweep or vacuum the floor to prevent dirt and grit from scratching the surface. Use floor protectors under furniture legs to prevent dents and scratches. With proper care and maintenance, a snap-together laminate wood floor can provide years of beauty and durability.
Key Considerations for a Successful Installation
Several key considerations contribute to a successful snap-together laminate wood flooring installation. These include understanding the expansion gap, proper cutting techniques, and addressing any potential moisture issues.
Understanding the Expansion Gap: The expansion gap is a critical element of laminate flooring installation that should not be overlooked. Laminate flooring expands and contracts with changes in temperature and humidity. The expansion gap, typically ¼ inch, allows the flooring to move freely without putting pressure on the walls. Without this gap, the flooring can buckle, warp, or even lift off the subfloor. Ensure that the expansion gap is maintained around the entire perimeter of the room and around any vertical obstructions, such as pipes or columns.
Proper Cutting Techniques: Accurate and clean cuts are essential for a professional-looking laminate floor. Use a sharp saw blade designed for cutting laminate to prevent chipping or splintering. A circular saw is suitable for long, straight cuts, while a jigsaw is better for curved or intricate cuts. A laminate cutter, also known as a guillotine cutter, is a specialized tool that can make clean, precise cuts without creating dust. When cutting laminate, always wear safety glasses to protect your eyes. Measure carefully and mark the cutting line clearly before making the cut.
Addressing Moisture Issues: Moisture is a laminate flooring's biggest enemy. Excessive moisture can cause the planks to swell, warp, or delaminate. Before installing laminate flooring, ensure that the subfloor is dry and that there are no potential sources of moisture, such as leaks or high humidity. If the subfloor is concrete, install a vapor barrier beneath the underlayment to protect the laminate from moisture. In areas with high humidity, consider using a dehumidifier to maintain a stable environment. Regularly inspect the flooring for signs of moisture damage, such as cupping or discoloration, and address any issues promptly.

How To Install Laminate Floors

Guide To Installing Laminate Flooring Diy Family Handyman

How To Install Lock Engineered Hardwood Flooring

How To Install Laminate Flooring For Beginners

How To Install Flooring Project Tutorial Bob Vila

Guide To Installing Laminate Flooring Diy Family Handyman

How To Install Lock Engineered Hardwood Flooring

Guide To Installing Laminate Flooring Diy Family Handyman

How To Install Laminate Flooring Easy Step By Instructions

How To Install Laminate Floors
Related Posts