How To Install Select Surfaces Laminate Flooring
Installing laminate flooring can significantly enhance the appearance and value of a home. Select Surfaces laminate flooring is a popular choice due to its durability, aesthetic appeal, and relatively straightforward installation process. This article provides a comprehensive guide on how to install Select Surfaces laminate flooring, covering preparation, essential tools, and step-by-step instructions.
Before commencing any flooring project, thorough preparation is crucial for a successful outcome. This includes assessing the subfloor, gathering necessary materials and tools, and acclimating the laminate flooring to the environment. Neglecting this preliminary phase can lead to installation errors, resulting in an uneven or unstable floor.
Key Point 1: Subfloor Preparation. The subfloor is the foundation upon which the laminate flooring will rest. Its condition directly impacts the stability and longevity of the finished floor. Thorough inspection and proper preparation of the subfloor are paramount.
Inspect the Subfloor
The first step involves a meticulous inspection of the existing subfloor, which can be concrete or wood. Examine it for any imperfections, such as cracks, holes, unevenness, or signs of moisture. Any existing flooring material, such as carpet, vinyl, or tile, must be completely removed. Be sure to remove all staples, nails, or adhesive residue from previous floorings. This creates a smooth, consistent surface for the new laminate flooring.
For concrete subfloors, look for cracks and areas of excessive moisture. Small cracks can usually be filled with a concrete patching compound. However, larger cracks or significant moisture issues may necessitate professional evaluation and repair before proceeding. A moisture test is essential to determine if the concrete subfloor is sufficiently dry. This can be done using a calcium chloride test or a plastic sheet test. If moisture levels are too high, a moisture barrier should be installed beneath the underlayment.
For wood subfloors, check for loose boards, squeaks, and signs of rot or water damage. Replace any damaged or unstable boards with new lumber of the same thickness. Ensure the subfloor is level; any unevenness exceeding 3/16 inch over a 10-foot span must be addressed. This can be achieved by sanding down high spots or filling low spots with a leveling compound designed for wood subfloors. Always use a level to consistently monitor the surface.
Clean the Subfloor
Once the subfloor has been inspected and any necessary repairs have been made, it must be thoroughly cleaned. Use a broom or vacuum to remove all dust, debris, and loose particles. For concrete subfloors, a wet-dry vacuum is particularly effective. Ensure the surface is completely dry before proceeding to the next step. Any remaining debris can interfere with the adhesion of the underlayment (if required). A clean subfloor provides a stable and even base for the laminate flooring.
Key Point 2: Gathering Materials and Tools. Having all the necessary materials and tools readily available streamlines the installation process and minimizes interruptions. A well-equipped workspace promotes efficiency and accuracy.
Essential Materials
The primary material is, of course, the Select Surfaces laminate flooring itself. Calculate the square footage of the room and purchase approximately 10% extra flooring to account for cuts and waste. This is particularly important for rooms with irregular shapes or intricate layouts. Other essential materials include:
- Underlayment: Select Surfaces laminate flooring typically requires an underlayment for sound insulation, moisture protection, and added cushioning. Choose an underlayment specifically designed for laminate flooring. Read the flooring manufacturer's instructions.
- Moisture Barrier (if needed): If the subfloor is concrete or has known moisture issues, a moisture barrier is crucial to prevent moisture from damaging the laminate flooring.
- Spacers: Spacers are used to maintain a consistent expansion gap around the perimeter of the room. This gap allows for the natural expansion and contraction of the flooring due to temperature and humidity changes.
- Transition Strips: Transition strips are used to create a seamless transition between the laminate flooring and other flooring types, such as carpet or tile.
- Baseboards and Quarter Round: These are used to cover the expansion gap around the perimeter of the room and create a finished look.
Essential Tools
The right tools are essential for a clean and efficient installation. Here is a list of necessary tools:
- Measuring Tape: For accurate measurements and precise cuts.
- Pencil: For marking cut lines on the flooring planks.
- Saw: A laminate flooring saw or a circular saw with a fine-tooth blade is ideal for cutting the planks. A miter saw is beneficial for precise angle cuts.
- Tapping Block: Used to gently tap the planks together without damaging the edges.
- Pull Bar: Used to engage the locking mechanism of the planks in tight spaces, such as against walls.
- Hammer: For gently tapping the tapping block and pull bar.
- Level: To ensure the subfloor and the installed flooring are level.
- Utility Knife: For cutting the underlayment and moisture barrier.
- Safety Glasses: To protect the eyes from dust and debris.
- Knee Pads: For added comfort during installation.
Key Point 3: Acclimating the Flooring. Laminate flooring needs time to adjust to the environmental conditions of the room where it will be installed. This process, known as acclimation, is essential for preventing warping or gapping after installation.
How to Acclimate
Acclimation involves storing the unopened boxes of Select Surfaces laminate flooring in the room where they will be installed for at least 48 to 72 hours. This allows the flooring to adjust to the room's temperature and humidity levels. The ideal temperature range is typically between 65°F and 75°F, with a relative humidity between 30% and 50%. Refer to the manufacturer's instructions for specific acclimation guidelines.
Stack the boxes of flooring in a way that allows air to circulate around them. Do not place the boxes directly against walls or in direct sunlight. This ensures that all sides of the planks are exposed to the ambient air. Remove the planks from the boxes only when you are ready to begin the installation process. This minimizes the risk of damage or exposure to excessive moisture.
Now, let's delve into the actual installation process.
Step-by-Step Installation Procedure
With the subfloor prepared, materials gathered, and flooring acclimated, the installation can begin.
- Install Underlayment (if required): Roll out the underlayment across the subfloor, covering the entire area where the laminate flooring will be installed. Overlap the seams of the underlayment according to the manufacturer's instructions, and tape them together using seam tape. Trim the underlayment to fit the room's perimeter using a utility knife. Secure the underlayment to the subfloor with staples or tape, if necessary.
- Plan the Layout: Before laying the first row of planks, plan the layout to ensure a balanced and aesthetically pleasing appearance. Start by measuring the width of the room and dividing it by the width of a plank. If the resulting number has a decimal, adjust the starting row to avoid ending with a narrow sliver of plank on the opposite side of the room. Aim for planks that are at least half-width.
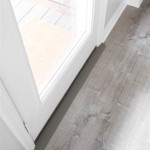
- Install the First Row: Begin installing the first row of planks along a straight wall. Position the planks with the tongue side facing the wall. Maintain a consistent expansion gap of approximately 1/4 inch between the planks and the wall using spacers. Engage the locking mechanism of the planks by aligning them edge-to-edge and gently tapping them together using a tapping block and hammer. Ensure the planks are securely locked together, creating a seamless joint.
- Continue Installing Subsequent Rows: Continue installing subsequent rows of planks, staggering the end joints by at least 6 inches. This adds visual interest and increases the structural integrity of the floor. Use the tapping block and pull bar to engage the locking mechanism of the planks in tight spaces. When cutting planks to fit around obstacles, such as pipes or doorframes, use a jigsaw or coping saw to make precise cuts.
- Cut End Planks to Fit: When reaching the opposite wall, measure and cut the final row of planks to fit, maintaining the expansion gap. Use a pull bar to engage the locking mechanism of the last row of planks, ensuring a secure fit.
- Install Transition Strips: Install transition strips where the laminate flooring meets other flooring types, such as carpet or tile. Follow the manufacturer's instructions for installing the transition strips. Typically, this involves attaching a mounting track to the subfloor and snapping the transition strip into place.
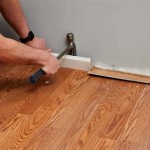
- Install Baseboards and Quarter Round: Install baseboards and quarter round to cover the expansion gap around the perimeter of the room. Attach the baseboards and quarter round to the wall studs using finishing nails. Caulk the top edge of the baseboards to create a clean and finished look.
- Clean the Floor: Once the installation is complete, clean the floor with a damp mop and a laminate floor cleaner to remove any dust or debris. Avoid using excessive water, as this can damage the laminate flooring.
Properly installed Select Surfaces laminate flooring will provide years of beauty and durability. By following these steps and exercising patience and attention to detail, a homeowner can achieve a professional-looking floor.

How To Install Select Surfaces Flooring From Sam S Club

Laminate Flooring Installation In Real Homes Select Surfaces

How To Install Select Surfaces Flooring

How To Install Select Surfaces Flooring From Sam S Club

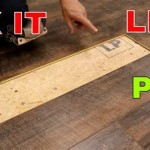
5 Tips To Install Laminate Flooring Like A Pro Casa Watkins Living

How To Install Select Surfaces Flooring From Sam S Club

5 Tips For Laminate Flooring You Can Rock This Diy

How To Install Select Surfaces Flooring

Select Surfaces Laminate Flooring Installation Well Groomed Home

Tips For Installing Sam S Club Select Surfaces Flooring
Related Posts