How To Install Rubber Flooring
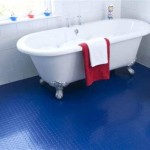
Rubber flooring has become an increasingly popular choice for a variety of applications, ranging from home gyms and children's play areas to commercial spaces such as fitness centers, retail stores, and industrial environments. Its resilience, durability, sound absorption qualities, and ease of maintenance make it a versatile flooring solution. However, a successful rubber flooring installation hinges on careful preparation and adherence to proper techniques. This article provides a comprehensive guide to installing rubber flooring, covering essential steps from initial assessment and material selection to final finishing touches.
Key Point 1: Pre-Installation Assessment and Preparation
Before commencing the installation process, a thorough assessment of the subfloor and the surrounding environment is crucial. This stage determines the necessary groundwork for a successful and long-lasting installation. Ignoring this preliminary step can lead to premature failure of the flooring, uneven surfaces, and potential safety hazards.
Subfloor Evaluation: The subfloor must be structurally sound, clean, dry, and level. Any existing flooring materials, such as carpet, tile, or linoleum, must be completely removed. Inspect the subfloor for cracks, holes, or unevenness. Concrete subfloors should be free of dust, debris, oil, grease, and any curing compounds or sealers. Wood subfloors must be secure and free of loose boards, protruding nails, or signs of moisture damage. If the subfloor is significantly uneven, self-leveling compound should be applied to create a smooth, consistent surface.
Moisture Testing: Moisture is a significant enemy of rubber flooring. Elevated moisture levels can lead to adhesive failure, mold growth, and degradation of the rubber material itself. Conduct a moisture test on the subfloor using a moisture meter. Acceptable moisture levels vary depending on the type of rubber flooring and the manufacturer's recommendations. Generally, concrete subfloors should have a moisture vapor emission rate (MVER) of less than 3 lbs per 1000 sq ft per 24 hours, or a relative humidity (RH) of less than 75%. Wood subfloors should have a moisture content of between 6% and 12%. If moisture levels are too high, take necessary steps to mitigate the issue, such as installing a moisture barrier.
Acclimation: Rubber flooring must be acclimated to the installation environment for at least 48 to 72 hours before installation. This allows the flooring to adjust to the temperature and humidity conditions of the room, preventing expansion or contraction after installation. Store the rubber flooring in the room where it will be installed, laid flat and out of direct sunlight.
Room Preparation: Ensure the room is adequately ventilated and well-lit. Remove any furniture or obstructions from the installation area. Protect adjacent surfaces with drop cloths or masking tape. Gather all necessary tools and materials before starting the installation process to avoid interruptions.
Key Point 2: Rubber Flooring Installation Techniques
The method of installation varies depending on the type of rubber flooring being used. Rubber flooring typically comes in rolls, tiles, or interlocking mats. Each format requires different installation techniques and adhesive selection.
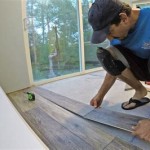
Roll Installation: Roll rubber flooring offers a seamless appearance and is suitable for large areas. Precise cutting and fitting are crucial for a professional finish. Begin by dry-laying the roll to determine the best layout and minimize waste. Overlap the edges slightly to allow for trimming. Use a sharp utility knife to cut the rubber flooring to the desired shape and size, following the contours of the walls and other obstacles. Apply adhesive to the subfloor using a notched trowel, following the manufacturer's recommendations for adhesive type and coverage. Carefully roll the rubber flooring into the adhesive, ensuring full contact with the subfloor. Use a heavy roller to press the flooring firmly into the adhesive, working from the center outwards to eliminate air pockets. Overlap the seams by approximately 1/8 inch and use a seam roller to create a tight, invisible seam. Once the adhesive has fully cured, trim the excess material along the walls with a utility knife, leaving a small expansion gap.
Tile Installation: Rubber tiles offer greater flexibility in design and are easier to install in smaller areas. Start by establishing a center point in the room and laying out the tiles in a grid pattern. Use spacers to maintain consistent grout lines. Apply adhesive to the back of each tile and press it firmly into the subfloor. Use a rubber mallet to tap the tiles into place and ensure proper adhesion. Wipe away any excess adhesive immediately with a damp cloth. Once the adhesive has fully cured, apply grout to the grout lines, if applicable. Seal the grout to protect it from stains and moisture.
Interlocking Mat Installation: Interlocking rubber mats are the easiest type of rubber flooring to install, requiring no adhesive or special tools. Simply align the edges of the mats and interlock them together. Use a utility knife to trim the mats to fit around walls and other obstacles. Interlocking mats are ideal for temporary or semi-permanent installations, such as home gyms or portable exercise areas.
Adhesive Selection: Choosing the correct adhesive is critical for a successful rubber flooring installation. Use an adhesive specifically designed for rubber flooring and compatible with the subfloor material. Consult the rubber flooring manufacturer's recommendations for adhesive selection. Water-based acrylic adhesives are generally suitable for most applications, while epoxy adhesives offer superior bonding strength and moisture resistance. Apply the adhesive according to the manufacturer's instructions, paying close attention to the open time and cure time.
Key Point 3: Finishing Touches and Maintenance
After the rubber flooring is installed, completing the finishing touches and establishing a regular maintenance routine are essential to prolong its lifespan and maintain its appearance.
Seam Treatment: For rolled rubber flooring, properly treating the seams is vital for preventing water penetration and ensuring a seamless look. Depending on the type of rubber and adhesive used, seam treatments may involve using a heat-welding rod or a chemical seam sealant. Heat welding creates a permanent bond between the two edges, while chemical sealants provide a flexible, watertight seal. Follow the manufacturer's instructions carefully for applying the chosen seam treatment product.
Baseboard Installation: Installing baseboards or wall trim around the perimeter of the room provides a finished look and protects the edges of the rubber flooring. Choose baseboards that complement the flooring and the overall design of the room. Attach the baseboards to the wall using nails, screws, or adhesive. Caulk the gap between the baseboards and the wall to prevent drafts and moisture penetration.
Cleaning and Maintenance: Regular cleaning and maintenance are essential to keep your rubber flooring looking its best. Sweep or vacuum the flooring regularly to remove dirt and debris. Clean the flooring with a mild detergent and water solution. Avoid using harsh chemicals or abrasive cleaners, as they can damage the rubber surface. For stubborn stains, use a rubber flooring cleaner specifically designed for the type of rubber flooring you have installed. Periodically apply a rubber flooring protector to enhance the shine and protect the flooring from wear and tear.
Preventative Measures: To further extend the life of your rubber flooring, consider implementing preventative measures to minimize wear and tear. Place mats or rugs at entrances to trap dirt and moisture. Use furniture pads under heavy objects to prevent indentations. Avoid dropping heavy or sharp objects onto the flooring. Regularly inspect the flooring for signs of damage and make repairs promptly.
By following these guidelines, a successful and durable rubber flooring installation can be achieved, resulting in a comfortable, safe, and aesthetically pleasing environment. Careful planning, proper preparation, and adherence to recommended installation techniques are key to maximizing the benefits of rubber flooring.

Gym Flooring Installation How To Easily Install Rubber Rolls Or Mats

How To Install Gym Rubber Flooring

How To Install Rubber Flooring The Technology Proper Tools

How To Install Rubber Flooring Step By Guide Full Tutorial

Rubber Flooring Rolls 1 2 Inch 10 Color Weight Room Gym

Rubber Flooring Installation

Poured Rubber Floor Installation How To Quickly Install In Place Granules

Installation Care Industrial Floor Covering Install Nora

How To Install Gym Rubber Flooring

Rubber Flooring Installation On Concrete Other Surfaces
Related Posts