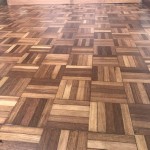
How to Install Parquet Flooring on Stairs
Installing parquet flooring on stairs can significantly enhance the aesthetics of a home, adding a touch of elegance and sophistication. This project requires precision and attention to detail, as the stair treads and risers must be accurately measured and cut to ensure a perfect fit. While it is possible to engage a professional for this task, a homeowner with intermediate DIY skills and the appropriate tools can successfully complete the installation. This article outlines a comprehensive process for installing parquet flooring on stairs, covering essential preparations, step-by-step procedures, and important considerations.
Before commencing the installation process, it is crucial to understand the existing structure of the stairs. Determine the type of stair construction—whether they are open stairs, closed stairs, or stairs with a landing. Open stairs have exposed sides, while closed stairs have walls on both sides. The type of stair construction will influence the methods used for measurement and installation. Moreover, ascertain the material of the existing stair treads and risers. Common materials include wood, concrete, or metal. The existing material may require preparation or modification before the parquet flooring can be installed.
Preparation and Material Selection
The initial phase of the project involves careful preparation and selection of appropriate materials. This stage is crucial for ensuring the durability and visual appeal of the finished staircase.
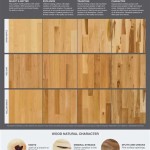
Firstly, gather the necessary tools and materials. Essential tools include a measuring tape, a pencil, a circular saw or miter saw, a jigsaw, a level, a square, a hammer, a rubber mallet, a construction adhesive, a nail gun (optional), shims, and safety glasses. Material-wise, acquire sufficient parquet flooring pieces to cover the stair treads and risers. Choose a high-quality parquet flooring that is compatible with stair installation. Solid wood parquet is generally preferred for its durability and stability. Also, obtain stair nosing, which is the rounded edge that protrudes slightly over the tread, providing a safe and finished edge. Choose stair nosing that complements the parquet flooring in terms of color and style. In addition to the flooring and nosing, sandpaper, wood filler, and a suitable finish (e.g., polyurethane) are required for refining and protecting the installed flooring.
Secondly, meticulously measure each stair tread and riser. Stairs are rarely perfectly uniform, so individual measurements are essential for accurate cutting. Measure the width and depth of each tread and the height of each riser. Record these measurements accurately and label them clearly to avoid confusion during the cutting process. Consider the thickness of the parquet flooring and stair nosing when taking measurements. This will ensure that the finished stair height is consistent and meets building code requirements.
Thirdly, prepare the existing stair surface. Clean the existing stair treads and risers thoroughly, removing any dirt, dust, paint, or adhesive residue. Use a scraper or sanding block to smooth out any imperfections or unevenness on the surface. If the existing stairs are made of concrete or metal, ensure that they are clean and dry. Apply a concrete primer or a metal primer to promote adhesion of the construction adhesive. If the existing stair treads are significantly damaged or uneven, consider installing a subfloor made of plywood or particleboard. The subfloor will provide a level and stable surface for the parquet flooring.
Installation Procedure
With the preparation complete, the installation process can commence. This phase involves cutting, fitting, and securing the parquet flooring pieces to the stair treads and risers.
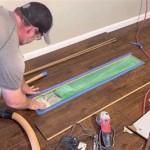
Firstly, cut the parquet flooring pieces to the measured dimensions. Use a circular saw or miter saw to make precise cuts. Ensure that the cuts are clean and square. To minimize splintering, use a fine-toothed blade and apply masking tape along the cutting line. For intricate cuts or curves, use a jigsaw. It is advisable to cut slightly oversized and then fine-tune the fit with a sanding block or plane. This allows for adjustments and ensures a snug fit against the adjacent surfaces.
Secondly, install the stair nosing. The stair nosing provides a safe and finished edge to the stair treads. Apply a bead of construction adhesive to the back of the stair nosing and position it along the front edge of the stair tread. Secure the stair nosing with finish nails or screws. Ensure that the stair nosing is flush with the edge of the tread and that it is securely attached. Some stair nosing models come with grooves or interlocking mechanisms that facilitate installation. Follow the manufacturer's instructions for proper installation.
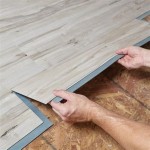
Thirdly, install the parquet flooring on the stair treads. Apply a generous amount of construction adhesive to the back of the parquet flooring pieces and position them on the stair tread. Press the flooring pieces firmly into place, ensuring that they are level and aligned. Use a rubber mallet to gently tap the flooring pieces into place, ensuring a secure bond with the adhesive. If gaps exist between the flooring pieces, use shims to maintain consistent spacing. Secure the flooring pieces with finish nails or a nail gun for added stability. Ensure that the nails are countersunk and that the nail holes are filled with wood filler.
Fourthly, install the parquet flooring on the risers. Apply construction adhesive to the back of the parquet flooring pieces and position them on the riser. Press the flooring pieces firmly into place, ensuring that they are level and aligned. Use shims to maintain consistent spacing between the flooring pieces. Secure the flooring pieces with finish nails or a nail gun. Pay attention to the alignment between the tread flooring and riser flooring for a unified look.
Finishing and Refinement
The final stage of the project involves finishing and refining the installed parquet flooring to enhance its appearance and durability.
Firstly, fill any gaps or imperfections with wood filler. Use a putty knife to apply the wood filler to any gaps between the flooring pieces or around the stair nosing. Allow the wood filler to dry completely according to the manufacturer's instructions. Sand the wood filler smooth with fine-grit sandpaper, ensuring that it is flush with the surrounding surface. Remove any dust or debris from the sanded areas.
Secondly, sand the entire surface of the installed parquet flooring. Use a fine-grit sandpaper (e.g., 220-grit) to lightly sand the surface of the flooring, removing any scratches or imperfections. Sand in the direction of the wood grain to avoid creating swirl marks. Remove any dust or debris from the sanded surface with a vacuum cleaner or a tack cloth.
Thirdly, apply a protective finish to the installed parquet flooring. Choose a durable finish that is suitable for stair applications, such as polyurethane or a water-based acrylic finish. Apply the finish according to the manufacturer's instructions. Typically, multiple coats of finish are required for optimal protection. Allow each coat of finish to dry completely before applying the next coat. Lightly sand the surface between coats with fine-grit sandpaper to ensure a smooth and even finish.
Fourthly, inspect the finished staircase for any imperfections or areas that require touch-up. Address any issues promptly to ensure a flawless and durable result. Clean the finished staircase thoroughly with a damp cloth to remove any dust or debris. Allow the finish to cure completely before using the stairs. The curing time may vary depending on the type of finish used. Follow the manufacturer's recommendations for curing time.
Installing parquet flooring on stairs is a rewarding project that can significantly enhance the aesthetic appeal of a home. By following these detailed instructions and taking the necessary precautions, homeowners can successfully complete this project and enjoy the beauty and durability of a parquet-floored staircase for years to come. This detailed methodology provides a comprehensive guide through the installation process, emphasizing the importance of meticulous preparation, accurate measurements, and careful execution. The result is a staircase that not only looks visually appealing but also contributes to the overall value and character of the home.

How To Install Laminate Flooring On Stairs Direct Wood

How To Install Laminate Flooring On Staircase Step By Guide

How To Install Laminate Flooring On Stairs Direct Wood

How To Install Laminate Flooring On Stairs 13 Steps

How To Install Wood Flooring On Stairs Esb

Can You Laminate Stairs The Pros Cons

How To Install Vinyl Plank Flooring On Stairs In 6 Steps Inc

Value Carpets Flooring Installing Laminate On Stairs

How To Convert Carpeted Stairs Hardwood Lowe S

Flooring For Stairs Hardwood Direct
Related Posts