How to Install Nail Down Wood Flooring on Concrete
Installing nail down wood flooring on concrete can seem like a daunting task, but with the right preparation and tools, it can be an achievable DIY project. Here's a step-by-step guide to help you get started:
Materials you'll need:
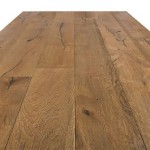
- Nail down hardwood flooring
- Concrete screws or ring shank nails
- Vapor barrier
- Underlayment
- Nail gun or hammer
- Circular saw or miter saw
- Tape measure
- Carpenter's pencil
- Safety glasses
- Ear protection
Step 1: Prepare the concrete
Begin by cleaning the concrete surface thoroughly to remove any dirt, debris, or moisture. Use a broom or vacuum to sweep away loose materials, then mop the floor with a solution of water and vinegar to remove any remaining grime. Allow the concrete to dry completely before moving on.
Step 2: Install the vapor barrier
A vapor barrier is essential to prevent moisture from seeping up through the concrete and damaging the flooring. Cut the vapor barrier to fit the dimensions of the room, overlapping the edges by at least 6 inches. Secure the vapor barrier to the concrete using double-sided tape or construction adhesive.
Step 3: Install the underlayment
Underlayment provides a cushion for the flooring and helps to reduce noise. Cut the underlayment to fit the dimensions of the room, staggering the seams to prevent any weak points. Secure the underlayment to the vapor barrier using tape or adhesive.
Step 4: Determine the starting point
Decide where you want to start installing the flooring. Typically, it's best to start in the center of the room and work your way out. Mark the starting point on the underlayment using a pencil.
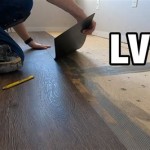
Step 5: Install the first row of planks
Place the first plank along the starting line, ensuring that the tongue and groove edges are facing the wall. Use a nail gun or hammer to secure the plank into place, driving nails or screws at an angle through the tongue.
Step 6: Continue installing the planks
Continue installing the remaining planks in the first row, connecting the tongue and groove edges as you go. Ensure that each plank is securely fastened to the underlayment and that the rows are straight.
Step 7: Install the rest of the flooring
Once the first row is complete, continue installing the rest of the flooring, following the same procedure. Stagger the joints between the planks in adjacent rows to prevent any weakness. Cut planks to fit around obstacles such as doorways or walls.
Step 8: Trim and finish
Once the flooring is installed, use a circular saw or miter saw to trim any excess flooring around the edges of the room. Install transition pieces, such as baseboards or quarter round, to cover any gaps or transitions between the flooring and walls.
Tips:
* Wear safety gear throughout the installation process. * Use a level to ensure that the flooring is flat and even. * Allow the flooring to acclimate to the room temperature for at least 48 hours before installation. * Seal the flooring with a polyurethane or wax-based finish to protect it from wear and tear.
How To Install Engineered Wood Flooring On Concrete

Installing Wood Flooring Over Concrete Diy

Installing Engineered Hardwood On Concrete Twenty Oak

Q A Solid Wood Floors Over Concrete Slabs Jlc

Hardwood Floor On Concrete Slab What I Did

Installing Wood Subfloors Over Concrete Hardwood Floors

Is It Possible To Put Hardwood Over A Concrete Subfloor Quora

How To Install Hardwood Flooring Nail Down Home Renovation I Like Make Stuff

How To Install Engineered Wood Flooring On Concrete

Installing Engineered Hardwood On Concrete Twenty Oak
Related Posts