How To Install Mannington Laminate Flooring Planks
Installing Mannington laminate flooring planks is a project often undertaken by homeowners seeking a cost-effective and aesthetically pleasing flooring solution. Laminate flooring offers durability, ease of maintenance, and a variety of styles that mimic natural wood and stone. Proper installation is crucial to ensure the longevity and performance of the flooring.
Before commencing the installation process, careful planning and preparation are essential. This includes accurately measuring the room, selecting the appropriate underlayment, and allowing the laminate planks to acclimate to the room's environment. Rushing these preliminary steps can lead to issues later in the installation or with the floor's long-term stability.
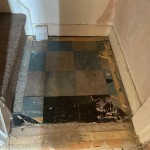
Preparing the Subfloor
The subfloor is the foundation upon which the laminate flooring will be installed, and its condition significantly impacts the final result. The subfloor must be clean, level, and dry. Any imperfections, such as uneven spots, cracks, or protruding nails, need to be addressed before proceeding.
Begin by thoroughly cleaning the subfloor using a broom and vacuum to remove any dust, debris, or loose particles. Inspect the surface for any signs of moisture damage, such as water stains or mold. If moisture is present, identify and resolve the source of the leak before installing the flooring. Moisture can cause the laminate to warp and buckle over time.
For concrete subfloors, use a level to identify any uneven areas. Minor imperfections can be corrected with a self-leveling compound. Follow the manufacturer's instructions for mixing and applying the compound, ensuring it is evenly distributed and allowed to dry completely before proceeding. Larger cracks or structural issues should be addressed by a qualified professional.
For wood subfloors, inspect for loose or damaged boards. Replace any weak or deteriorated sections with new wood of the same thickness. Use a hammer and nail set to drive any protruding nails below the surface. Ensure the wood subfloor is securely fastened to the joists to prevent squeaking. If the subfloor is significantly uneven, consider installing a layer of plywood to create a smoother surface.
Once the subfloor is prepared, it's crucial to ensure it is dry. Use a moisture meter to test the moisture content of both concrete and wood subfloors. The acceptable moisture level varies depending on the manufacturer's recommendations and the type of subfloor. Consult the Mannington laminate flooring installation guidelines for specific requirements. If the moisture level is too high, use a dehumidifier to reduce it or install a moisture barrier underlayment.
After cleaning, leveling, and ensuring dryness, the subfloor is ready for the installation of the underlayment. The underlayment provides a cushion between the subfloor and the laminate flooring, reducing noise, adding insulation, and providing a moisture barrier (if specified).
Installing the Underlayment
The underlayment plays a vital role in the performance and longevity of the laminate flooring. It provides cushioning, sound absorption, and in some cases, a moisture barrier. Selecting the appropriate underlayment is important, considering factors such as the subfloor type, the expected foot traffic, and any specific requirements outlined by Mannington.
There are various types of underlayment available, including foam, cork, and combination products. Foam underlayment is a popular choice due to its affordability and ease of installation. Cork underlayment offers excellent sound absorption and is a more environmentally friendly option. Combination underlayments often include a moisture barrier to protect the laminate from moisture rising from the subfloor.
Before installing the underlayment, review the manufacturer's instructions for specific recommendations on the overlap and seam sealing. Typically, the underlayment is rolled out across the subfloor, ensuring it is flat and smooth. Overlap the edges by the recommended amount (usually 2-4 inches) and use seam tape to secure the overlap. This creates a continuous, sealed surface that prevents moisture from penetrating.
When installing the underlayment, pay attention to corners and edges. Cut the underlayment to fit snugly around obstructions, such as pipes or door frames. Use a utility knife to make precise cuts and ensure a clean, professional finish. Avoid leaving gaps or wrinkles in the underlayment, as these can affect the stability of the laminate flooring.
For concrete subfloors, a moisture barrier underlayment is particularly important. Concrete can wick moisture from the ground, which can damage the laminate flooring over time. Ensure the moisture barrier is properly sealed and extends up the walls at least a few inches to prevent moisture from seeping in from the edges.
After the underlayment is installed, thoroughly inspect the surface to ensure it is smooth, flat, and free of any gaps or wrinkles. Address any imperfections before proceeding with the laminate flooring installation. A properly installed underlayment will provide a solid foundation for the laminate flooring and contribute to its overall performance.
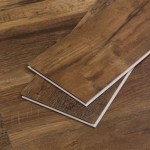
Laying the Laminate Planks
The actual installation of the Mannington laminate planks is the final step in the process. Precise measurements, proper alignment, and attention to detail are crucial for achieving a professional-looking and durable floor.
Before starting, gather all necessary tools, including a measuring tape, pencil, utility knife, tapping block, pull bar, and spacers. The spacers are used to maintain a consistent expansion gap around the perimeter of the room, allowing the laminate to expand and contract with temperature and humidity changes. The manufacturer's recommendation for the expansion gap should be followed meticulously.
Begin by laying the first row of planks along the longest straight wall of the room. Place the planks with the tongue side facing the wall, inserting spacers between the planks and the wall to maintain the expansion gap. Ensure the planks are aligned straight and are interlocking properly, using the tapping block and pull bar to gently tap the planks together until they click into place.
When cutting planks to fit at the end of a row, use a measuring tape and pencil to mark the cut line. Use a utility knife or a laminate cutter to make a clean, straight cut. Remember to leave the appropriate expansion gap at the end of each row. The cut piece from the end of the row can often be used to start the next row, staggering the seams for a more visually appealing and structurally sound result.
Continue laying the planks row by row, ensuring each plank is securely interlocked with the previous row. Use the tapping block and pull bar to gently tap the planks together, paying attention to the locking mechanism. Avoid using excessive force, as this can damage the planks. Periodically check the alignment of the rows to ensure they are straight and parallel.
When encountering obstacles, such as pipes or door frames, carefully measure and cut the planks to fit around them. Use a jigsaw or a coping saw to make intricate cuts. Leave a small gap around the obstacle to allow for expansion and contraction. Cover the gap with a trim piece to create a clean, finished look.
For the final row, it may be necessary to cut the planks lengthwise to fit. Measure the remaining space and cut the planks accordingly, ensuring the expansion gap is maintained. Use the pull bar to gently pull the final row into place.
Once all the planks are installed, remove the spacers from around the perimeter of the room. Install baseboards or quarter-round molding to cover the expansion gap and add a finishing touch. Secure the molding to the wall, not to the laminate flooring, to allow the floor to move freely.
After the installation is complete, inspect the floor for any gaps, uneven spots, or other imperfections. Address any issues promptly to prevent further problems. Clean the floor with a damp cloth to remove any dust or debris. Avoid using abrasive cleaners or excessive water, as these can damage the laminate flooring.
Proper installation of Mannington laminate flooring planks requires careful planning, thorough preparation, and attention to detail. By following these guidelines, homeowners can achieve a beautiful and durable floor that will provide years of enjoyment.

How To Install A Mannington Restoration Collection Laminate Floor

How To Install A Mannington Adura Flex Glue Down Vinyl Plank Floor

How To Replace A Mannington Restoration Collection Laminate Plank

How To Install Adura Max Vinyl Plank Floors

Mannington Restoration Laminate Plank Flooring 28400p Alexanian

Sundries Mannington

Mannington Restoration Collection Wide Plank Heirloom Cedar From Znet Flooring

Laminate Flooring Mannington Restoration Wide Plank Anthology Parchment Liquidators

Laminate Restoration Collection French Oak Nutmeg 28022l Mannington

Mannington Restoration Wide Palace Plank Tapestry 28401p Laminate Flooring
Related Posts