How To Install Luxury Vinyl Plank Flooring On Wood Subfloor
Luxury vinyl plank (LVP) flooring offers a durable, water-resistant, and aesthetically pleasing option for homeowners. Installing LVP over an existing wood subfloor is a relatively straightforward process that can be accomplished with the right tools and preparation. This guide outlines the necessary steps for a successful LVP installation.
Assessing and Preparing the Subfloor
A properly prepared subfloor is crucial for a successful LVP installation. The subfloor must be clean, level, and structurally sound. Begin by thoroughly cleaning the subfloor to remove any debris, dust, or old adhesive residue. A shop vacuum is recommended for this task.
Inspect the subfloor for any signs of damage, such as warping, rotting, or excessive squeaking. Address these issues before proceeding with the installation. Uneven areas can be sanded down or filled with a leveling compound. Significant structural problems may require professional repair.
Measure the moisture content of the wood subfloor using a moisture meter. Excessive moisture can lead to problems with the LVP, such as warping or buckling. The moisture content should ideally be below 12%. If the moisture content is too high, identify and address the source of the moisture before proceeding.
Gathering Necessary Materials and Tools
Proper planning involves gathering all necessary materials and tools before beginning the installation. This ensures a smooth and efficient workflow. The following items are typically required:
* Luxury vinyl planks * Measuring tape * Utility knife * Tapping block * Pull bar * Spacers * Safety glasses * Gloves * Underlayment (if necessary) * Moisture meter * Level * Pencil * Straight edge * Circular saw or jigsaw (for cutting planks)
Installing the Underlayment (Optional)
While some LVP products come with an attached underlayment, others may require a separate underlayment installation. An underlayment provides several benefits, including added cushioning, sound insulation, and moisture protection. If using a separate underlayment, roll it out over the subfloor, ensuring the seams are butted together tightly and taped securely.
Planning the Layout
Careful planning of the plank layout contributes to a professional-looking finished floor. Consider the direction of the planks, typically running parallel to the longest wall in the room. This creates a visually appealing and spacious feel. Staggering the end joints of the planks is also essential for stability and aesthetics. A recommended offset is typically one-third to one-half the length of the plank. Dry lay a few rows to visualize the layout and make any necessary adjustments.
Beginning the Installation
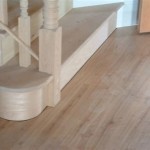
Start the installation in a corner of the room, working outward. Place the first plank against the wall, leaving a small expansion gap (typically ¼ inch) using spacers. This gap allows for natural expansion and contraction of the flooring due to temperature and humidity fluctuations. Continue laying the first row, ensuring the planks are tightly interlocked along the long edges and short ends.
Continuing the Installation Process
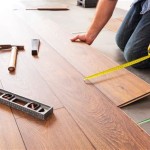
Subsequent rows are installed by angling the long edge of the plank into the groove of the previous row and then gently lowering it into place. Use a tapping block and pull bar to ensure tight seams and prevent damage to the planks. Maintain the expansion gap along all walls and other vertical surfaces.
Cutting Planks
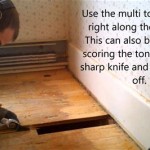
Planks will need to be cut to fit around door frames, corners, and the ends of rows. Measure the required length carefully and mark the plank accordingly. Use a utility knife to score the plank along the cut line, then snap the plank along the score. A circular saw or jigsaw can be used for more complex cuts.
Completing the Installation
Continue installing the LVP planks row by row, ensuring tight seams and proper spacing. Once the final row is installed, remove the spacers along the walls. Install baseboards or other trim to cover the expansion gaps and complete the finished look.
Post-Installation Considerations
After installation, allow the flooring to acclimate to the room's temperature and humidity for a few hours before placing furniture or heavy objects on it. Regular sweeping and damp mopping will keep the LVP flooring clean and maintain its appearance.

20 Tips For A Great Vinyl Plank Flooring Installation

How To Prep Wood Subfloor For Luxury Vinyl Plank Flooring Beginners Fix High And Low Spots

How To Install Glue Down Luxury Vinyl Plank Flooring On Osb Sub Floor

How To Install Waterproof Vinyl Plank Flooring Diy Installation

Preparing To Install Luxury Vinyl Flooring A How Guide

How To Install Vinyl Plank Flooring On Plywood Floor

How To Prep Your Sub Floor For Luxury Vinyl Flooring

Lvp Flooring Installation How To Install Luxury Vinyl Plank In A Basement Diy

Preparing Your Sub Floor For Luxury Vinyl Plank Flooring

Full House Luxury Vinyl Plank Flooring Install With No Transitions Lvp How To
Related Posts